RenderMan and toys have a long relationship at Pixar Animation Studios, dating back to 1988 and Pixar’s animated short, Tin Toy, in which RenderMan was used to render toys magically coming to life. Tin Toy not only won an Academy Award, but also helped pave the way for the blockbuster franchise that became Toy Story, permanently associating the brand with toys and making the whole world believe that plastic characters could have feelings, emotions and conflicts.
Usually RenderMan is used to render VFX for the big screen, and not for toys, so when Funko Games contacted me to collaborate with the team and we discussed taking the concept art that they created in-house and building it up in 3D to reflect the POP figure aesthetic, I was super excited to use my go-to renderer for production. That choice was invaluable to meet the challenging timeframe and tight turnaround that the project demanded.
The challenge was to deliver a first pass on the art, in 4K, in only four days and the additional poses for the cards in a single day each. Funko Games would provide me with an initial concept and the production file for the main toys and I would have to develop all the other 3D elements that would make the scene. A good opportunity to put my generalist skills into good use. In the following lines I will give you a behind the scenes look on how I achieved the end result.
“It's all psychological. You yell barracuda, everybody says, 'Huh? What?' You yell shark, we've got a panic on our hands on the Fourth of July.”
- Mayor Larry Vaughn in Jaws
Layout
With the concept art and provided models in hand, the first thing to do was a layout of the scene, creating a placeholder volume model of the boat, to stage the models and their relationship with the camera in Maya.
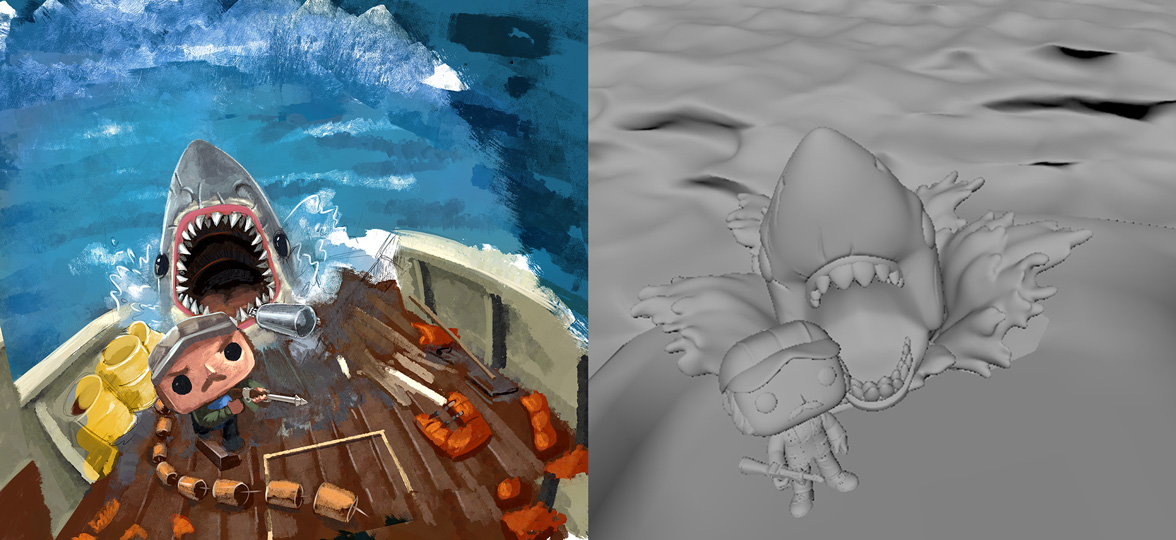
The concept provided to Fabio Sciedlarczyk and the subsequent Maya layout ... it all starts with a concept!
Starting with a blank canvas can be somewhat frightening, so as soon as you start to block things in, you can have a better idea on what's needed to be done and how to move further. Since we are creating a static image, blocking the scene will also provide a good idea on what won't show in camera when you are building the scene.
Modeling
With the rough layout done, the first thing to do was to create a more render-friendly version of the characters. RenderMan can process a lot of polygons, but in order for me to rig the main character I would have to reduce its poly-count from the extremely high resolution production models.
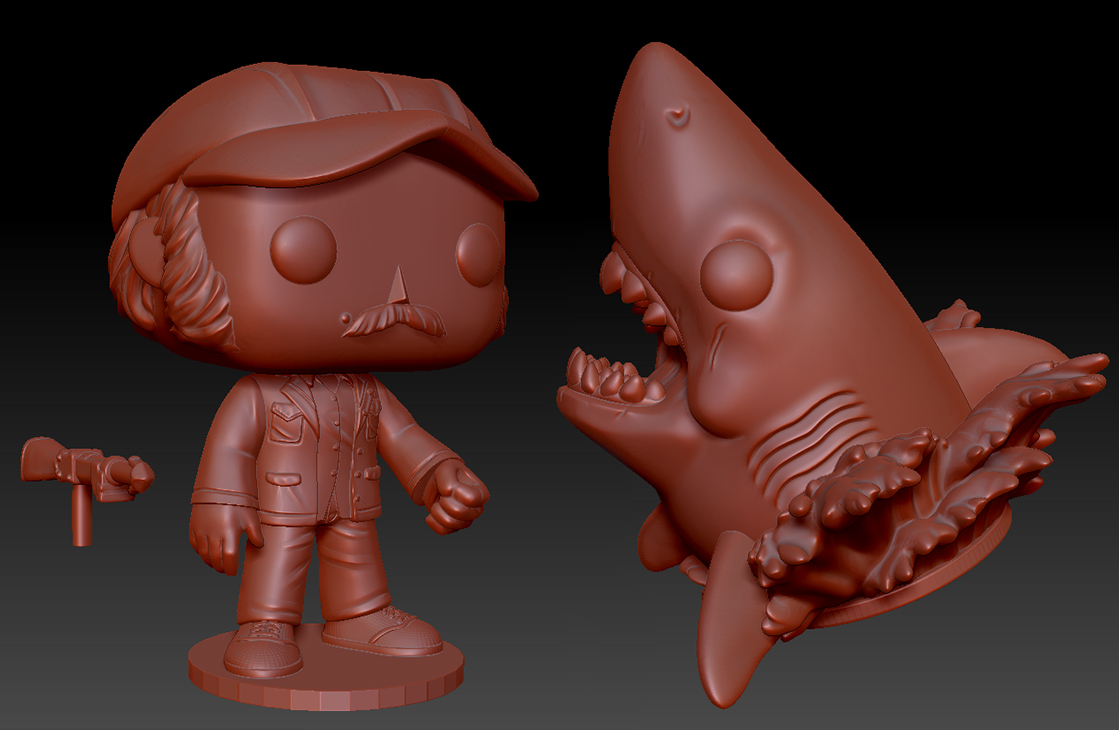
Funko provided the high resolution production models in Zbrush Tool format.
To keep things as simple as possible, the workflow was mostly Zbrush based. For each of the parts, I would duplicate the high resolution version into a new subtool, run it through ZRemesher to have a low resolution cage of the model, open it's UVs automatically using the UVMaster Zplugin, subdivide the low resolution mesh to be as high poly as needed and re-project the high-res subtool details. I would then export the low version of the parts to Maya, to fix and layout the UVs into UDIMS and inject them back to Zbrush for the normal and displacement map exports.
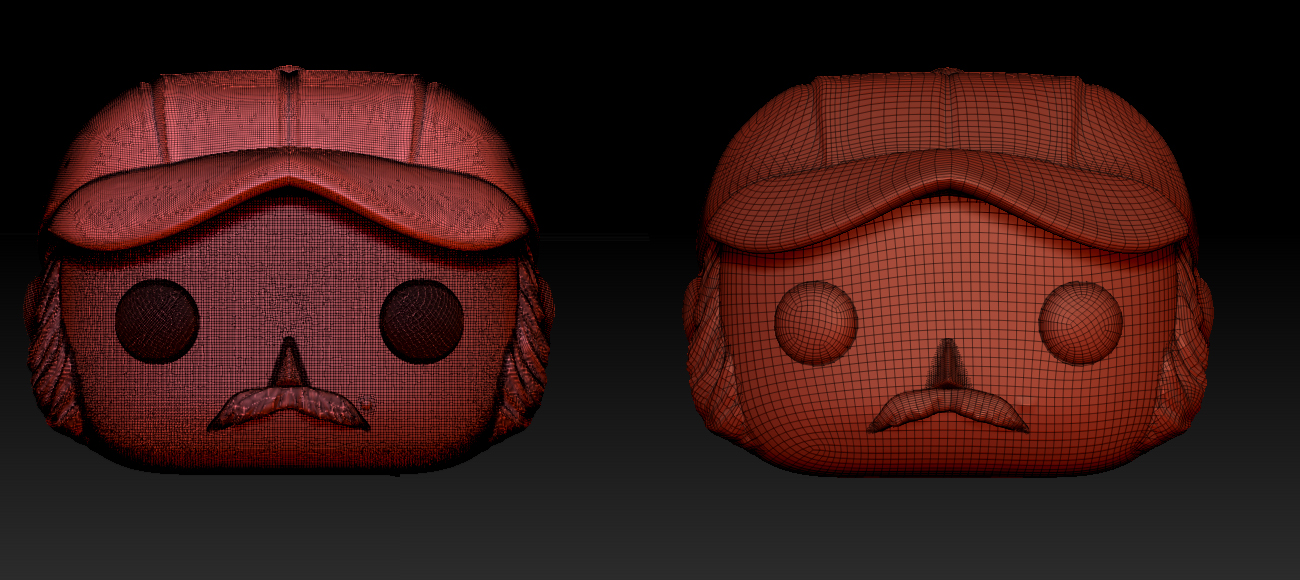
High and low poly side-by-side.
For the props and set modeling I created a reference board with frames from the movie and the concept in pureRef - an amazing free software that lets you have your reference or mood board organized and visible at all times - and start modeling asset by asset using Maya's polygon tools keeping in mind not to over detail and keeping the stylized toy look that the project required. Since the boat would only be visible in one angle I didn't bother to model anything more than what was necessary for the scene. I didn’t "need a bigger boat," in fact, the one I needed was way smaller. Just a portion of the deck, to be precise.
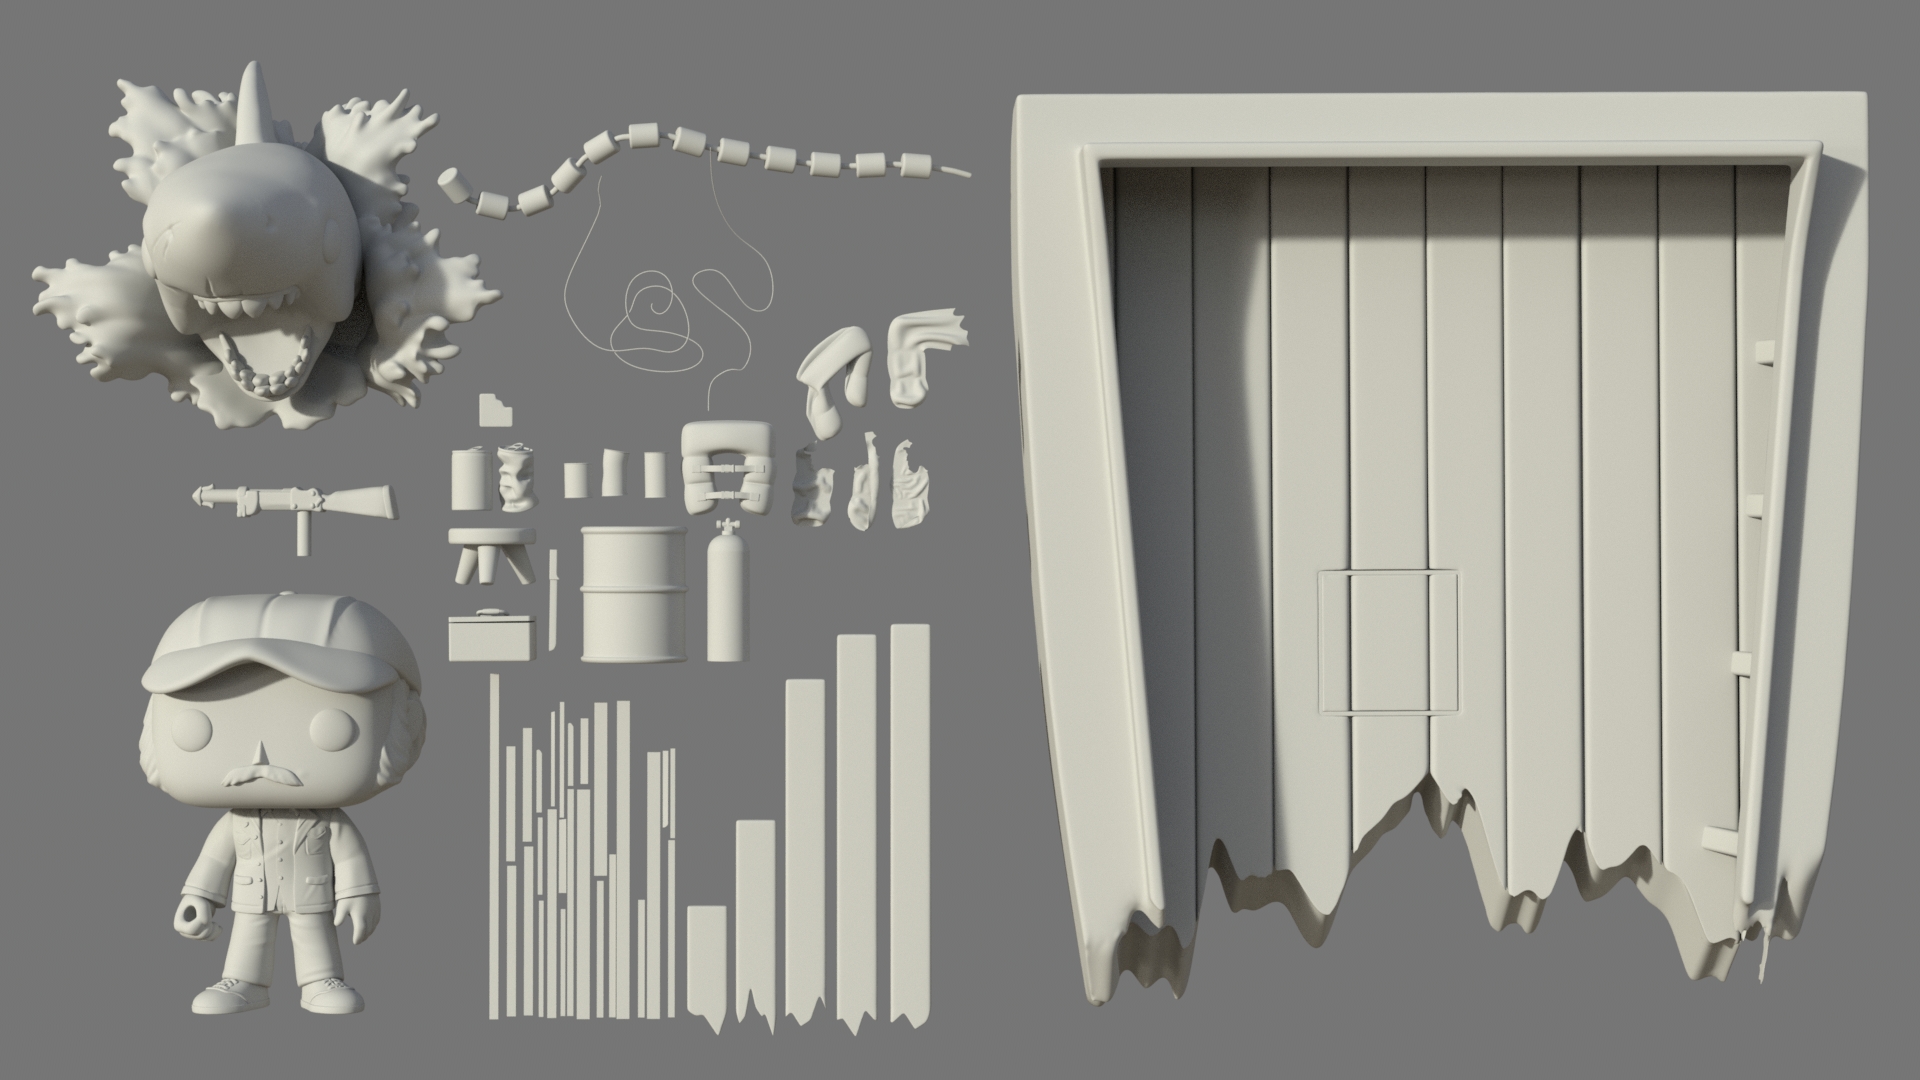
All the unique models used in the final image.
“We’re going to need a bigger boat.”
- Martin Brody in Jaws
I did a preliminary sculpt of the ocean in ZBrush by hand, and it turned out so bad I won't even show here. So I resorted to Maya's Bifrost Ocean Simulation System (BOSS). Selecting a subdivided plane and adding a SpectralWave system to it enabled me to fiddle with the parameters until I found a desired wave pattern look. Then I used Maya's Sculpting tools to refine the shapes a little bit more.
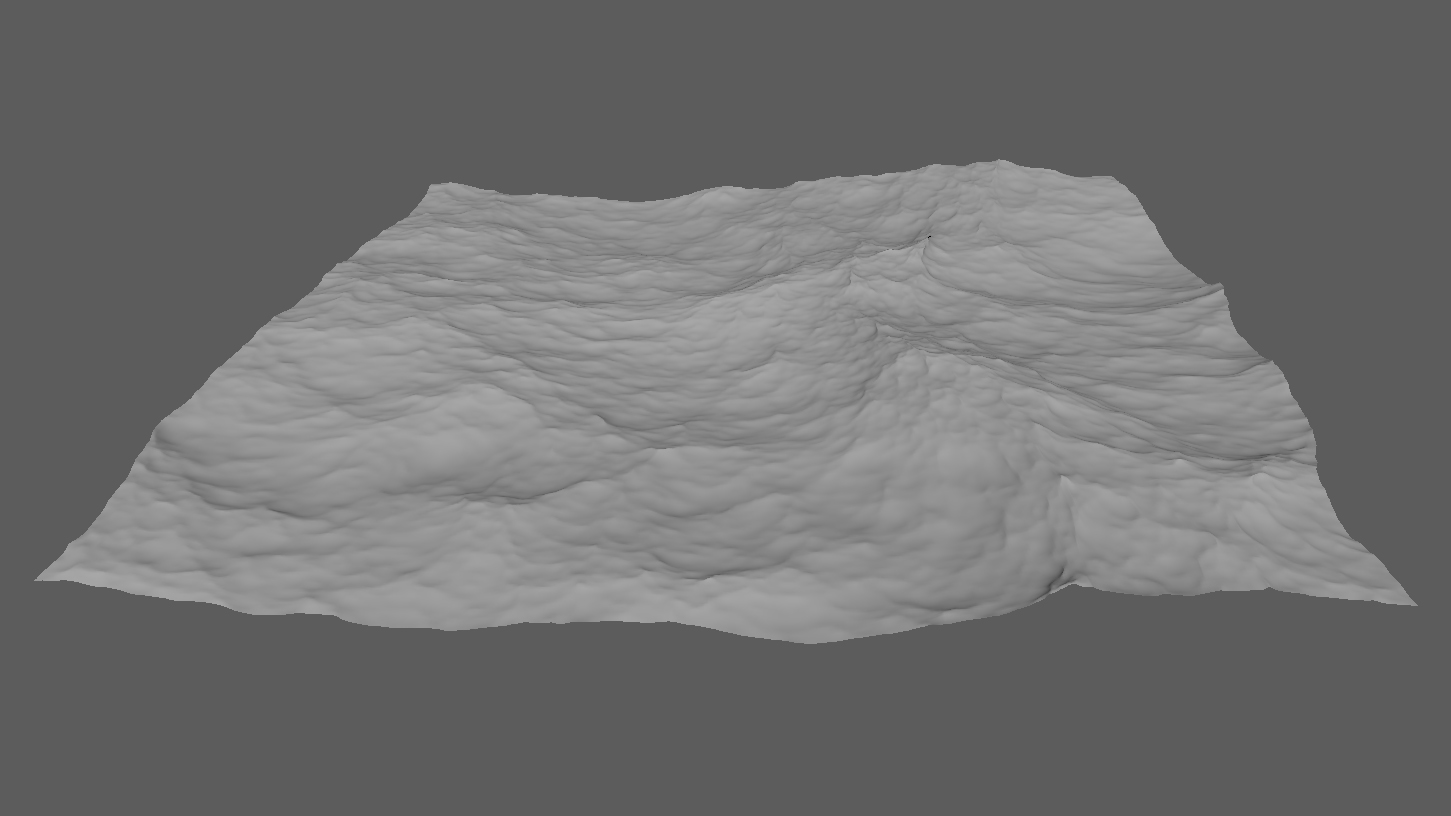
BOSS spectral waves with Sculpting tools were used to shape the ocean model.
Rigging
To be able to pose the main character, Quint, I decided to create a very basic bone structure and skin it using geodesic voxel mode. I didn't have much time for this task so I decided to paint the skin weight as good as I could and fix any skinning errors that might appear, with Maya's Sculpting tools.
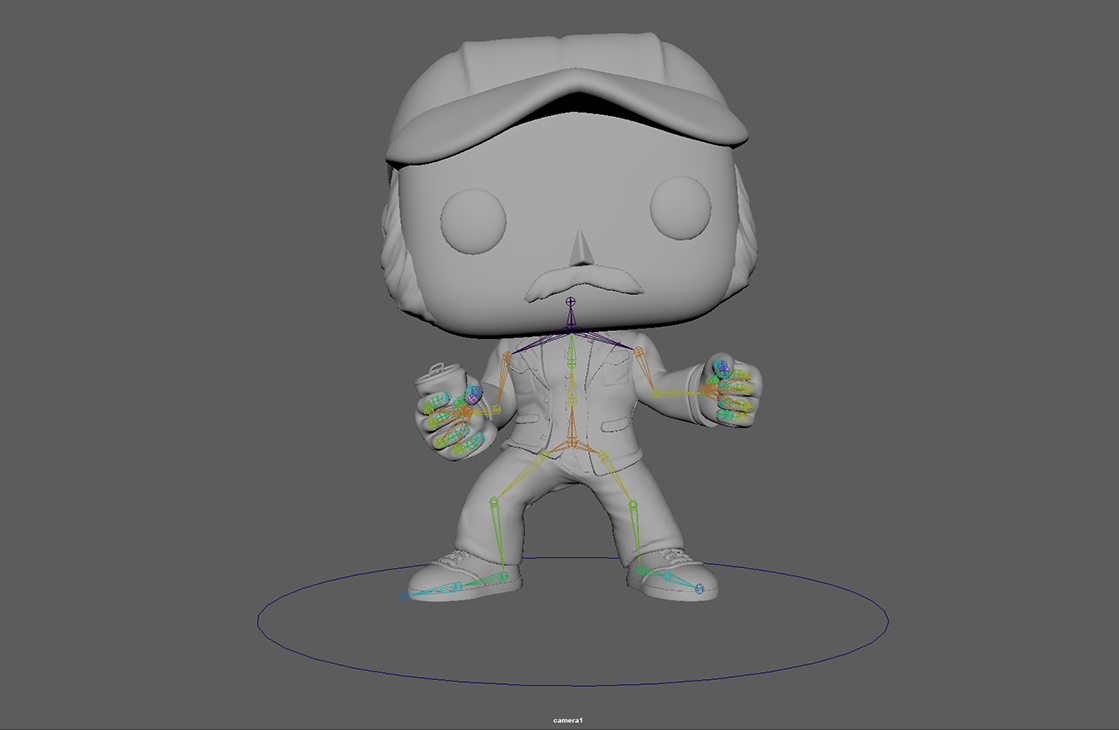
One of Quint's poses showcasing a very basic skeleton rig.
“Sometimes that shark, he looks right into ya, right into your eyes. Y'know, the thing about a shark, he's got lifeless eyes, black eyes, like a doll's eyes.”
- Quint in Jaws
Together, Funko Games and I would explore a range of poses to see what would better fit both the cover scene and the playing cards illustrations. Using RenderMan IPR during this process was an extremely helpful tool, not only would I get a fast idea on how the pose would look like in final lighting and shading conditions but I also would catch any displacement penetrations and errors that might occur if the pose was pushed too far. Once I was happy with the pose I would let the scene converge to a desired level of quality and in combination with the interactive denoise tool and send the screenshot for approval. It was really a fast and interactive turnaround workflow.
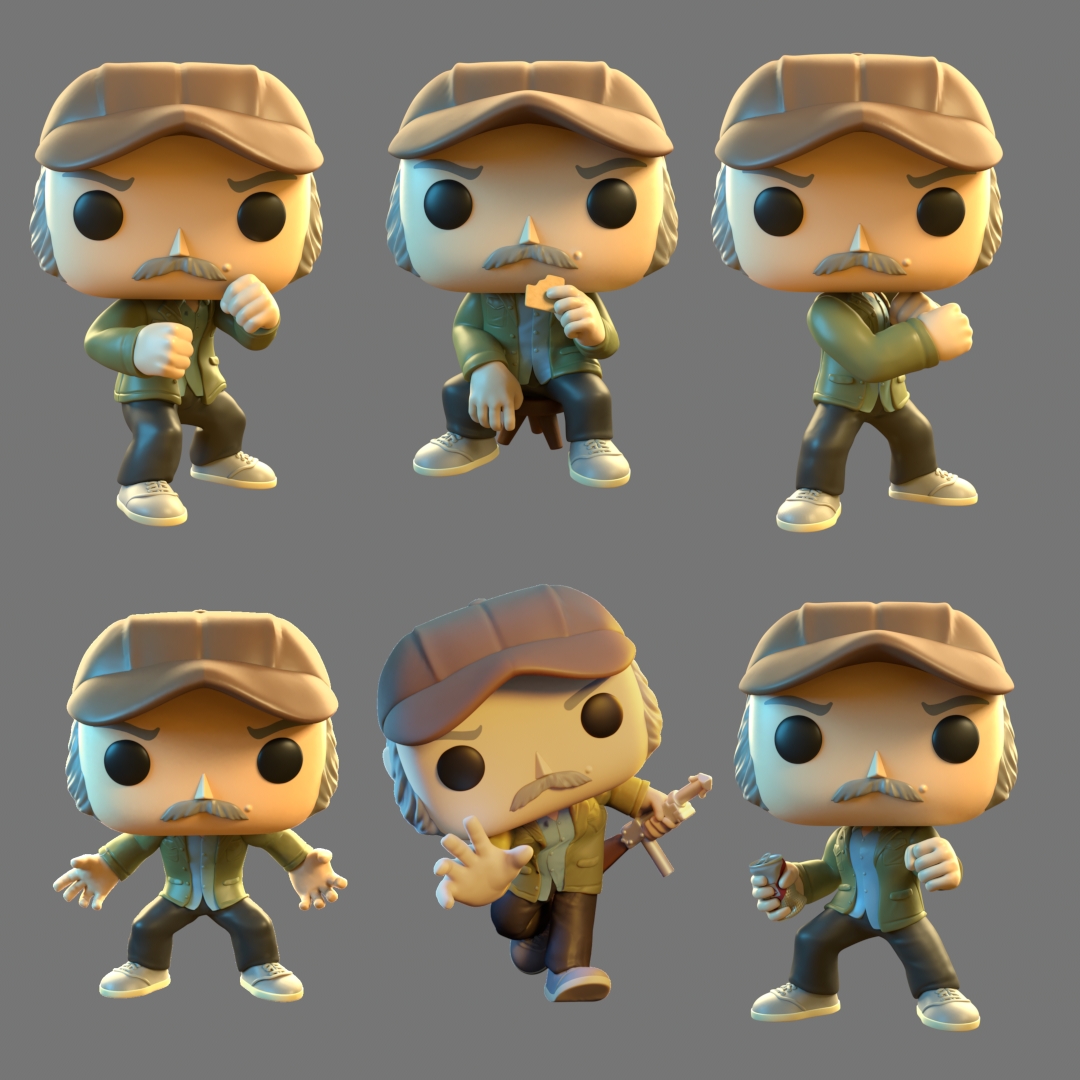
Some of the pose studies we did for Quint.
Texturing
Much of the texturing process was as straightforward as it could be for the characters. I wanted to retain that pristine vinyl toy look. Since they are the main selling product I didn't want them to look used or damaged in any possible way. Other than a flat color for the parts, I painted a very subtle roughness map and added small bumps to the normal map, just to break a little bit the infamous computer graphic specular look and match the character’s feeling a bit more with the final product. Substance Painter was used to create and export those maps.
For the props, once the models were arranged in the layout I sent them all together with proper UDIMs to Substance Painter. This would allow me to have a single RenderMan shader for all the props. My first instinct was to go with the same vinyl look, but it proved not to be very refined or in line with the other boxes, so the client asked me to add a bit more of realism and physicality to the materials. The maps were painted taking advantage of some pre-made smart materials and masks as a starting point and refining them to their final look.
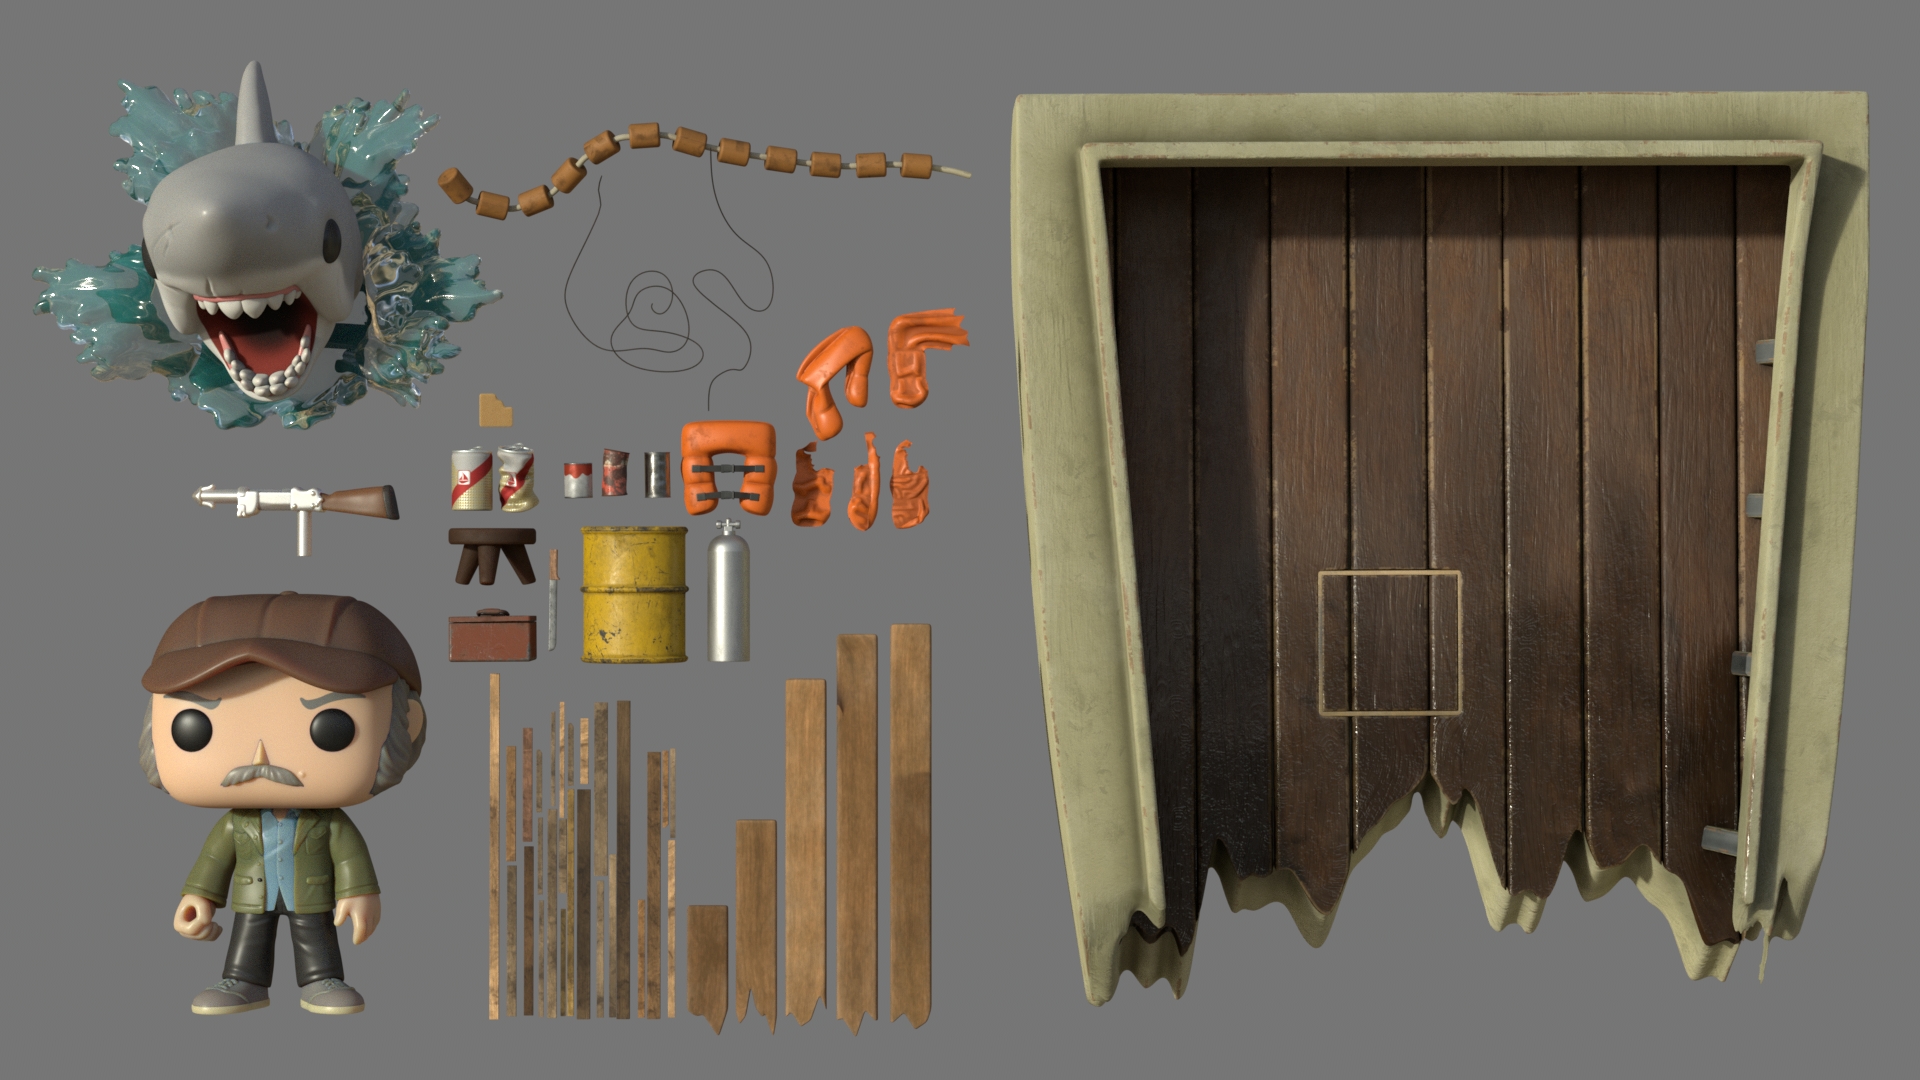
Props with final Texturing.
To create the ocean texture, I used a combination of Substance masks and maps to generate a foam mask and make the crest of the waves a bit brighter, pushing the natural subsurface look that oceans usually have. I exported the color maps without the foam and a RGB mask to have control over the look of the foam directly in the material.
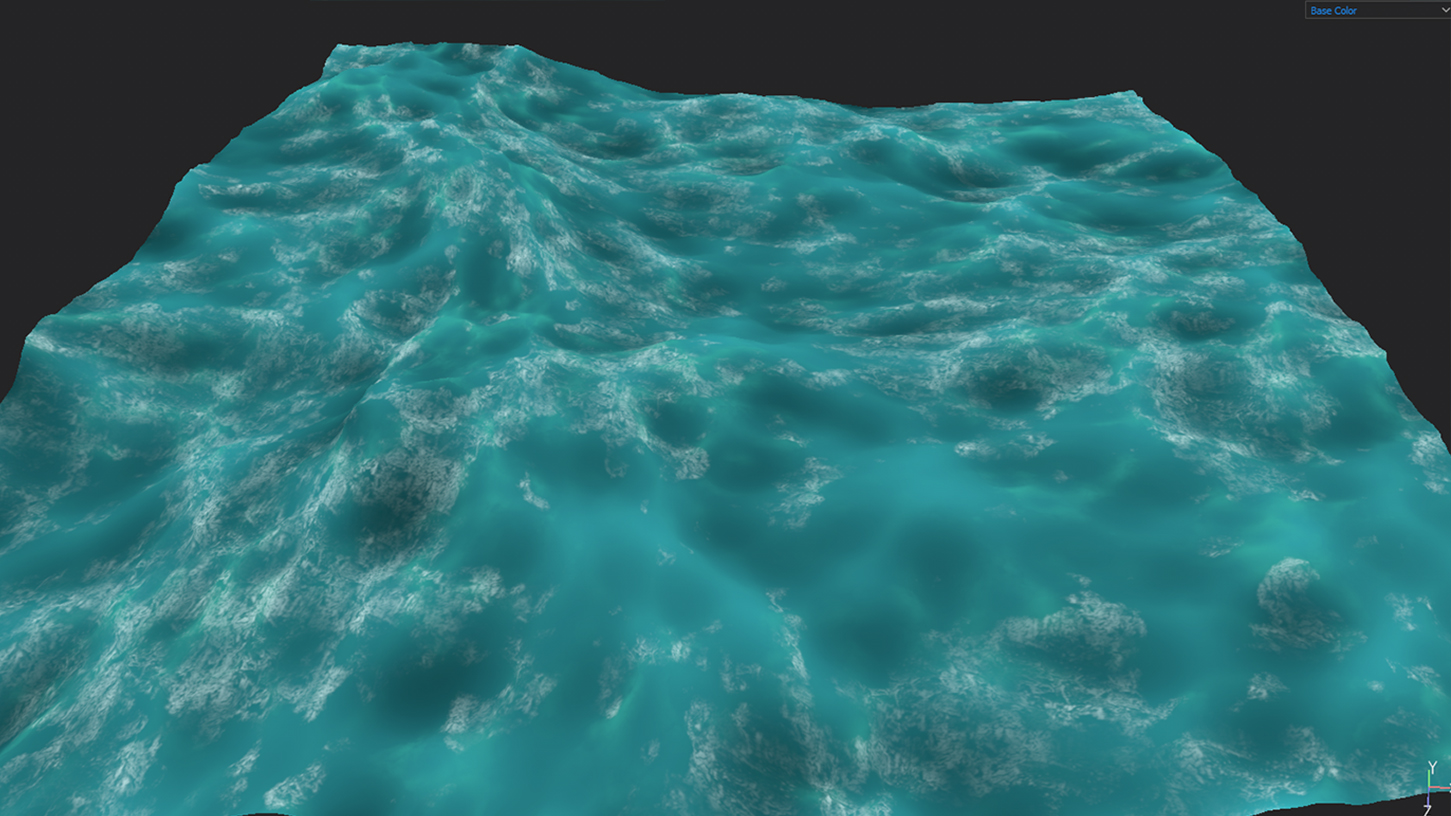
Ocean base color in substance painter.
Shading
Subsurface scattering plays a huge role in creating the characteristic Pop Funko Games toys vinyl look. The non-Exponential Path Traced subsurface model was perfect for simulating this effect because it provides very accurate path traced results and adds an extra Bleed slider to artistically control the look a bit further. Parts covered by light-colored paint absorbs and scatters light while darker painted parts like the eyes tend to not show the effect at all. To simulate this effect on the characters I used PxrColorCorrect node to extract the luminance of the base color map and set a threshold to drive the subsurface shader Mean Free Path Distance. The Resolve Self Intersections attribute was specially useful for keeping the subsurface effect continuous among separate parts of the model. The Diffuse Computation Switch was turned off by setting the slider to zero, that would prevent errors in thin backlit parts.
Comparison between subsurface scattering off (left) and on (right) .
“See what I do, Chief, is I trick 'em to the surface.And I jab at 'em. I'm not gonna haul 'em up like a lot of catfish.”
- Quint in Jaws
Connecting Substance Painter generated maps to PxrSurface shader is extremely straight forward, base color goes to Diffuse Color or Subsurface Color when needed, specular Roughness connects to the same-named input and normal map is connected with the help of PxrNormalMap node into the Bump Normal input of the shader.
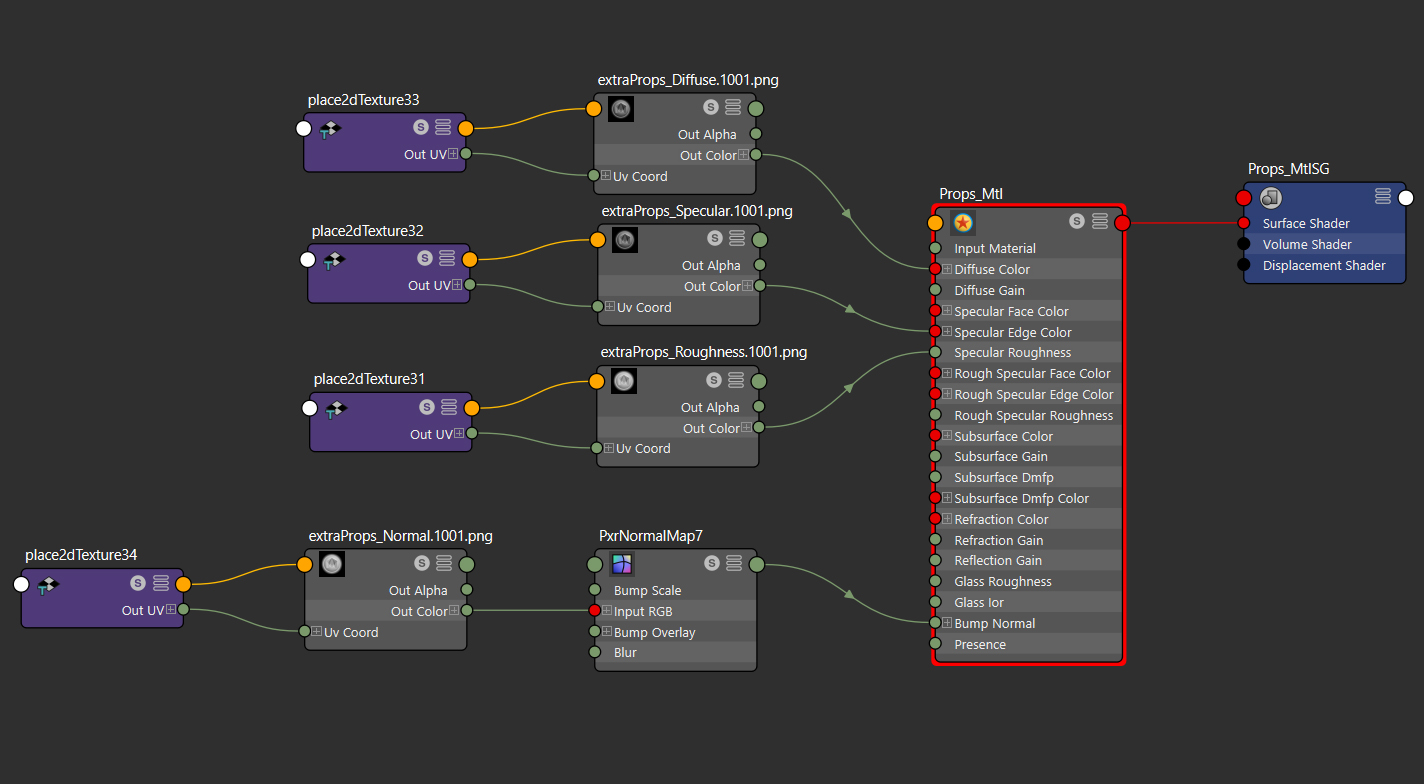
Connecting Substance Painter maps to PxrSurface Shader.
There is a cool trick to account for metalness and help matching exactly the look on Painter's viewport, at the expense of losing control over the specular IOR. Setting the Specular Fresnel Mode to Artistic and connecting Painter's Specular Color map to Edge Color, while setting Fresnel Exponent to zero and making sure that Specular model is set to GGX takes care of the specular look for the shaders. Setting the shader up that way, I was able to create a single PxrSurface shader to assign to all the props, be it a metal can or the wood deck of the boat.
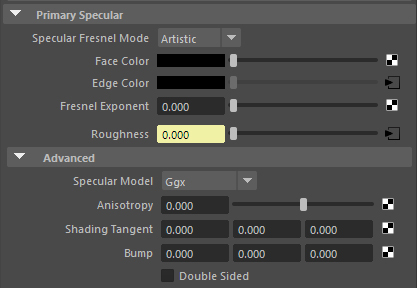
PxrSurface universal specular settings for Substance materials.
For the ocean I relied on the PxrSurface Glass attributes to create the light scattering and absorption effect that tints the water in relation to its depth. The key to achieving this effect is to leave refraction color white and plug the ocean color map into Single Scatter Albedo under the Interior tab. The absorption effect is stronger the brighter the Extinction Coefficient parameter gets. I also made sure to check the Multiscattering box under the interior advanced tab. The foam mask created in substance was used later to break the specularity, negate refraction where foam occurs and introduce diffuse where the foam appears most.
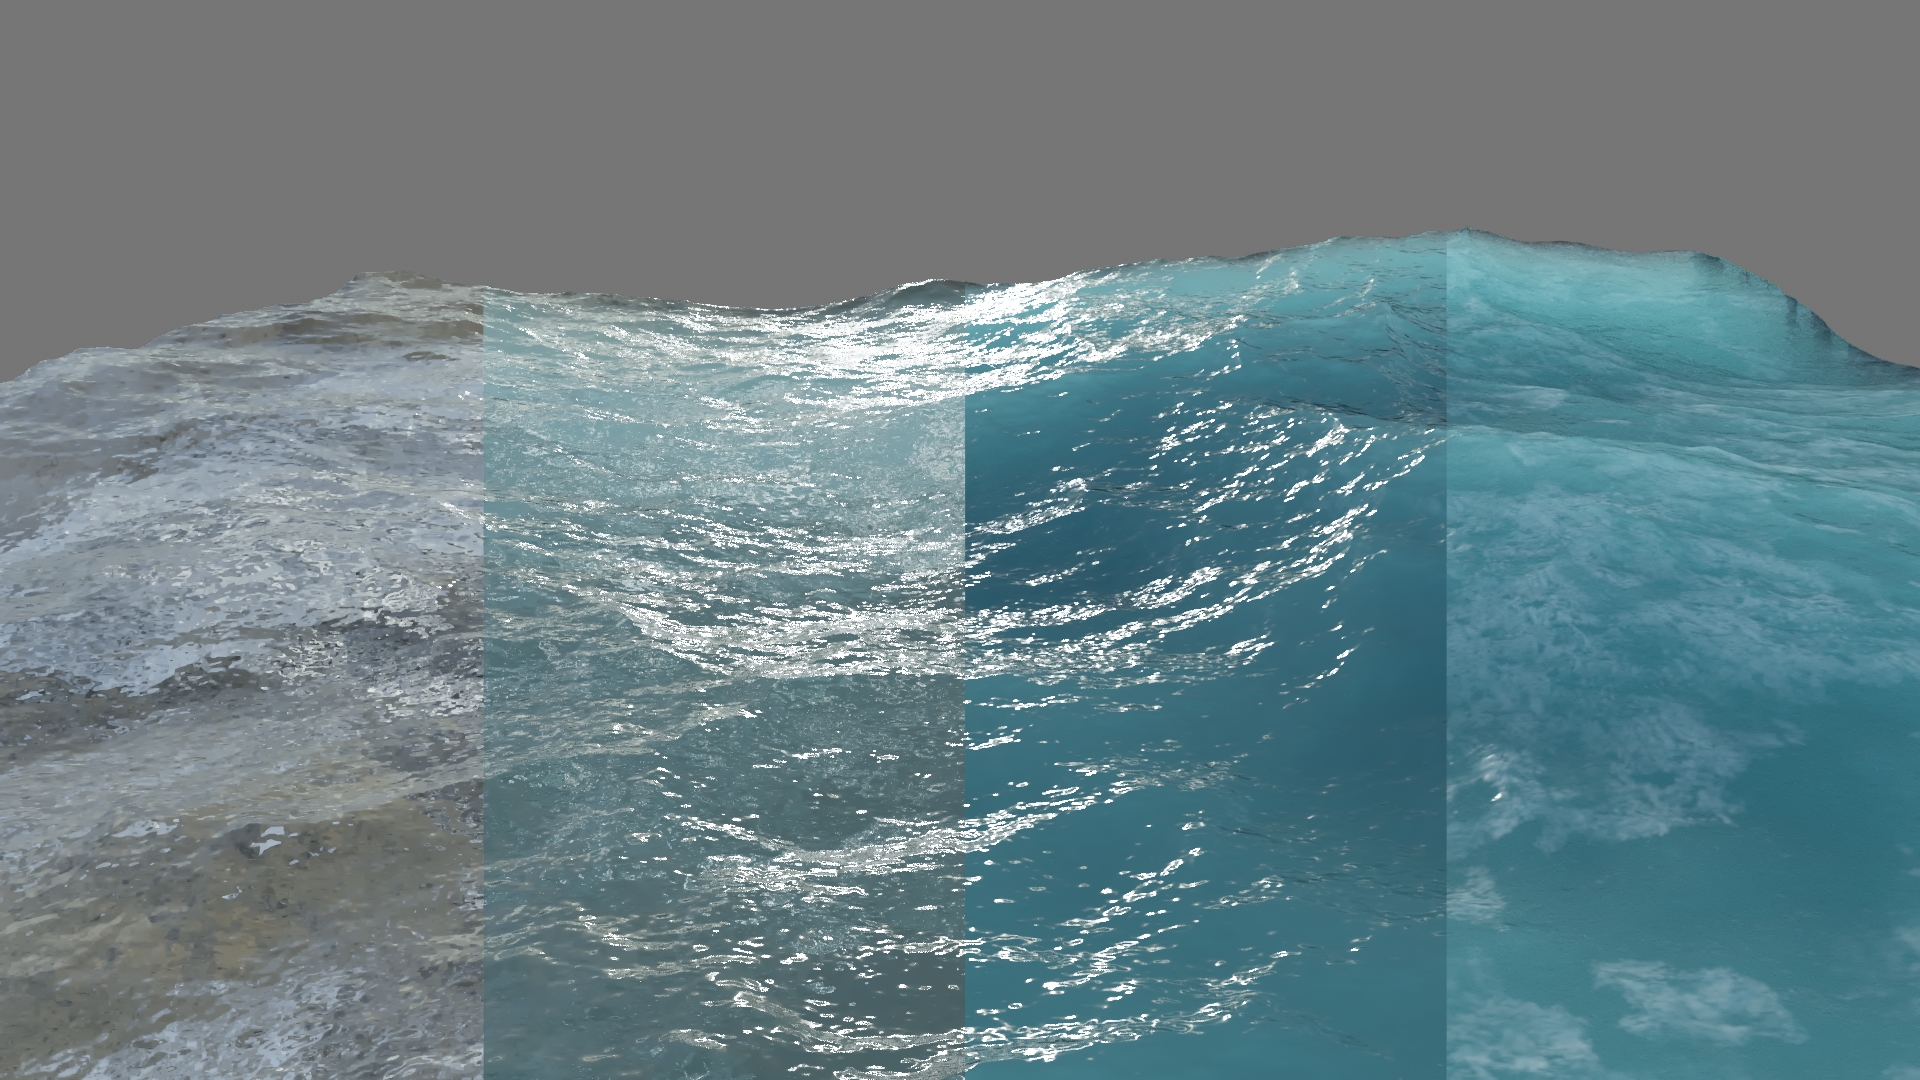
The evolution of the ocean shader. From left to right: A- Extinction Coefficient set to 0.0
B- Extinction Coefficient set to 0.25 C- Extinction Coefficient set to 0.55 and Multiscattering on. D- Foam mask driving the refraction, roughness and diffusion.
“The ocean turns red, and despite all the poundin' and the hollerin', they all come in and they... rip you to pieces. You know by the end of that first dawn, lost a hundred men. I don't know how many sharks, maybe a thousand.”
- Quint in Jaws
Lighting
Lighting was the aspect of the project in which we could bring more playfulness to the scene. Without any compromise with the actual movie cinematography, the goal here was to make the scene look playful, colorful and eye-catching. A great and quick way to direct light artistically is to use Emission Focus, under the light's Refine tab, to limit the lights to certain parts of the image. It is analogous to picking real light's barn-dorns and closing them simultaneously. RenderMan offers a ton of extra light control through light filters but for this image just playing with color and Emission Focus was enough.
I decided to use complementary colors to separate each character. Quint would be orange and Jaws would be represented by teal (I think I have seen this combination before...). Complementary rim-light colors were used to shape Quint’s silhouette as well, playing with the color theme the teal on his right side would represent the imminence of Bruce's approach. Bruce was also lit by a sharp and strong rim light, in order for him to pop out of the background. Carefully aimed lights were used to accentuate the shape and motion of the water and Bruce's splash. To tie everything together I mapped a PxrDomeLight with a cloudy beach sky HDRI, removing its bright sun values in Nuke, for it to act just as a plain environment light without any bright sources coming from it. That would brighten the image overall and provide great reflections while not interfering too much with the established look.
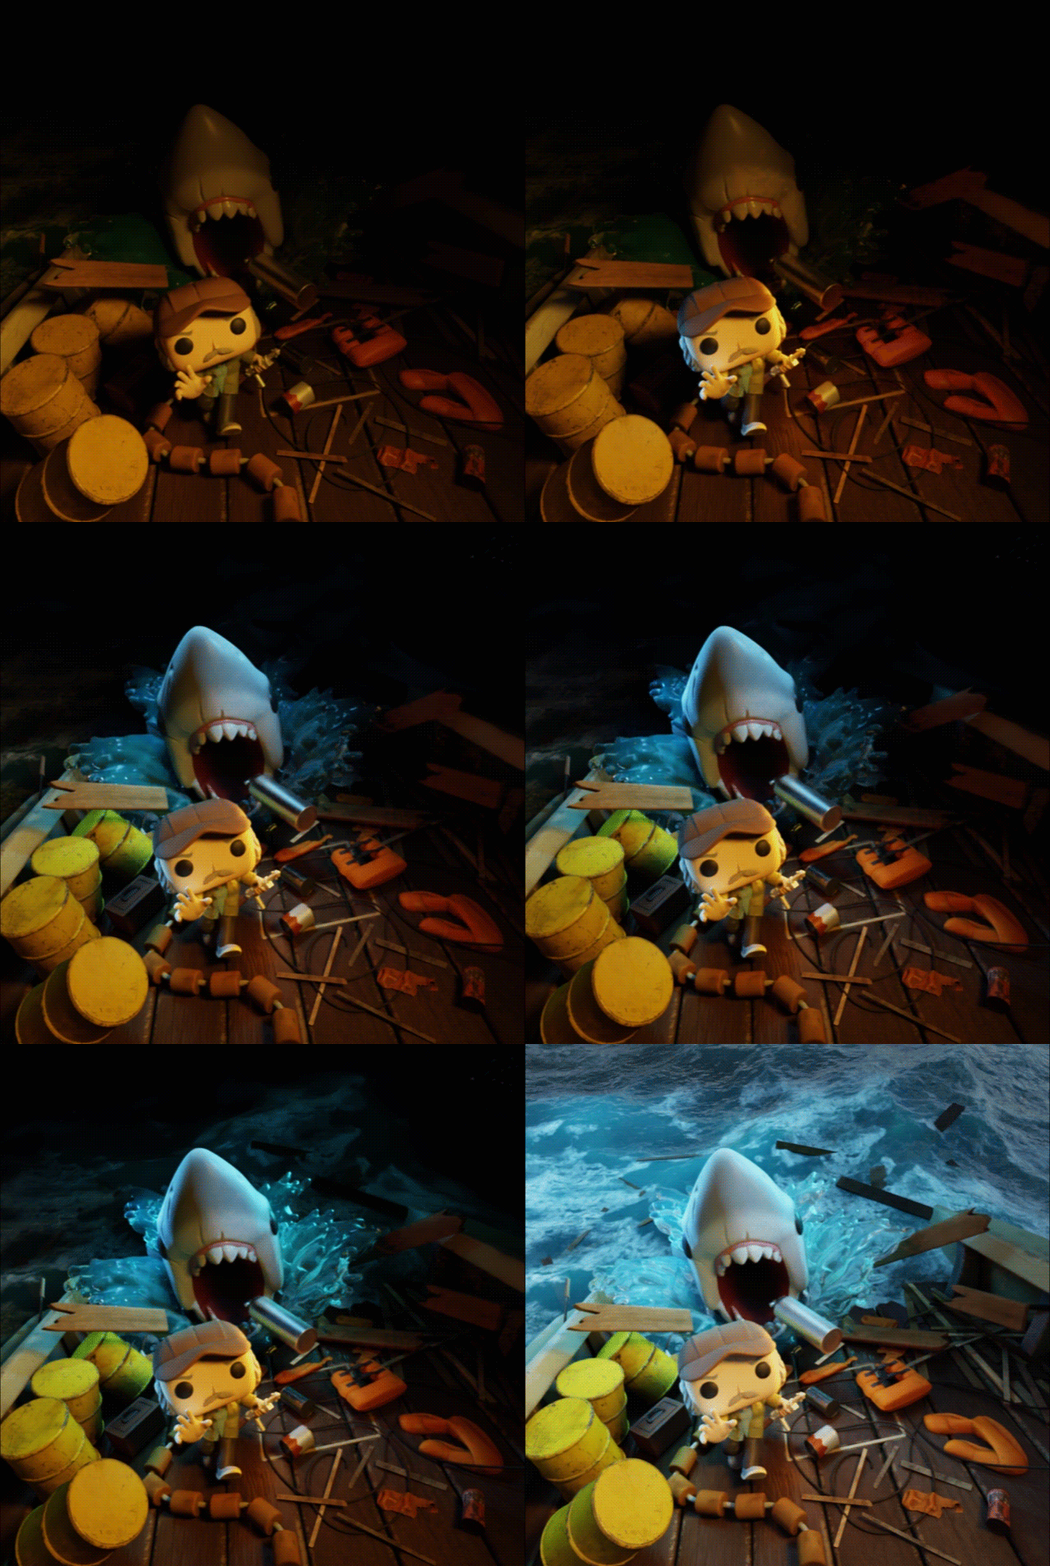
Scene lighting evolution.
Rendering
In order for the artists at Funko Games to create the final box art as quickly and efficiently as possible, I wanted to provide the image in separate layers, RenderMan’s integration with Maya's layer manager made it super easy to separate the elements in collections and assign the proper holdout shaders. I also provided some useful AOV passes like Specular, Subsurface and Albedo. Another great addition that proved to be extremely useful was the cryptomate pass which can be created as a Sample Filter under Render Settings Features tab. that would allow the artists to isolate and change any of the individual elements of the scene.
Funko Games asked me to provide an ambient occlusion pass as well. Instead of having to create a new shader and assign to all my objects, I simply switched the Integrator to PxrOcclusion and the task was done.
To manage render times as efficiently as possible the denoiser was heavily used across all the elements, allowing me to render a massive 4800 x 4800 pixel image with subsurface scattering, transmission, and motion blur in roughly 2 hours.
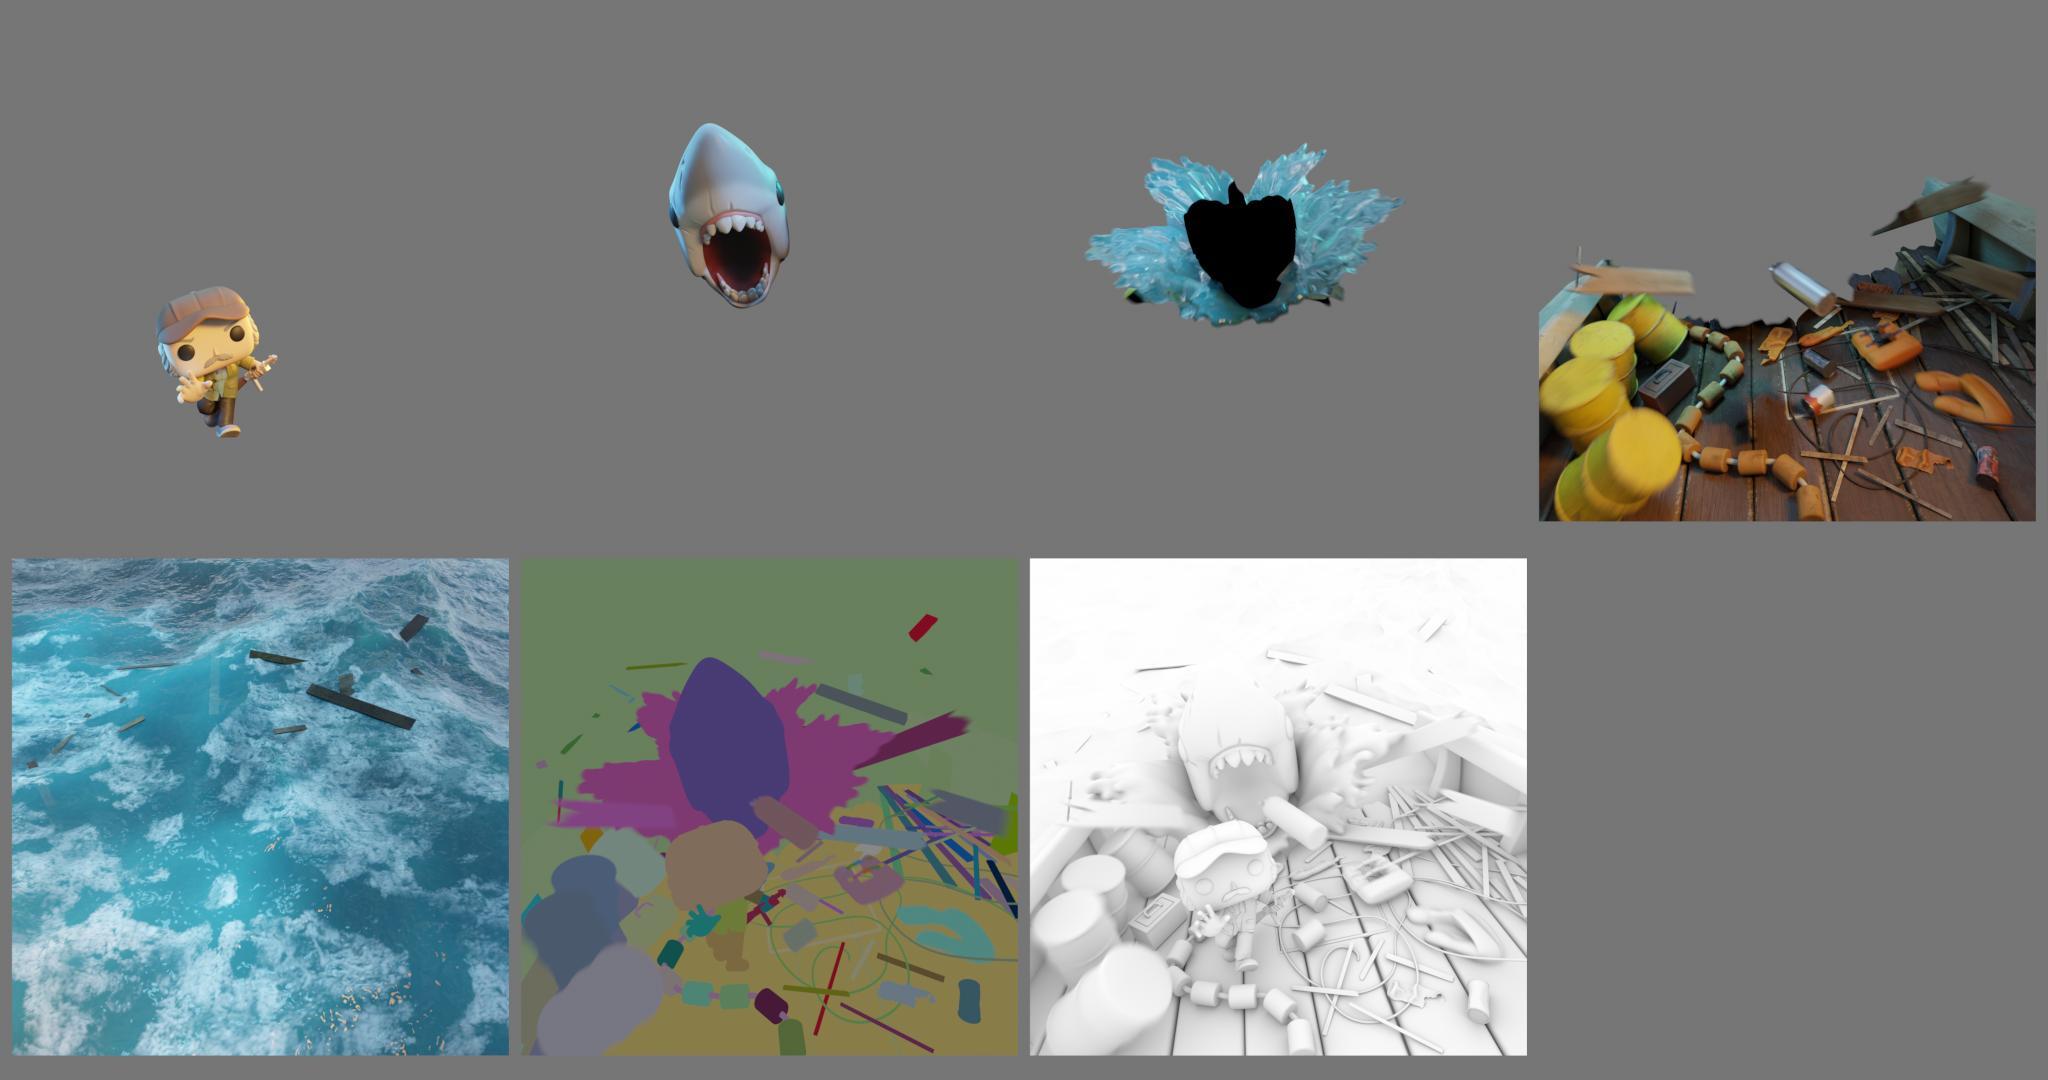
Contact sheet with all the separate render layers.
Paint Over
With the passes delivered, it was up for Scott Vigil, the amazing Funko Games paint over artist, to produce the signature painterly look that we see in the printed version of the boxes and the final product. Here is a full look at the final image after his incredible paint-over job.
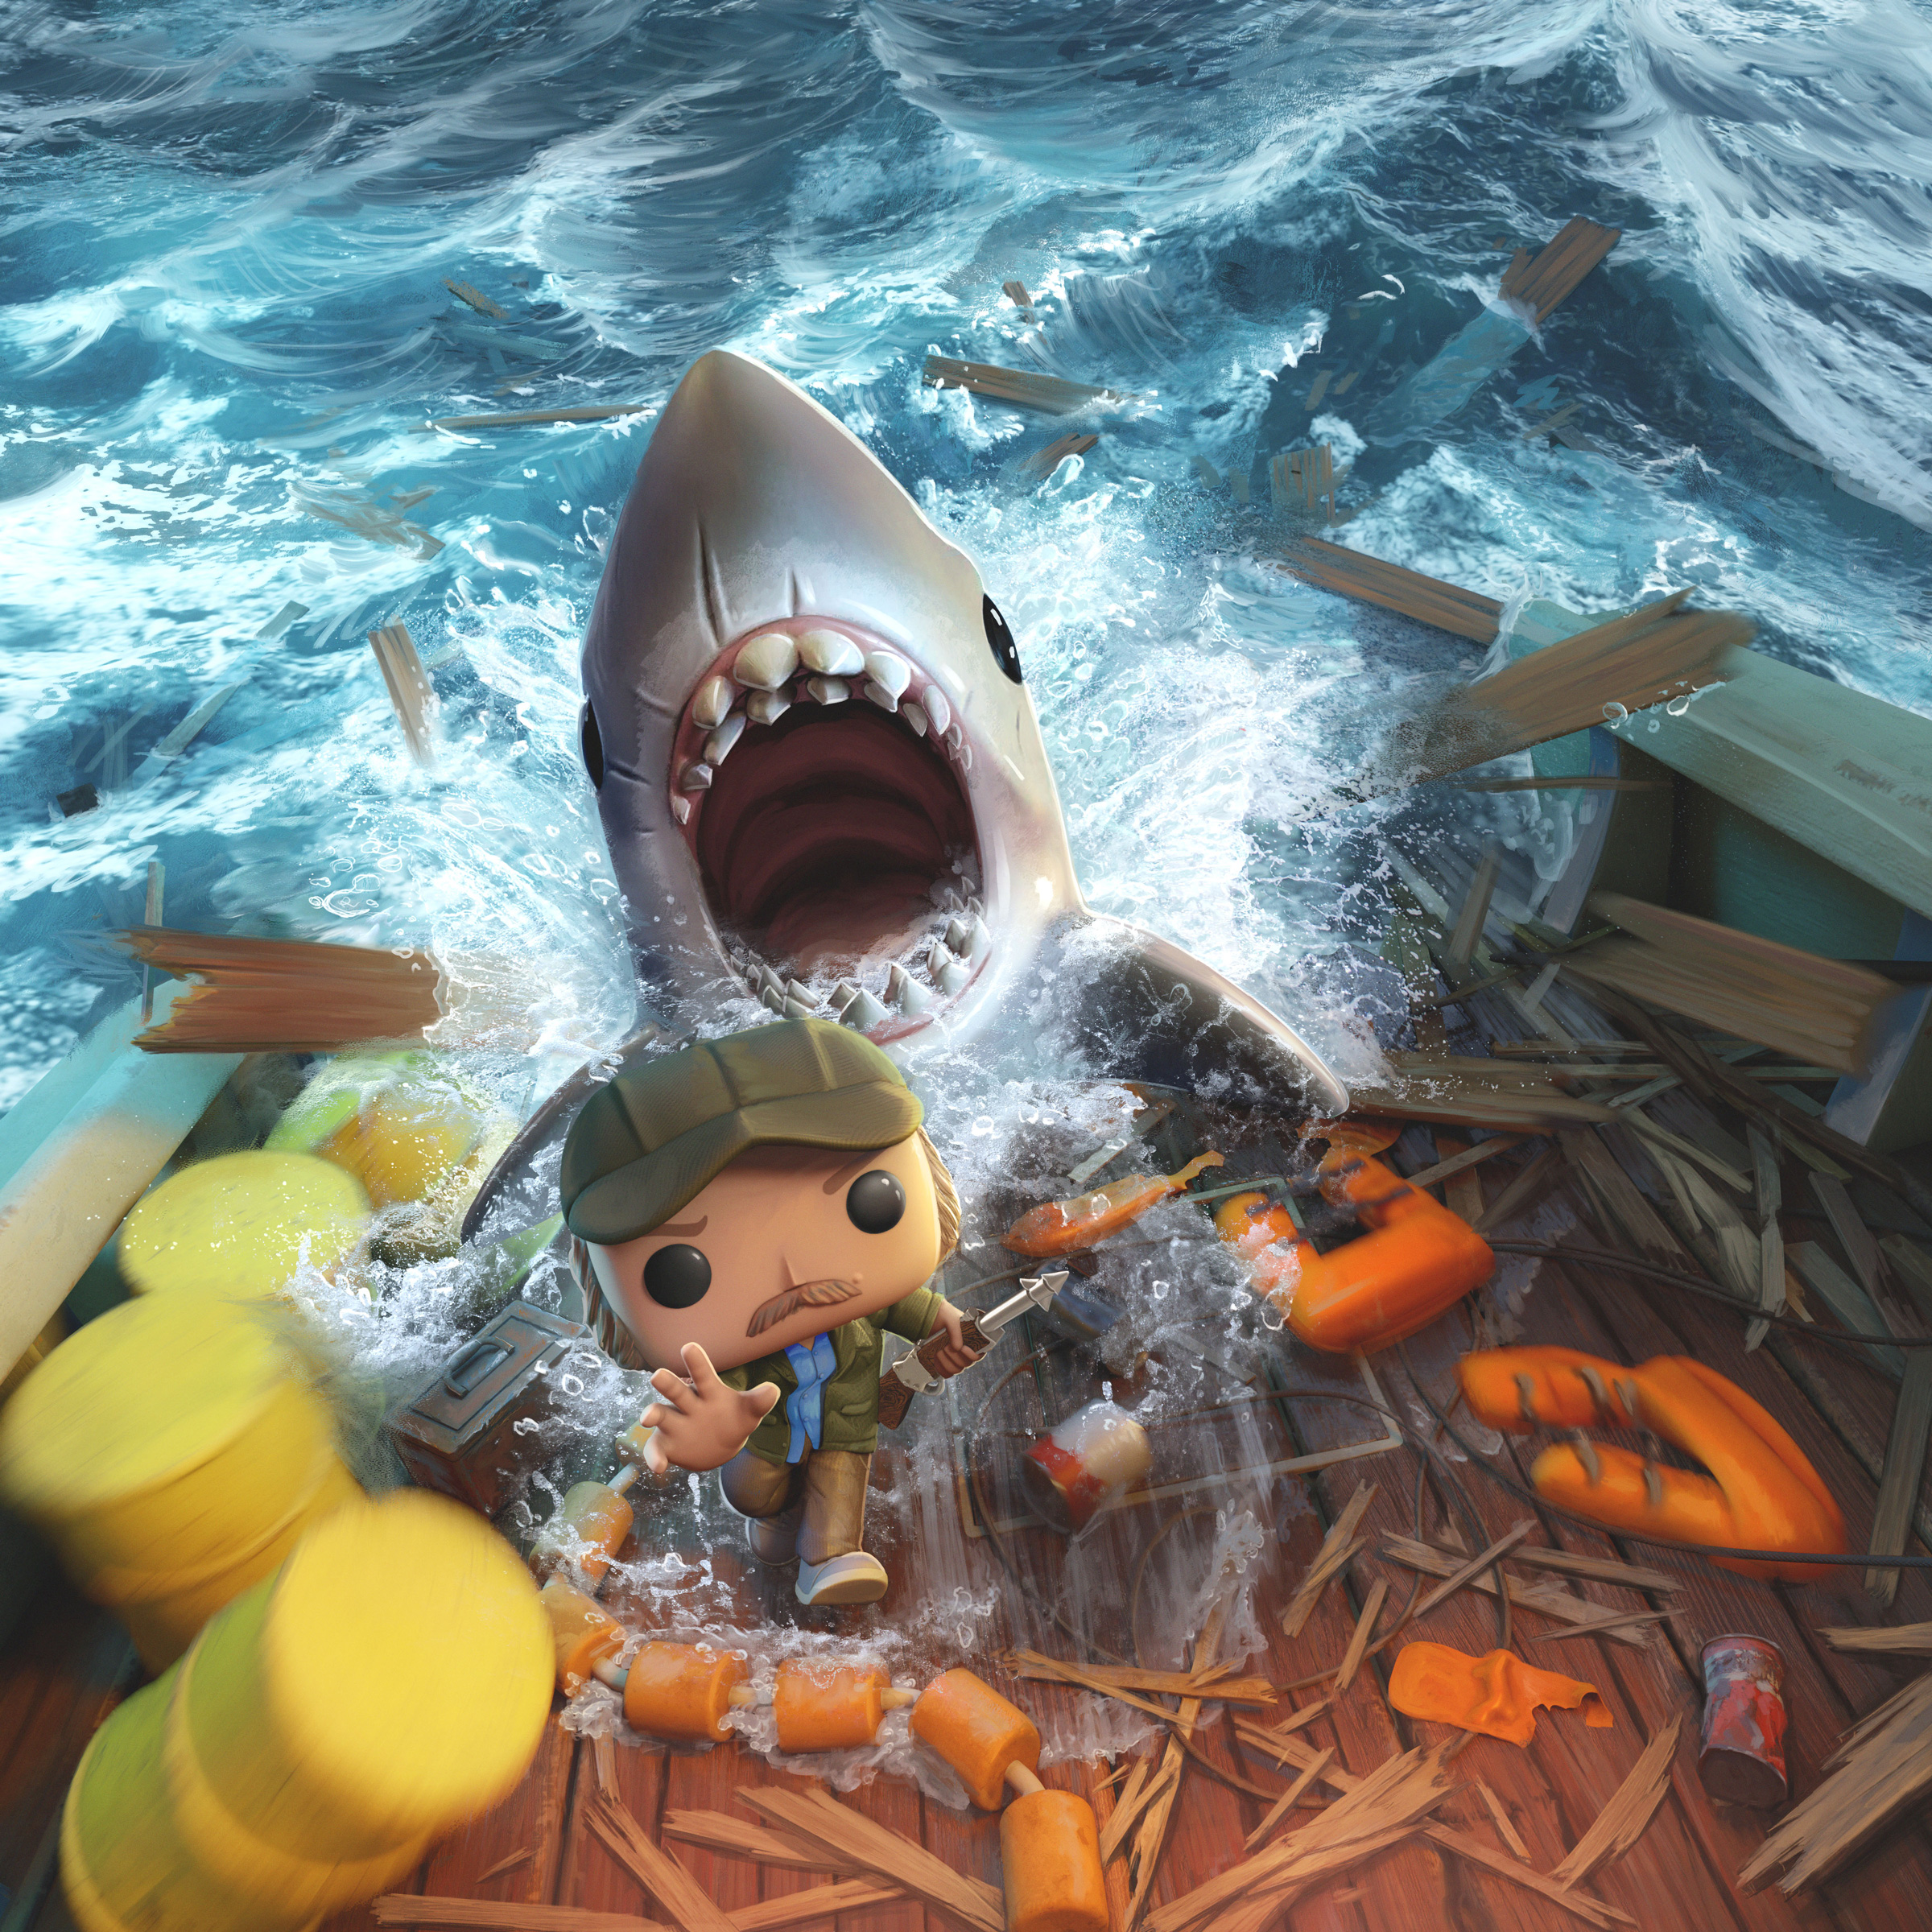
Conclusion
As a huge fan of toys and Pixar, this project was an incredible opportunity to bring these elements together, working alongside Funko Games talented team and wearing many hats from modeling to simulation and of course rendering during the short and intense days of production. I don't think it would be possible to deliver this amount of work respecting the deadline with the same level of quality and detail without RenderMan which was essential and present in all steps, from pre-visualizing the poses to the massive-sized delivery. Funko Games was an incredible partner to collaborate with as they were extremely understanding of the challenges and incredible team players. It was a blast! And that concludes my personal toy story.
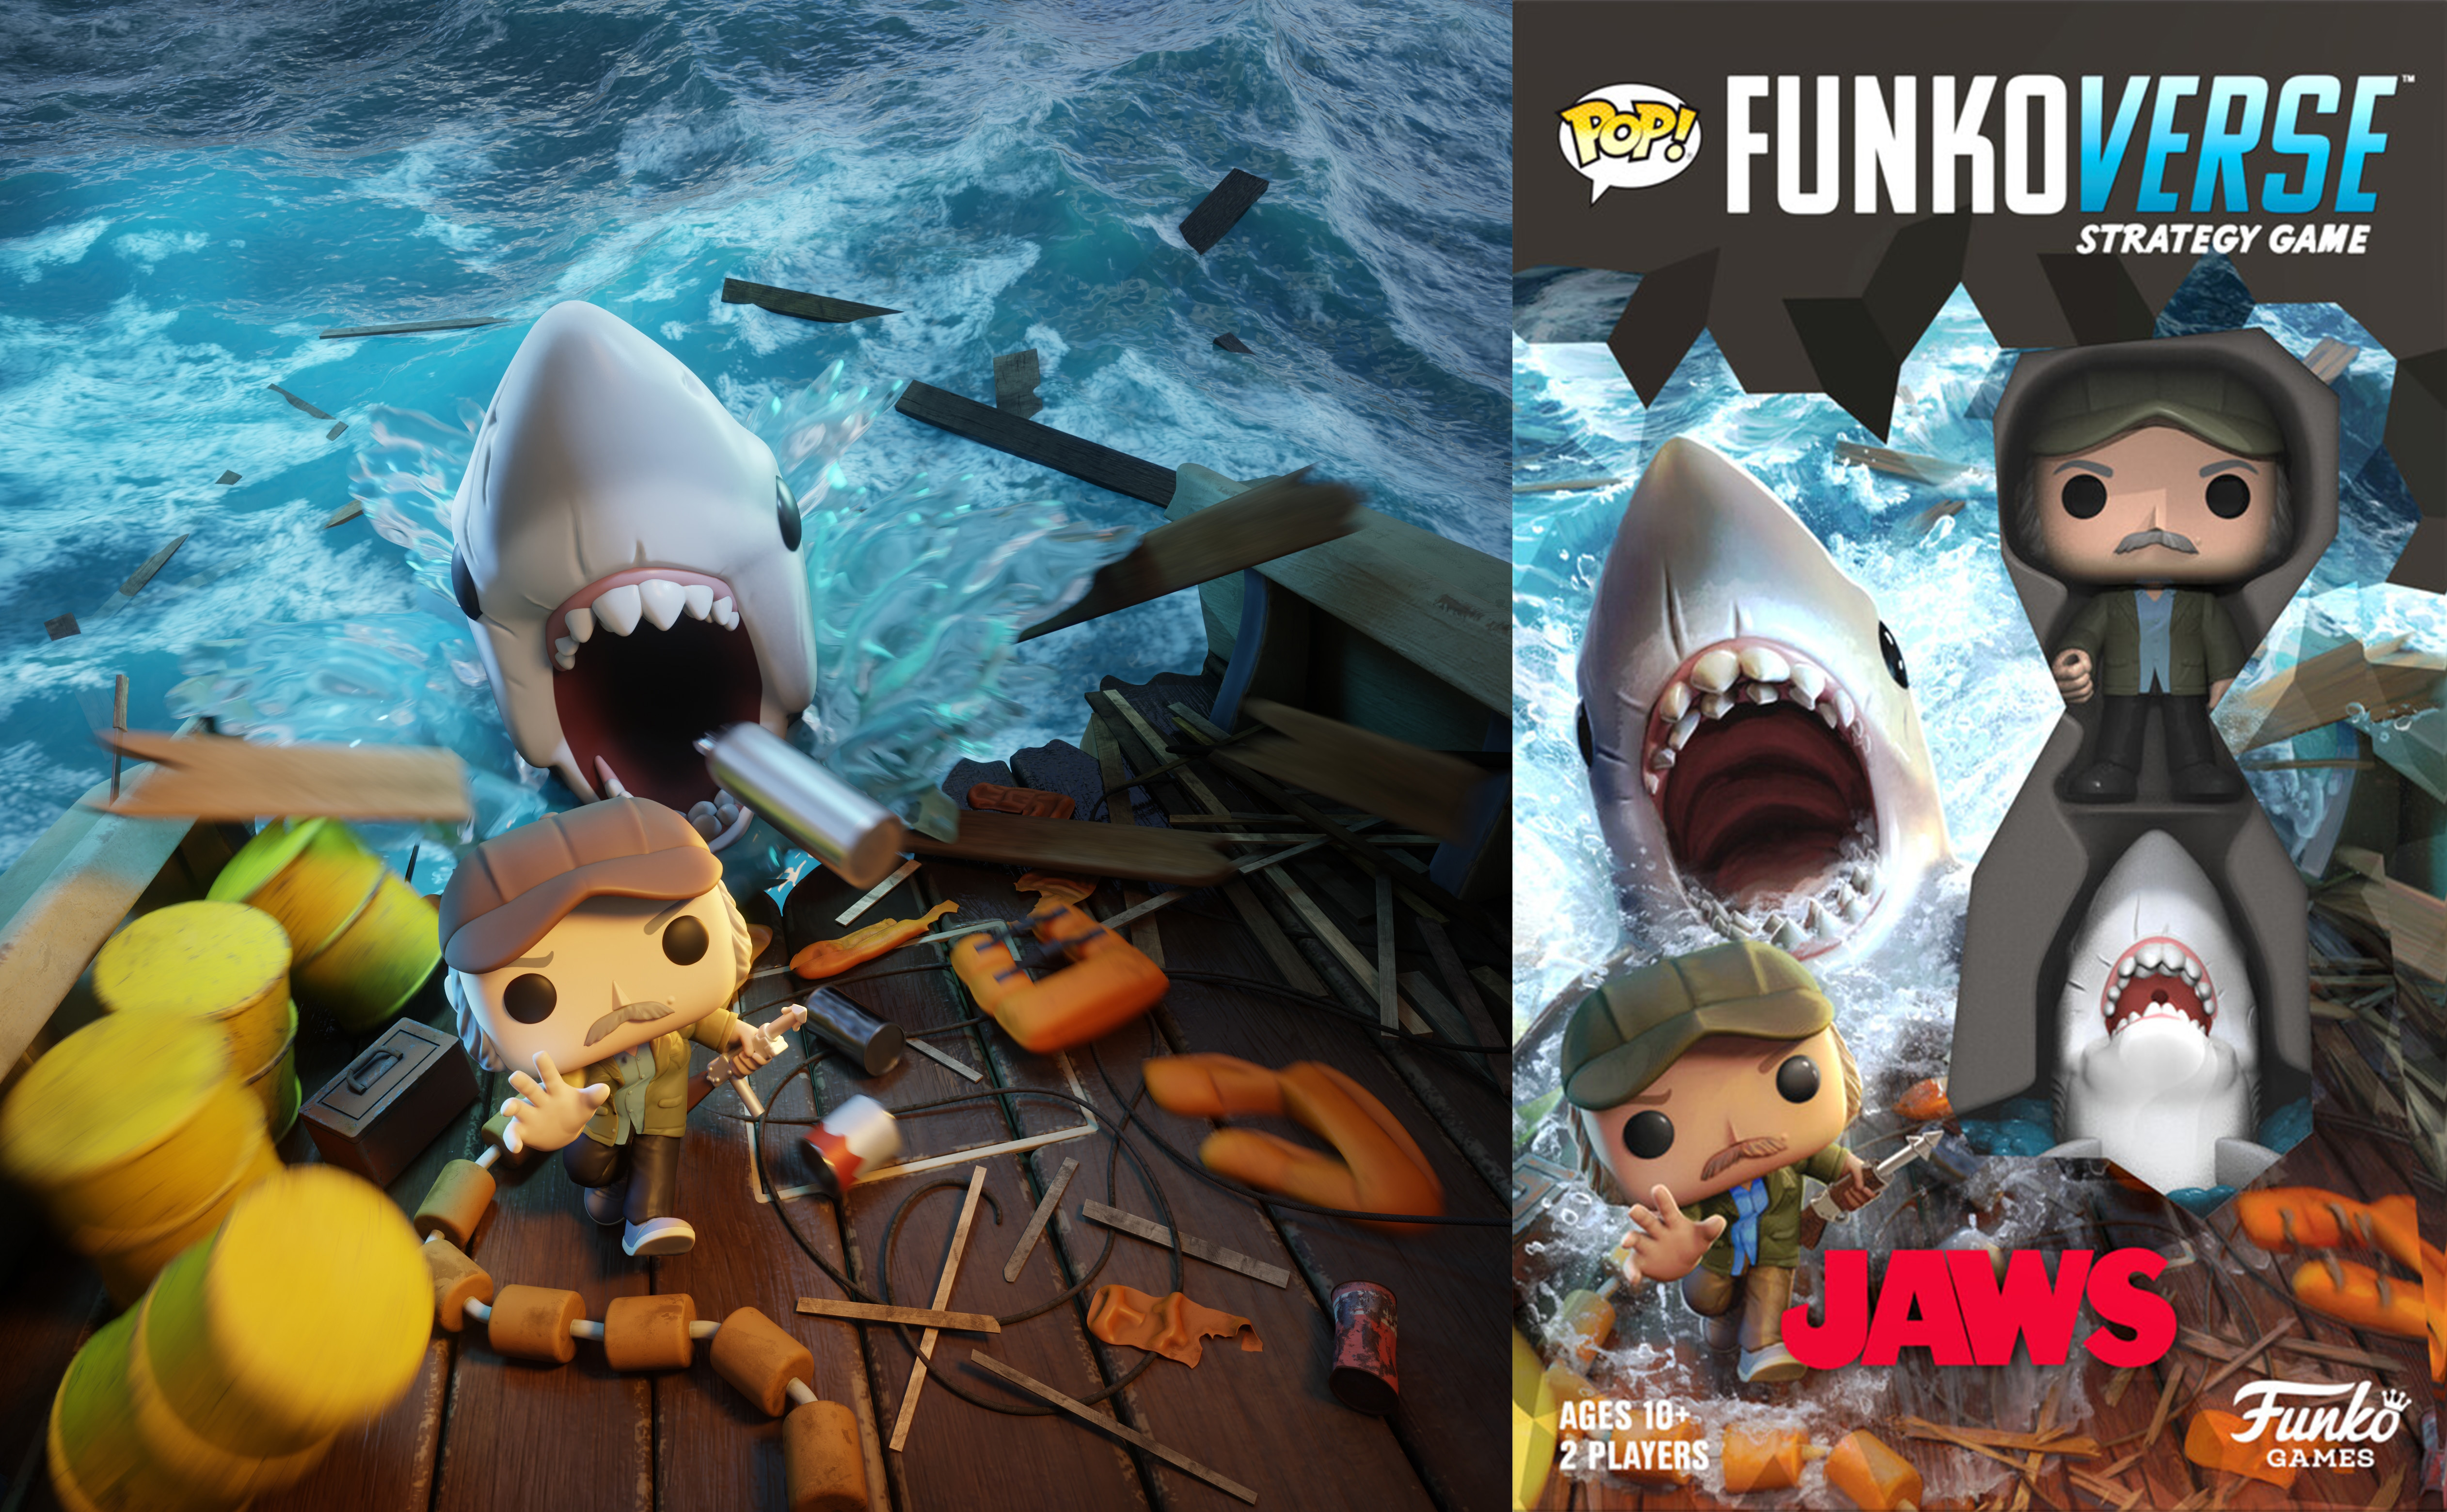
Final Image
About the Author
Fabio Sciedlarczyk has 15 years of experience in computer graphics doing TV commercials and feature films, both live-action and animated. He's had different roles from generalist to VFX artist, but ultimately he's specialized in lookDev, lighting, and shading and currently works for Mikros Animation.
Want to learn more about Fabio? Then check out this great article >
Acknowledgements
The creation of this article wouldn’t be possible without the precious help of Leif Pedersen and Dylan Sisson who helped me thoroughly with feedback, editing and suggested the writing of this piece in the first place and Luke Turpeinen, the producer, who invited me to be involved in the creation process and which was truly a pleasure to collaborate with.
from Hacker News https://ift.tt/2ZArd1f
No comments:
Post a Comment
Note: Only a member of this blog may post a comment.