Although the ability to expand a home computer with more RAM, storage and other features has been around for as long as home computers exist, it wasn’t until the IBM PC that the concept of a fully open and modular computer system became mainstream. Instead of being limited to a system configuration provided by the manufacturer and a few add-ons that really didn’t integrate well, the concept of expansion cards opened up whole industries as well as a big hobbyist market.
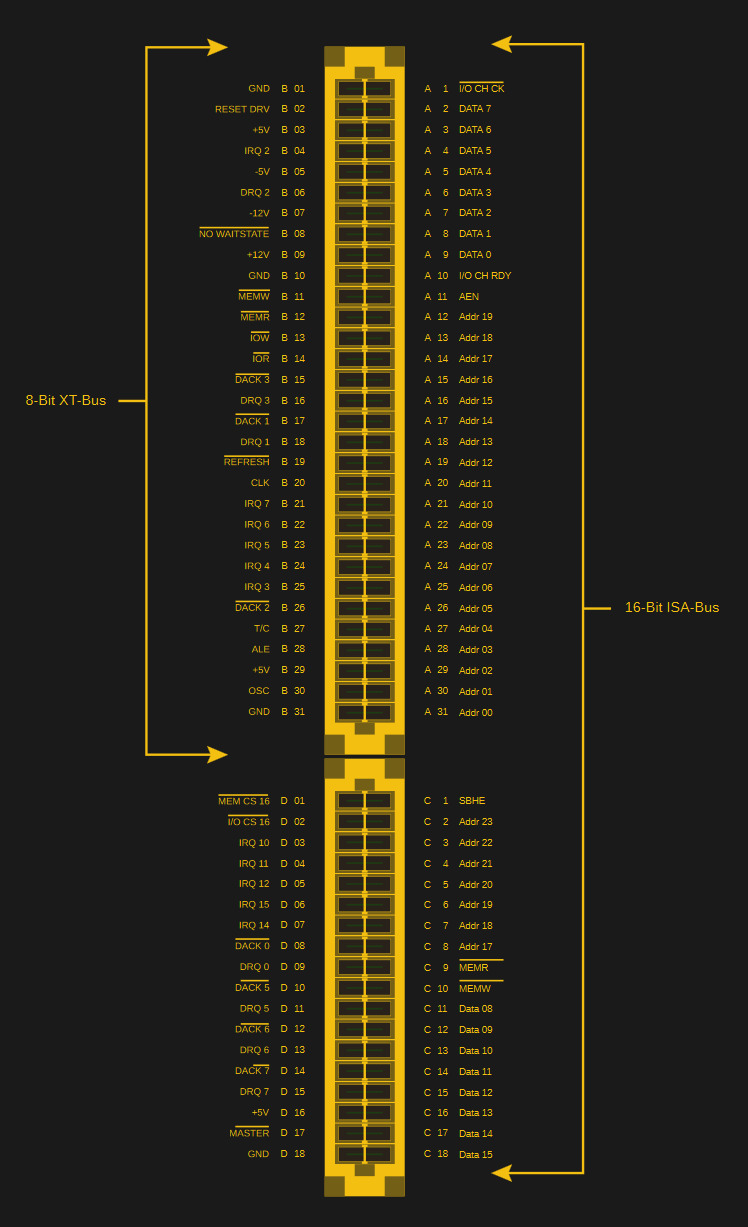
The first IBM PC had five 8-bit expansion slots that were connected directly to the 8088 CPU. With the IBM PC/AT these expansion slots became 16-bit courtesy of the 80286 CPU it was built around. These slots could be used for anything from graphics cards to networking, expanded memory or custom I/O. Though there was no distinct original name for this card edge interface, around the PC/AT era it got referred to as PC bus, as well as AT bus. The name Industry Standard Architecture (ISA) bus is a retronym created by PC clone makers.
With such openness came the ability to relatively easy and cheaply make your own cards for the ISA bus, and the subsequent and equally open PCI bus. To this day this openness allows for a vibrant ecosystem, whether one wishes to build a custom ISA or PCI soundcard, or add USB support to a 1981 IBM PC system.
But what does it take to get started with ISA or PCI expansion cards today?
The Cost of Simplicity
An important thing to note about ISA and the original PC/AT bus is that it isn’t so much a generic bus as it describes devices hanging off an 8088 or 80286 addressing and data bus. This means that for example that originally the bus is as fast as the clock speed of the CPU in question: 4.77 MHz for the original PC bus and 6-8 MHz for the PC/AT. Although 8-bit cards could be used in 16-bit slots most of the time, there was no guarantee that they would work properly.
As PC clone vendors began to introduce faster CPUs in their models, the AT bus ended up being clocked at anywhere from 10 to 16 MHz. Understandably, this led to many existing AT (ISA) bus cards not working properly in those systems. Eventually, the clock for the bus was decoupled from the processor clock by most manufacturers, but despite what the acronym ‘ISA’ suggests, at no point in time was ISA truly standardized.
It was however attempted to standardize a replacement for ISA in the form of Extended ISA (EISA). Created in 1988, this featured a 32-bit bus, running at 8.33 MHz. Although it didn’t take off in consumer PCs, EISA saw some uptake in the server market, especially as a cheaper alternative to IBM’s proprietary Micro Channel architecture (MCA) bus. MCA itself was envisioned by IBM as the replacement of ISA.
Ultimately, ISA survives to this day in mostly industrial equipment and embedded applications (e.g. the LPC bus), while the rest of the industry moved on to PCI and to PCIe much later. Graphics cards saw a few detours in the form of VESA Local Bus (VLB) and Accelerated Graphics Port (AGP), which were specialized interfaces aimed at the needs of GPUs.
Getting started with new old tech
The corollary of this tumultuous history of ISA in particular is that one has to be careful when designing a new ‘ISA expansion card’. For truly wide compatibility, one could design an 8-bit card that can work with a bus speed from anywhere from 4.77 to 20 MHz. Going straight to a 16-bit card would be an option if one has no need to support 8088-based PCs. When designing a PC/104 card, there should be no compatibility issues, as it follows pretty much the most standard form of the ISA bus.
The physical interface is not a problem with either ISA or PCI, as both use edge connectors. These were picked mostly because they were cheap yet reliable, which hasn’t changed today. On the PCB end, no physical connector exists, merely the conductive ‘fingers’ that contact the contacts of the edge connector. One can use a template for this part, to get good alignment with the contacts. Also keep in mind the thickness of the PCB as the card has to make good contact. Here the common 1.6 mm seems to be a good match.
One can easily find resources for ISA and PCI design rules online if one wishes to create the edge connector themselves, such as this excellent overview on the Multi-CB (PCB manufacturer, no affiliation) site. This shows the finger spacing, and the 45 degrees taper on the edge, along with finger thickness and distance requirements.
Useful for the electrical circuit design part is to know that ISA uses 5 V level signaling, whereas PCI can use 5 V, 3.3 V or both. For the latter, this difference is indicated using the placement of the notch in the PCI slot, as measured from the IO plate: at 56.21 mm for 3.3 V cards and 104.47 mm for 5 V. PCI cards themselves will have either one of these notches, or both if they support both voltages (Universal card).
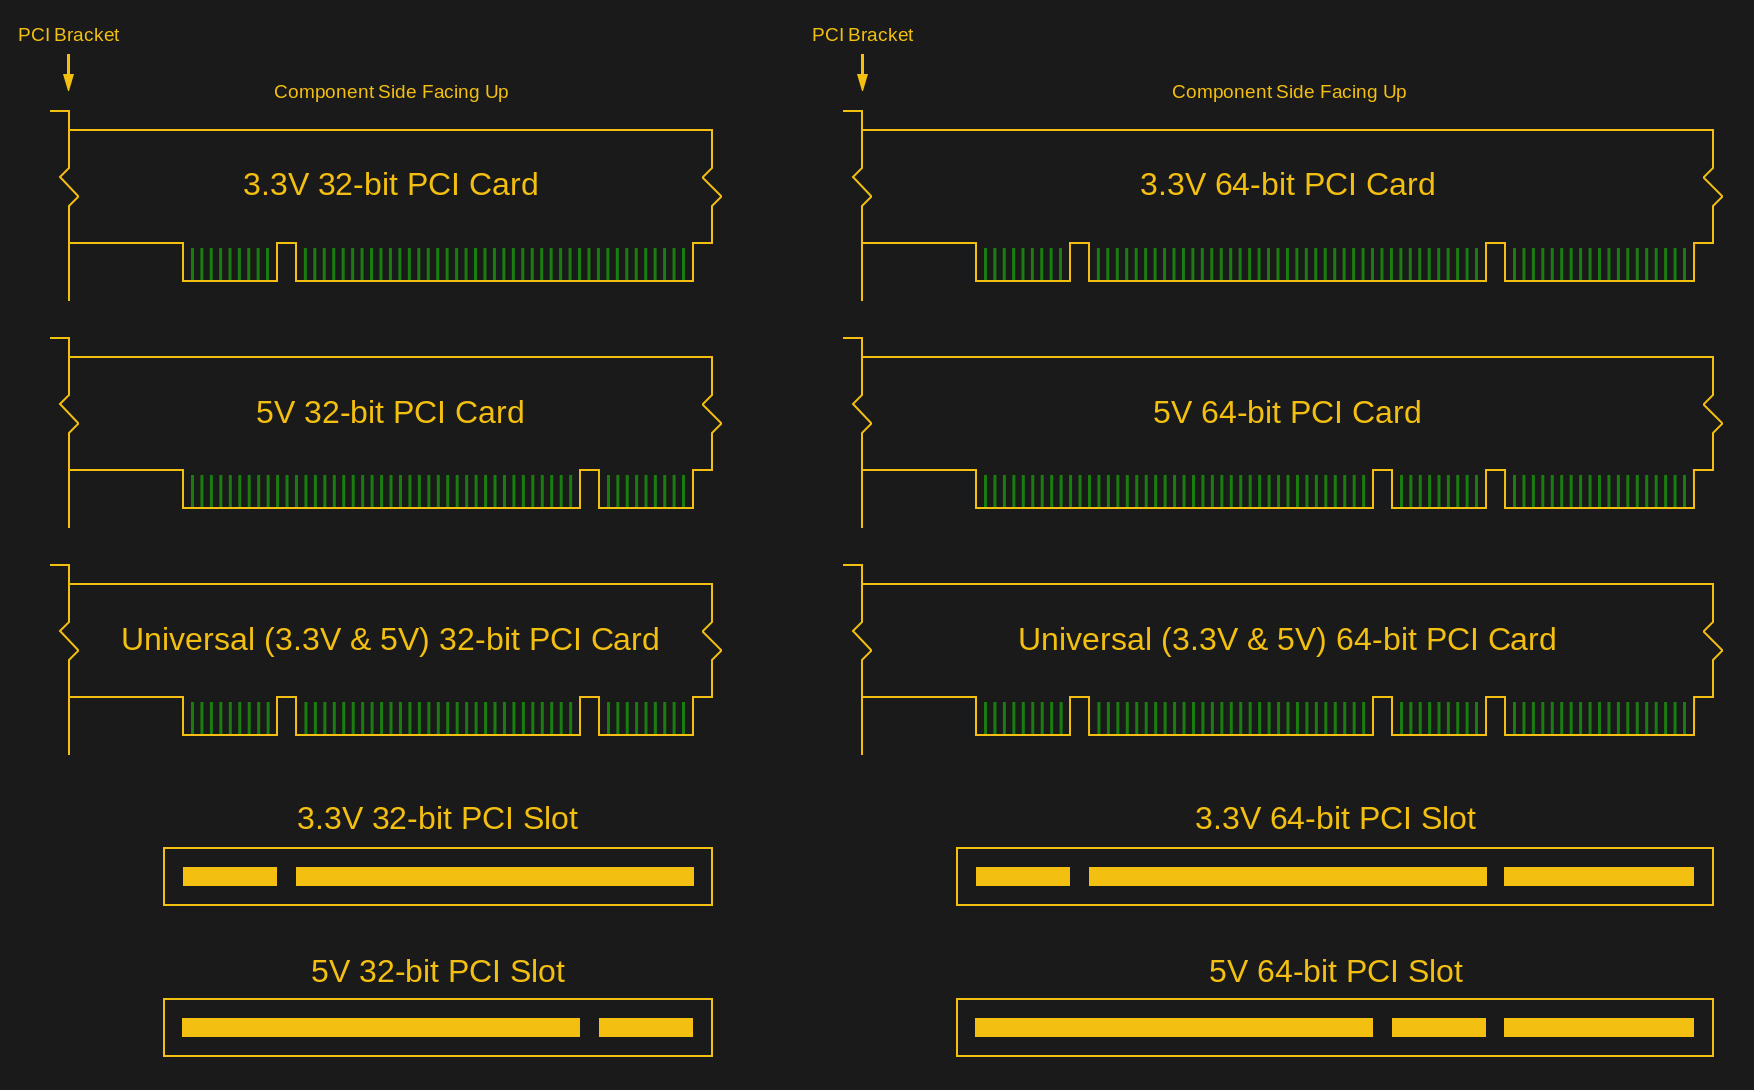
PCI slots exist in 32-bit and 64-bit versions, of which only the former made a splash in the consumer market. On the flip-side of PCI we find PCI-X: an evolution of PCI, which saw most use in servers in its 64-bit version. PCI-X essentially doubles the maximum frequency of PCI (66 to 133 MHz), while removing 5V signaling support. PCI-X cards will often work in 3.3V PCI slots for this reason, as well as vice-versa. A 64-bit card can fall back to 32-bit mode if it is inserted into a shorter, 32-bit slot, whether PCI or PCI-X.
Driving buses
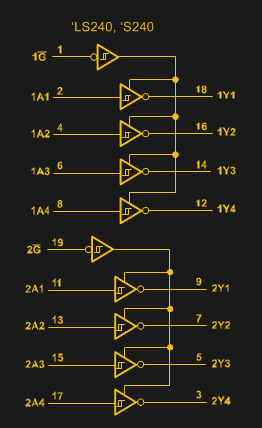
Every device on a bus adds a load which a signaling device has to overcome. In addition, on a bus with shared lines, it’s important that individual devices can disengage themselves from these shared lines when they are not using them. The standard way to deal with this is to use a tri-state buffer, such as the common 74LS244. Not only does it provide the isolation provided by a standard digital buffer circuit, it can also switch to a Hi-Z (high-impedance) state, in which it is effectively disconnected.
In the case of our ISA card, we need to have something like the 74LS244 or its bi-directional sibling 74LS245 to properly interface with the bus. Each bus signal connection needs to have an appropriate buffer or latch placed on it, which for the ISA bus is covered in detail in this article by Abhishek Dutta. A good example of a modern-day ISA card is the ‘Snark Barker’ SoundBlaster clone.
PCI could conceivably be done in such a discrete manner as well, but most commonly commercial PCI cards used I/O accelerator ASICs, which provide a simple, ISA-like interface to the card’s circuitry. These ICs are however far from cheap today (barring taking a risk with something like the WCH CH365), so a good alternative is to implement the PCI controller in an FPGA. The MCA version of the aforementioned ‘Snark Barker’ (as previously covered by us) uses a CPLD to interface with the MCA bus. Sites like OpenCores feature existing PCI target projects one could use as a starting point.
Chatting with ISA and PCI
After creating a shiny PCB with gold edge contact fingers and soldering some bus buffer ICs or an FPGA onto it, one still has to be able to actually talk the actual ISA or PCI protocol. Fortunately, a lot of resources exist for the ISA protocol, such as this one for ISA. The PCI protocol is, like the PCIe protocol, a ‘trade secret’, and only officially available via the PCI-SIG website for a price. This hasn’t kept copies from the specification to leak over the past decades, however.
It’s definitely possible to use existing ISA and PCI projects as a template or reference for one’s own projects. The aforementioned CPLD/FPGA projects are a way to avoid implementing the protocol oneself and just getting to the good bits. Either way, one has to use the interrupt (IRQ) system for the respective bus (dedicated signal lines, as well as message-based in later PCI versions), with the option to use DMA (DRQn & DACKn on ISA). Covering the intricacies of the ISA and PCI bus would however take a whole article by itself. For those of us who have had ISA cards with toggle switches or (worse), ISA PnP (Plug’n’Pray) inflicted on them, a lot of this should already be familiar, however.
As with any shared bus, the essential protocol when writing or reading involves requesting bus access from the bus master, or triggering the bus arbitration protocol with multiple bus masters in PCI. An expansion card can also be addressed directly using its bus address, as Abhishek Dutta covered in his ISA article, which on Linux involves using kernel routines (sys/io.h) to obtain access permissions before one can send data to a specific IO port on which the card can be addressed. Essentially:
if (ioperm(OUTPUT_PORT, LENGTH+1, 1)) {
        ...
}
if (ioperm(INPUT_PORT, LENGTH+1, 1)) {
        ...
}

outb(data, port);
data = inb(port);
With ISA, the IO address is set in the card, and the address decoder on the address signal lines used to determine a match. Often toggle switches or jumpers were used to allow a specific address, IRQ and DMA line. ISA PnP sought to improve on this process, but effectively caused more trouble. For PCI, PnP is part of the standard: the PCI bus is scanned for devices on boot, and the onboard ROM (BIOS) queried for the card’s needs after which the address and other parameters are set up automatically.
Wrapping up
Obviously, this article has barely even covered the essentials when it comes to developing one’s own custom ISA or PCI expansion cards, but hopefully it has at least given a broad overview of the topic. A lot of what one needs depends on the type of card one wishes to develop, whether it’s a basic 8-bit ISA (PC/XT) card, or a 64-bit PCI-X one.
A lot of the fun with buses such as ISA and PCI, however, is that they are very approachable. Their bus speeds are well within the reach of hobbyist hardware and oscilloscopes in case of debugging/analysis. The use of a slower parallel data bus means that no differential signaling is used which simplifies the routing of traces.
Even though these legacy buses are not playing in the same league as PCIe, their feature set and accessibility means that it can give old systems a new lease on life, even if it is for something as simple as adding Flash-based storage to an original IBM PC.
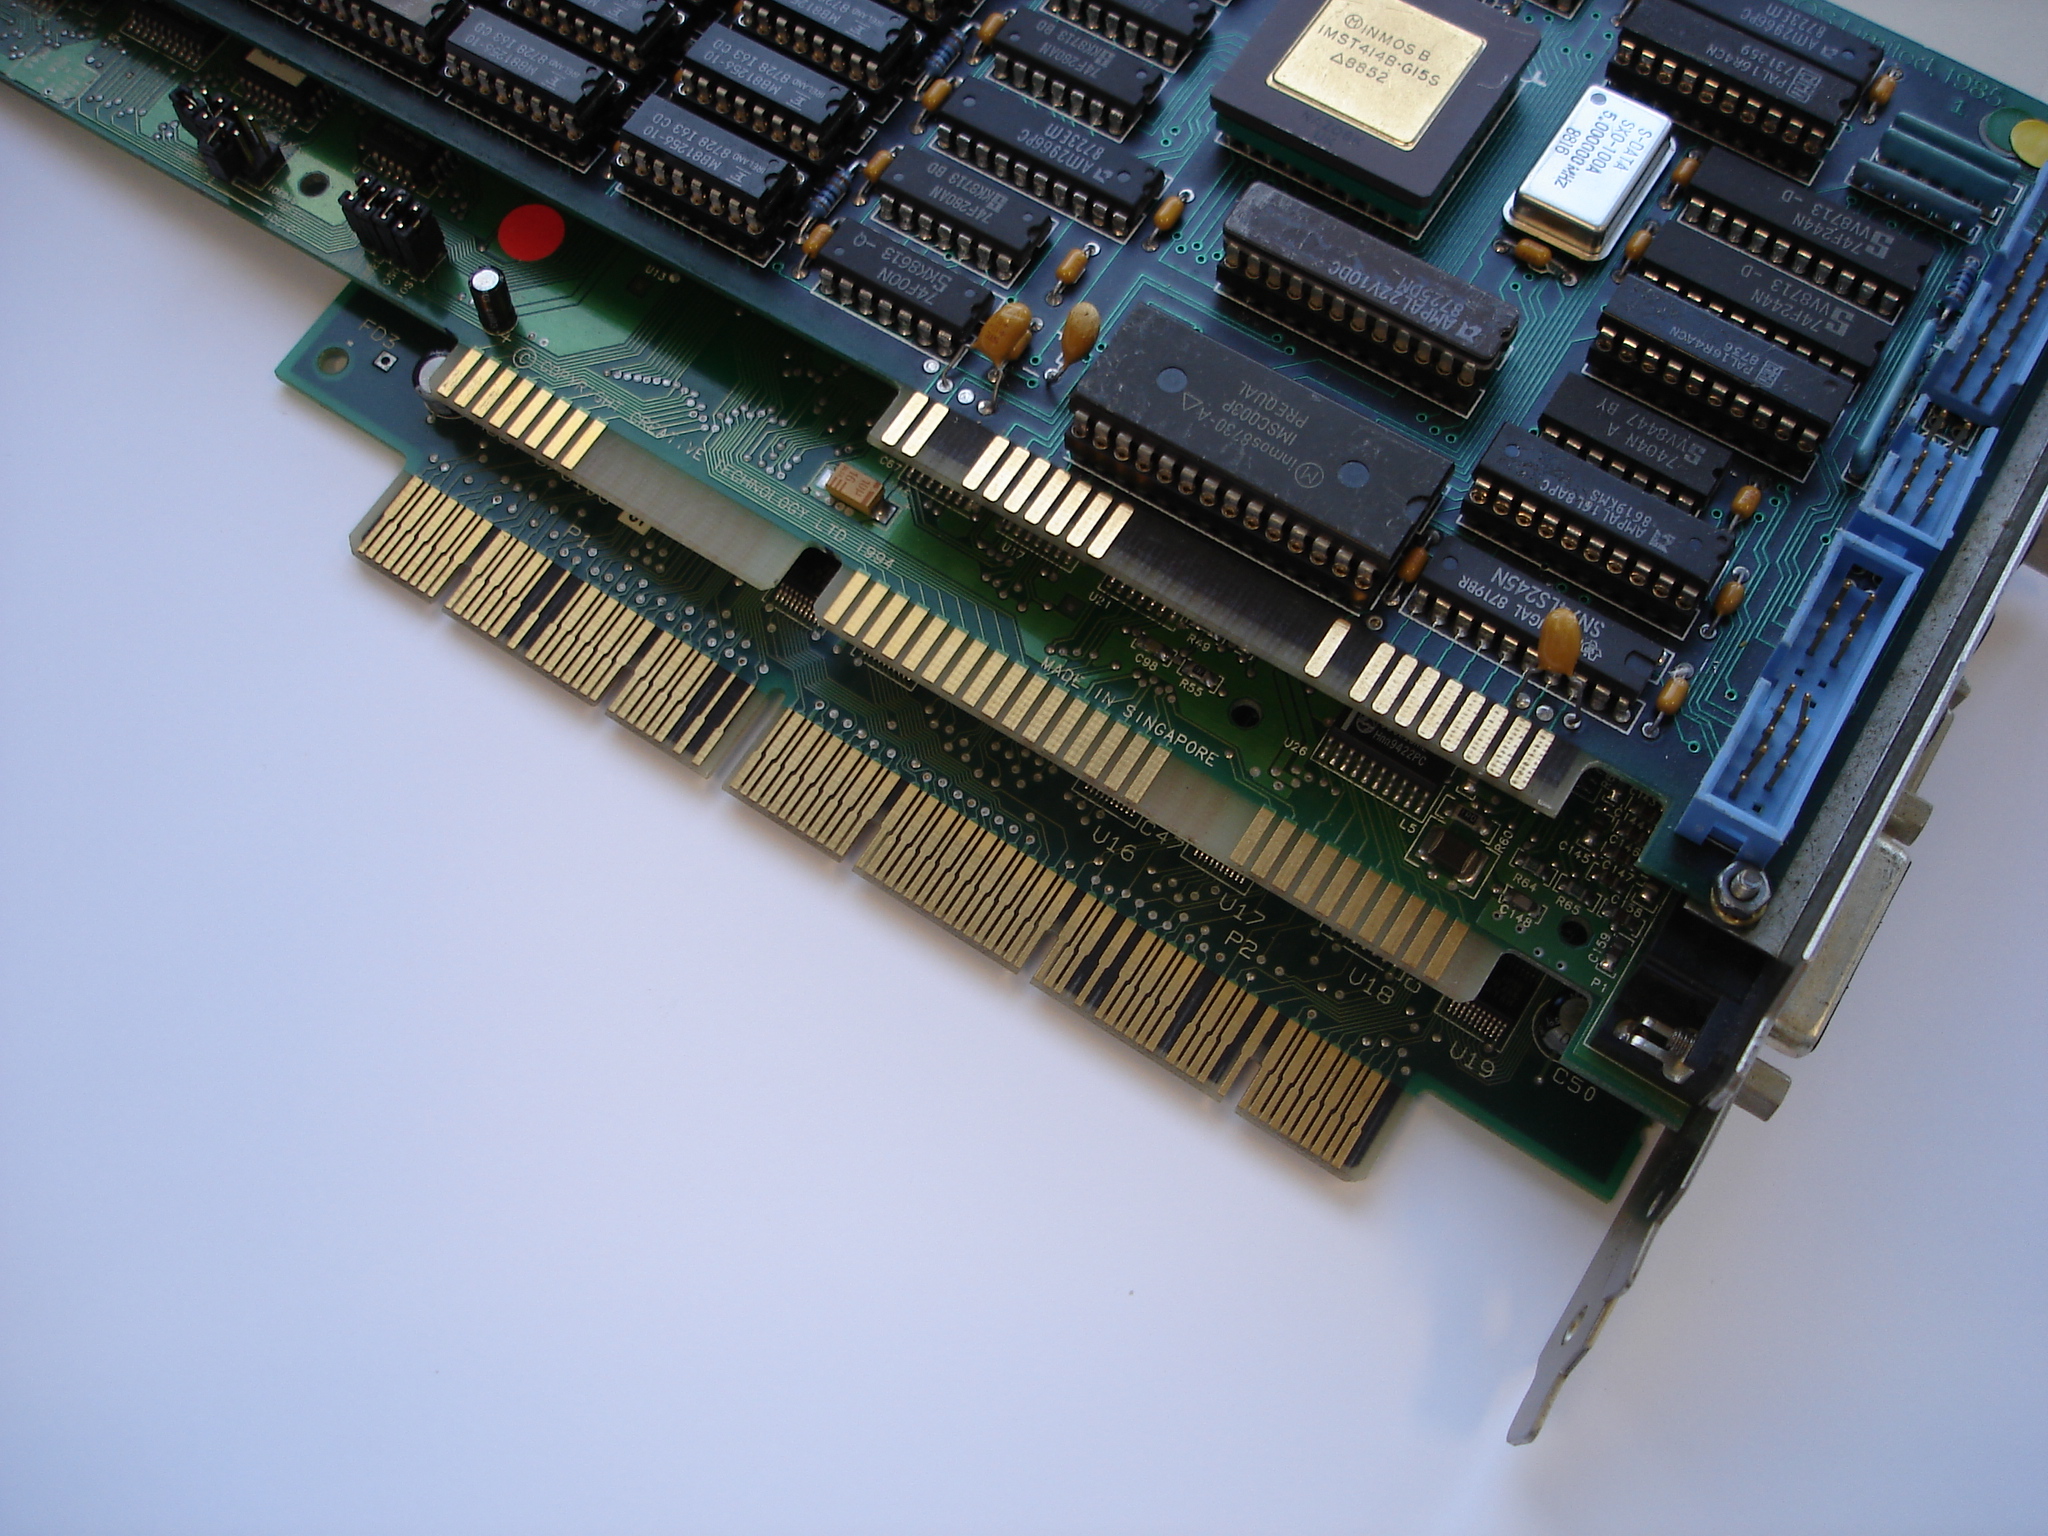
[Heading image: Snark Barker ISA SoundBlaster clone board. Credit: Tube Time]
from Hacker News https://ift.tt/GzJ9qEa
No comments:
Post a Comment
Note: Only a member of this blog may post a comment.