An example feynman diagram of a kaon decay. A kaon, made of an up and strange antiquark, decays both weakly and strongly into three pions, with intermediate steps involving a W boson and a gluon, represented by the blue sine wave and green spiral, respectively. Credit: JabberWok on en.wikipedia
Scientists searching for evidence of new physics in particle processes that could explain dark matter and other mysteries of the universe have moved one step closer, with the new result of the NA62 experiment reported today at CERN.
The experiment, led by an international team of scientists, demonstrates a new technique which captures and measures the ultra rare decay of a sub atomic particle called a kaon.
Their results, presented at a CERN Seminar on Monday 23 September, show how precise measurements of this process could hint at new physics, beyond the Standard Model developed in the 1970s.
The Standard Model is still commonly used to describe the fundamental forces and building blocks of the universe and is a highly successful theory, but there are several mysteries of the universe that the Standard Model does not explain, such as the nature of dark matter, or the origins of the matter-antimatter imbalance in the universe. Physicists have been searching for extensions to the Standard Model that can predict new particles or interactions that can explain these phenomena.
The new measurement was made at the CERN particle physics laboratory by a team led by the University of Birmingham. The aim of the experiment, called NA62, is to study the sub-atomic particles kaons, containing the quark strange, and a particular way in which they transform into other types of particles with odds around 1 in 10 billion.
This process is predicted in detail by the Standard Model with an uncertainty of less than 10 percent, so any deviation from that prediction is an exciting clear sign of new physics. By combining the 2016 and 2017 data sets, the team finds that the relative frequency of this process would be at most 24.4 in 100 billion K+ decays. This combined result is compatible with the Standard Model prediction and allows the team to put limits on beyond-Standard Model theories that predict frequencies larger than this upper bound.
"This kaon decay process is called the 'golden channel' because the combination of being ultra-rare and excellently predicted in the Standard model. It is very difficult to capture, and holds real promise for scientists searching for new physics," explains Professor Cristina Lazzeroni, Professor in Particle Physics at the University of Birmingham, and spokesperson for NA62. "By capturing a precise measurement of the decay we can identify deviations from the Standard Model prediction. The new result has still limited statistics but has already enabled us to begin putting constraints on some new physics models."
The experiment took place over three years at CERN's Prevessin site, in France and involves about 200 scientists from 27 institutions. The aim was to measure precisely how the kaon particle decays into a pion and a neutrino–antineutrino pair using the proton beam from CERN's Super Proton Synchrotron (SPS). The kaons are created by colliding high energy protons from the SPS into a stationary beryllium target. This creates a beam of secondary particles which contains and propagates almost one billion particles per second, about 6% of which are kaons.
Because the process being measured is so rare, the team had to be particularly careful not to do anything that might bias the result. For that reason, the experiment was carried out as a "blind analysis," where physicists initially only look at the background to check that their understanding of the various sources is correct. Only once they are satisfied with that, they look at the region of the data where the signal is expected to be. This "opening of the blind box" was carried out on 10th September at the International Conference on Kaon Physics, KAON2019, held in Perugia, Italy.
Professor Lazzeroni added: "This is a big step forward for the field of particle physics that will enable us to explore new ways to understand our universe. This has been made possible through a huge team effort from all the collaborating institutes and the continuous support of CERN."
The experiment will analyze further data taken in 2018 and publish it next year. There are also plans to take more data to refine the measurement from 2021 when the CERN SPS will restart operation.
Citation: Ultra-rare kaon decay could lead to evidence of new physics (2019, September 23) retrieved 1 August 2020 from https://ift.tt/2m581II
This document is subject to copyright. Apart from any fair dealing for the purpose of private study or research, no part may be reproduced without the written permission. The content is provided for information purposes only.
In this article, I’ll share my motivation for doing 60+ technical interviews in 30 days. More importantly, I’ll share 13 lessons I learned from my failures and my successes.
I’ve grouped the lessons into three categories to match the phases of a typical recruitment process.
While most of the lessons apply directly to software engineers and technical professionals, the principles behind these lessons can be applied to all careers. I hope you find something useful that you can apply to your professional lives.
How did I get started?
“If you’re going to fail, do it fast.” — Unknown
Like any other software engineer, I’ve had different types of technical interviews - from the dreaded whiteboard coding interview to the unreal 45-minute coding challenge on platforms like HackerRank. While some of my experiences in these interviews were great, others were bad. Really bad.
But I wanted to get really good at interviewing. I wanted to learn to overcome the interviewing phobia and exude confidence at interviews. Like a skilled surfer, I wanted to learn to ride the high pressure waves that came with interviews. I was also looking to change jobs at the time.
So from January through early March 2020, I applied to and was contacted by companies based in the US and Europe. From early-stage startups like Coda to later stage startups like Crunchbase, from mid-size companies like Affirm, to bigger companies like Amazon and even remote companies like Webflow.
109+ applications later, I landed myself more than 60 interviews. These comprised more than 60 introductory phone interviews, 50+ technical phone screen interviews, 18 take-home coding projects, 11 coding challenges and 8 on-site interviews including 3 virtual ones.
What did I learn?
For better appreciation, I have grouped the lessons into three categories to match the different phases of a typical recruitment process.
Pre-Interview Phase
This covers everything from the initial contact with a company to the point where the first interview happens.
1. What I learned about applications
When I started applying to companies, I imagined that the more applications I submitted, the higher my chances of getting an interview would be. Seems logical, huh? So I set a target of 5 applications a day, aiming for 1 interview for every 5 applications.
But my strategy didn’t work as I hoped it would. The number of interview requests I got often fell short of my target. It was almost a 1:12 ratio - 1 interview for every 12 applications.
I was faced with the question: do I need to increase my daily target to, say, 10 companies? Or was there something else I needed to change?
With every unsuccessful application, I saw that something needed to change.
That change came when I took a break from meeting my daily numbers and began to think of my applications differently. I began to see each application as a sales pitch to the hiring manager or whoever was going to be reading my application, but here the product being sold was me.
If a company needed to fill a talent gap and I say I had the skills, I needed to find a way to convince them that I did.
My new task then became to find a way to effectively pitch my unique skills, experience and personality in a way that convinced the hiring manager that I was the right fit for the job.
Here is an example of one of such pitches I came up with:
Backed with my resume, this cover letter had a 95% success rate. The one time this didn’t work, the hiring manager still replied to let me know that the position was no longer available but he would like to connect in the future.
The lesson here is, be very intentional about the application you put forward – quality over quantity. Better still do both. Know your unique competencies and experience and present them in a way that matches the company’s needs without sacrificing your personality.
It is also important to understand the peculiarity of the company you are applying to and its specific needs. A startup or a smaller-sized company may have different needs from a bigger company, thus requiring a different skill-set.
Sell yourself and be sure to back your sales pitch during the interview.
2. What I learned about recruiter in-mails
During this period, I received a number of in-mails from recruiters (mostly unsolicited) for open roles, the majority of which were roles I wasn’t interested in.
Granted, it was sometimes a lot given my busy schedule but I learned to be empathetic, understanding that these recruiters were only trying to do their jobs.
I stopped seeing these in-mails as noise in my inbox and started making the effort to reply to all recruiter in-mails, even for positions I was not interested in. By doing this, I succeeded in building a network of recruiters that have become a rich resource if I have to switch roles in the future.
Now I don’t expect you may want to start replying to every in-mail you receive. But it might interest you to know that some of the interview requests I got were from recruiters I had replied to before for roles I wasn’t interested in. It never hurts to reply.
The Interview Phase
This covers everything about the interview itself, cutting across the different interview types.
3. How to handle introductory phone calls
Yes I get it, you’re busy and many things are competing for your time. But hey, you are also an excellent professional, and that means you never get on a phone call without knowing at least these two things:
the first name of your interviewer, and
at least one tangible thing about the company — what they do, where they are located, any recent news, something, anything!
I noticed that for interviews where I put in the effort to make these findings, I always came across as being genuinely interested in the company. That’s something recruiters typically look for in these kinds of interviews.
4. How to handle technical phone screens
The one thing that can almost single-handedly decide how well you do in a technical phone screen interview is your ability to communicate your thoughts clearly.
You may have heard stuff like this before: “The interviewers care about your thought process. Yes they can see your code but importantly, they want to know why you are doing what you’re doing.”
The interviewer isn’t there with you and so does not have the luxury of seeing other non-verbal cues like your hand gestures or nuances. All the interviewer has is your voice as a means of understanding your thought process.
Now you know how you should lead this conversation, the next question is how do you become good at this? Because the truth is, while expressing your thoughts may come naturally to some people, it doesn’t to others – including me.
So – Practice! Practice!! Practice!!!
Practice doing a lot of mock interviews. Doing these mock interviews with friends made me better and more confident in explaining my thought process. But more interestingly, it helped me develop a new mindset about interviews.
I began to see interviews as a conversation with a friend or a team member. I visualized the interviewer on the other end as one of my friends (I sometimes gave the interviewer a name in my head). So what would have been a high-pressure interview I now saw as a friendly ‘chat’ about a technical problem.
This new mindset, aided by the many practice interviews, helped me grow in confidence so much so that I started enjoying interviews, sorry, technical chats. How to get started on a problem
Never start solving a problem without fully understanding the problem statement. You are almost never wrong if you start by asking clarifying questions. It’s also a good sign to your interviewer when you ask those questions rather than run with your assumptions.
5. How to solve the problem
Good candidates know how to solve a problem (e.g. a sorting problem), but the best candidates know multiple solutions to a problem and understand the trade-offs of one solution versus the other.
The interviews where I performed the best (Cruise comes to mind) are the ones where I didn’t just solve the algorithmic challenge – I was also able to provide alternative solutions and discuss the trade-offs.
Aim to provide multiple solutions to a problem, be willing to discuss the trade-offs, and be able to implement at least one of them.
For technical interviews, write clean code. Most interviewers care about your code quality as well as the correctness of your solution. Aim for modular code, separate reusable logic into utility functions, name variables and methods properly, and just be a boss!
6. What to do when you’re stuck on a problem
There will be times when you’re stuck. And this could be caused by a number of reasons: you don’t have the requisite knowledge, incorrect assumptions, missing details, and so on.
I used to think that at such times I was being judged by how fast I could come up with a solution. So I would be quiet, thinking, not communicating with the interviewer, just thinking.
And this is where a lot of us get it wrong. I get it, you need some alone time to think. But sorry to burst your bubble, that alone time is not when you’re being interviewed by a person.
Yes, your interviewer wants to see that you can come up with a solution, but one thing you must not forget is that they also want to see that you can collaborate with other team-mates to come up with a solution. While companies want rock-stars, they also want team-players.
Since your interviewer is a friend, a buddy, a team member who’s on your side and means well for you (Refer to 4), talk to them while you're figuring it out.
Share your thought process up till the point you got stuck and do it confidently, not like some cry for help. By doing so you just may uncover the solution, as was the case during my interview with Coda.
7. How to handle coding challenges
The lessons here apply to interviews that take the form of coding challenges on platforms like Hackerrank, Codility, and so on. Typically these are timed challenges, say 45 minutes or sometimes could be more.
Some of the lessons I shared earlier are useful here, while others like asking clarifying questions don’t apply since there’s no one to ask. So here are some steps I recommend:
Read through and fully understand the problem.
Write code that works first, even if it’s a brute-force algorithm. It may not pass all the test cases but get some working code out there first, hopefully within the first 15–20 minutes.
Test your code with different input types, as this helps you handle edge cases.
Optimize for efficiency (runtime and space complexity).
Repeat Steps 4 and 5, till the very last minute.
A good grasp of computer science fundamentals is key here. I’ve added some links to helpful resources in the Resources section below.
8. How to handle take-home projects
Take home projects are an opportunity to really shine because you have more time. This also means they can be time-consuming.
One of the companies I interviewed with provided hourly pay, about $68/hr, for the number of hours you worked on their take-home project — it’s that serious, so you should be serious about it. Be sure you really want to be a part of a company before investing your time in the take-home projects.
Never compromise on code quality for take-home projects. Be very intentional about your design decisions, naming conventions, code structure and so on, and be ready to defend your choices.
During my interview with Course Hero, I used regex to solve a problem I could have solved using a simpler string parsing algorithm. It turned out to be a bad decision as I didn’t pass the interview.
The lesson: only use tools you’re very comfortable with and have a lot of experience with.
10. How to approach on-site interviews
Get a good night's sleep the night before. Arrive early on the day of your interview and smile a lot (it helps portray confidence, but more importantly helps you stay relaxed and be in control).
Confront your fears and accept that even if this doesn’t work out it’s not going to be the end of the world – after all you’re just going to have another technical chat. Then go in and absolutely chat away.
11. How to approach virtual on-site interviews
These can be very different from on-site interviews because everybody’s eyes are on you – literally – and that can be nerve-racking.
I had three virtual on-site interviews and I didn’t pass any of them. Sorry I’m not your guy for this one, but I’ve shared some resources that I think you may find helpful below.
After the Interview
12. How to handle failure
There are many reasons why you didn’t pass an interview. Some of the best engineers I know have failed interviews at some point and still do.
So separate failed interviews from yourself, look for the learning points from each failed interview, and use those to forge ahead. As they say – we move!
13. What about success?
Celebrate your successes, regardless of how small you think they are. I have a few ideas for celebration.
Am I better after doing this?
I’m not going to tell you that I've aced every interview that has come my way since I embarked on this journey. But assuredly, I can tell you I have gotten better at interviewing and my confidence levels have really grown. And yes, I also got multiple offers too 😊.
What should you do next?
Practice doing a lot of mock interviews with friends. While I don’t totally agree that practice makes perfect (because perfection sounds like a moving target to me) practice helps you quickly identify patterns in interview questions, grow in mastery and ultimately your confidence.
For technical interviews, nothing beats a very good understanding of the fundamentals of data structures and algorithms. I’ve added links to resources I think you may find helpful.
Start interviewing and keep interviewing. Even if you have a job, aim to interview every now and then — maybe once every other month or a quarter. Interviewing is a skill, so keep honing it.
I really hope this was helpful to you. And hopefully some of the lessons shared here will make you more confident and better at interviewing – and will ultimately help you land that job you really want.
If you ever need someone to do a mock interview with you, feel free to reach out to me on Twitter @meekg33k.
By coincidence, right when The Cherno announced his game engine series I was just starting to get going on my own engine. I couldn’t wait to finally have a professional opinion on how to make one. With self-taught programming it’s hard to not doubt yourself constantly, wondering if you are doing things right or just think you are.
Recently, he has been posting videos about huge aspects of his engine like physics and entity systems, which were what I really wanted to learn about by making myself, but he ended up using libraries instead of going through the internals! I am not against using libraries, but to use them for the fun stuff? I felt like it defeated the point of making a custom engine series.
There is an argument to be made about saving time, but this was the first C++ project that I was making and the goal from the start was to go through all the major pillars of an engine: input, graphics, physics, entities, and audio. I wanted to learn how those things worked along with C++ and code design in general.
I bet that some other people are interested in the details of how these systems work, and I want to learn how to explain code better, so I am going to try and make some videos going over the internals of these systems. They end up being much simpler than at first glance.
Let’s start with the physics engine…
Physics engines are responsible for figuring out where each object in a scene is over time. Objects can collide with one another, then choose to respond in several ways. It’s a generic problem that the user can configure at several different levels. Do they want a collider? Do they want to respond to collisions? Do they want to simulate dynamics? They could want dynamics, but not gravity. It’s a problem that calls for good planning and robust design.
I looked at how bullet and box2d went about sorting their engines and concluded that the way bullet went about it was solid. I boiled it down to just what was needed, and based my design around that. There are already some great articles going over the hard math involved, so I am going to focus on the design aspect instead because I haven’t seen anyone do that, and it’s also a real headache.
At the current moment, this physics engine is not fully featured, but in future articles I plan to build it out further. This article will not cover rotation, multiple contact point collisions, or constrained simulation. I think it will work out for the best as it’s easy to get overwhelmed, and I want to ease into those topics. With that out of the way, let’s dive into the different parts of a physics engine.
The problem can be split into 2 or 3 pieces, dynamics, collision detection, and collision response. I’ll start with dynamics because it is by far the simplest.
Dynamics
Dynamics is all about calculating where the new positions of objects are based on their velocity and acceleration. In high school you learn about the four kinematic equations along with Newton's three laws which describe the motion of objects. We’ll only be using the first and third kinematic equations, the others are more useful for analysis of situations, not simulation. That leaves us with:
v = v_0+at\Delta x = v_0t + \frac{1}{2}at^2
We can give ourselves more control by using Newtons 2nd law, subbing out acceleration giving us:
v = v_0+\frac{F}{m}tx = x_0+vt
Each object needs to store these three properties: velocity, mass, and net force. Here we find the first decision we can make towards the design, net force could either be a list or a single vector. In school you make force diagrams and sum up the forces, implying that we should store a list. This would make it so you could set a force, but you would need to remove it later which could get annoying for the user. If we think about it further, net force is really the total force applied in a single frame, so we can use a vector and clear it at the end of each update. This allows the user to apply a force by adding it, but removing it is automatic. This shortens our code and gives a performance bump because there is no summation of forces, it’s a running total.
We’ll use this struct to store the object info for now.
structObject{vector3Position;// struct with 3 floats for x, y, z or i + j + kvector3Velocity;vector3Force;floatMass;};
We need a way to keep track of the objects we want to update. A classic approach is to have a physics world that has list of objects and a step function that loops over each one. Let’s see how that might look; I’ll omit header/cpp files for brevity.
classPhysicsWorld{private:std::vector<Object*>m_objects;vector3m_gravity=vector3(0,-9.81f,0);public:voidAddObject(Object*object){/* ... */}voidRemoveObject(Object*object){/* ... */}voidStep(floatdt){for(Object*obj:m_objects){obj->Force+=obj->Mass*m_gravity;// apply a forceobj->Velocity+=obj->Force/obj->Mass*dt;obj->Position+=obj->Velocity*dt;obj->Force=vector3(0,0,0);// reset net force at the end}}};
Note the use of pointers, this forces other systems to take care of the actual storing of objects, leaving the physics engine to worry about physics, not memory allocation.
With this you can simulate all sorts of stuff from objects flying through the sky to solar systems.
You can do a lot with this, but it’s the easy part to be honest, and that’s not what you came for…
Collision detection
Collision detection is more involved, but we can lighten the load by using some clever tricks. Let’s think about what needs to be found first. If we look at some examples of objects colliding, we notice that in most cases there is a point on each shape that is furthest inside the other.
This turns out to be all we need to respond to a collision. From those two points we can find the normal, and how deep the objects are inside one another. This is huge because it means that we can abstract the idea of different shapes away, and only worry about the points in the response.
Let’s jump into the code, we’ll need some helper structs that I’ll note first.
structCollisionPoints{vector3A;// Furthest point of A into Bvector3B;// Furthest point of B into Avector3Normal;// B – A normalizedfloatDepth;// Length of B – AboolHasCollision;};structTransform{// Describes an objects locationvector3Position;vector3Scale;quaternionRotation;};
Each shape will have a different type of collider to hold its properties and a base to allow them to be stored. Any type of collider should be able to test for a collision with any other type, so we’ll add functions in the base for each one. These functions will take Transforms, so the colliders can use relative coordinates. I’ll only demonstrate spheres and planes, but the code is repeatable for any number of colliders.
Let’s make both types of colliders at the same time too see how they interact. A sphere is defined as a point and a radius, and a plane is defined as a vector and a distance. We’ll override the functions from Collider, but won’t worry about the work for now.
We can choose per collider which other colliders it will detect by filling, or not filling, in these functions. In this case, we don’t want Plane v Plane collisions, so we return an empty CollisionPoints.
We can add a function for testing the base and use a technique called double dispatch. This takes advantage of the type system to determine both types of colliders for us by swapping the arguments, determining the first, then the second type through two calls of TestCollision. This saves us needing to know what type of colliders we are checking, which means we’ve fully abstracted away the notion of different shapes outside the collision detection.
structPlaneCollider:Collider{vector3Plane;floatDistance;CollisionPointsTestCollision(constTransform*transform,constCollider*collider,constTransform*colliderTransform)constoverride{returncollider->TestCollision(colliderTransform,this,transform);}CollisionPointsTestCollision(constTransform*transform,constSphereCollider*sphere,constTransform*sphereTransform)constoverride{// reuse sphere codereturnsphere->TestCollision(sphereTransform,this,transform);}CollisionPointsTestCollision(constTransform*transform,constPlaneCollider*plane,constTransform*planeTransform)constoverride{return{};// No plane v plane}};
In cases like this, where there are many classes with a web of similar functions, it can be confusing as to where the actual code is located. Sphere v Sphere would obviously be in the Sphere.cpp file, but Sphere v Plane could be in either Sphere.cpp or Plane.cpp, there is no way to know without hunting, which gets annoying when there are many files.
To get around this lets let’s make an algo namespace and put the actual work in there. We’ll need a function for each pair of colliders we want to be able to check. I’ve made a Sphere v Sphere, Sphere v Plane, but not Plane v Plane because it’s not so useful. I’m not going to cover these functions here because they are not part of the design per se, but you can check out the source if you are interested.
You can use these colliders on their own, but most likely want to attach one to an object. We’ll replace Position with a Transform in the Object. We are still only using position in the dynamics but can use scale and rotation in the collision detection. There is a tricky decision to make here. I’m going to use a Transform pointer for now, but we’ll come back to this at the end and see why that might not be the best choice.
A good design practice is to separate all the different aspects of complex functions like Step into their own. This makes the code much more readable, so let’s add another function named ResolveCollisions in the physics world.
This is looking good, because of that double dispatch there is no need for anything other than a single call to TestCollision. Using a break in the for loop gives us the unique pairs, so we never check the same objects twice.
There is only one annoying caveat which is that because the order of the objects is unknown, sometimes you will get a Sphere v Plane check, but others will be a Plane v Sphere check. If we just called the algo function for Sphere v Plane, we would get the reverse answer, so we need to add some code in the plane collider to swap the order of the CollisionPoints.
CollisionPointsPlaneCollider::TestCollision(constTransform*transform,constSphereCollider*sphere,constTransform*sphereTransform)const{// reuse sphere codeCollisionPointspoints=sphere->TestCollision(sphereTransform,this,transform);vector3T=points.A;// You could have an algo Plane v Sphere to do the swappoints.A=points.B;points.B=T;points.Normal=-points.Normal;returnpoints;}
Now that we have detected a collision, we need some way to react to it.
Collision Response
Because we have abstracted away the idea of different shapes into points, the collision response is almost pure math. The design is relatively simple compared to what we just went through; we’ll start with the idea of a solver. A solver is used to solve things about the physics world. That could be the impulse from a collision or raw position correction, really anything you choose to implement.
We’ll need another list in the physics world to store these, and functions to add and remove them. After we generate our list of collisions, we can feed it to each solver.
In the last section the meat was in the design, this one leans much more towards what kinds of solvers you implement. I’ve made an impulse & position solver myself that seem to work for most situations. To keep this short, I won’t cover the math here, but you can check out the source for the impulse solver here, and the position solver here if you are interested.
Let’s see a demo!
More Options
The real power of a physics engines comes from the options that you give to the user. In this example there aren’t too many that can be changed, but we can start to think about the different options we want to add. In most games you want a mix of objects, some that simulate dynamics, and others that are static obstacles. There is also a need for triggers, objects that don’t go through the collision response, but fire off events for exterior systems to react to, like an end of level flag. Let’s go through some minor edits we can make to allow these settings to be easily configured.
The biggest change we can make is to distinguish between objects that simulate dynamics and ones that don’t. Because of how many more settings a dynamic object needs, let’s separate those out from what is necessary for collision detection. We can split Object into CollisionObject and Rigidbody structs. We’ll make Rigidbody inherit from CollisionObject to reuse the collider properties and allow us to store both types easily.
We are left with these two structs. A dynamic_cast could be used to figure out if a CollisionObject is really a Rigidbody, but will make code slightly longer, so I like to add a boolean flag even through it’s not considered best practice. We can also add a flag for the object to act as a trigger and a function for a callback. While we’re at it, let’s beef up the security by protecting the raw values.
structCollisionObject{protected:Transform*m_transform;Collider*m_collider;boolm_isTrigger;boolm_isDynamic;std::function<void(Collision&,float)>m_onCollision;public:// getters & setters, no setter for isDynamic};
We can add many more settings to the Rigidbody. It’s useful if each object has its own gravity, friction, and bounciness. This opens the door to all sorts of physics based effects. In a game you could have an ability that changes the gravity in an area for a time. You could have some objects be bouncy and other like weight balls. A floor could be made of ice and be slippy for a harder challenge.
structRigidbody:CollisionObject{private:vector3m_gravity;// Gravitational accelerationvector3m_force;// Net forcevector3m_velocity;floatm_mass;boolm_takesGravity;// If the rigidbody will take gravity from the world.floatm_staticFriction;// Static friction coefficientfloatm_dynamicFriction;// Dynamic friction coefficientfloatm_restitution;// Elasticity of collisions (bounciness)public:// getters & setters};
Let’s split the PhysicsWorld into a CollisionWorld and a DynamicsWorld as well. We can move the Step function into the DynamicsWorld, and ResolveCollisions into the CollisionWorld. This saves someone who doesn’t want dynamics from sifting through functions that are useless to them.
We can make some edits to ResolveCollisions function to give triggers their correct functionality. Let’s split the function into its parts to keep it readable. Adding a callback to the world can be useful too if you want program wide events.
Now we have a whole stack of options that the user can configure for many different scenarios with a simple yet powerful API.
There is one more option that I want to cover. The physics world has no need updating every frame. Say a game like CS:GO gets rendered at 300 fps. It’s not checking the physics every frame; it might run at 50 Hz instead. If the game only used the positions from the physics engine, objects would have .02 seconds between each update, causing a jittery look. And that’s an ideal rate, some games will only update at 20 Hz leaving .05 seconds between update!
To get around this, it is common to split the physics world from the rendered world. This is simply done by using a raw Transform instead of a pointer and having a system outside the physics interpolate the position every frame. Let’s see how we might implement this.
First, we’ll get rid of that pointer. We’ll need to add a last transform as well which will gets set just before the update in MoveObjects.
structCollisionObject{protected:Transformm_transform;Transformm_lastTransform;Collider*m_collider;boolm_isTrigger;boolm_isStatic;boolm_isDynamic;std::function<void(Collision&,float)>m_onCollision;public:// Getters & setters for everything, no setter for isDynamic};
Because we used getters and setters, this won’t break any code outside the CollisionObject. We can make an exterior system that keeps track of how far it is into the physics update and use a linear interpolation between the last and current position. I’m not going to go into where to put this system, but it should update every frame rather than every physics update.
This system smoothy moves the objects between their positions in the physics engines every frame, removing all jittery artifacts from the movement.
And that’s the final result. I hope you can use the principles from this article to get a better idea of how to lay out complex systems in nimble ways, or even make your own engine. There is a lot more to cover, but I’ll leave it to a part 2 because this is getting long. Let me know what you thought, should I keep focusing on design, or dive deeper into the math behind the implementations?
Thanks for reading, I hope to catch you next time!
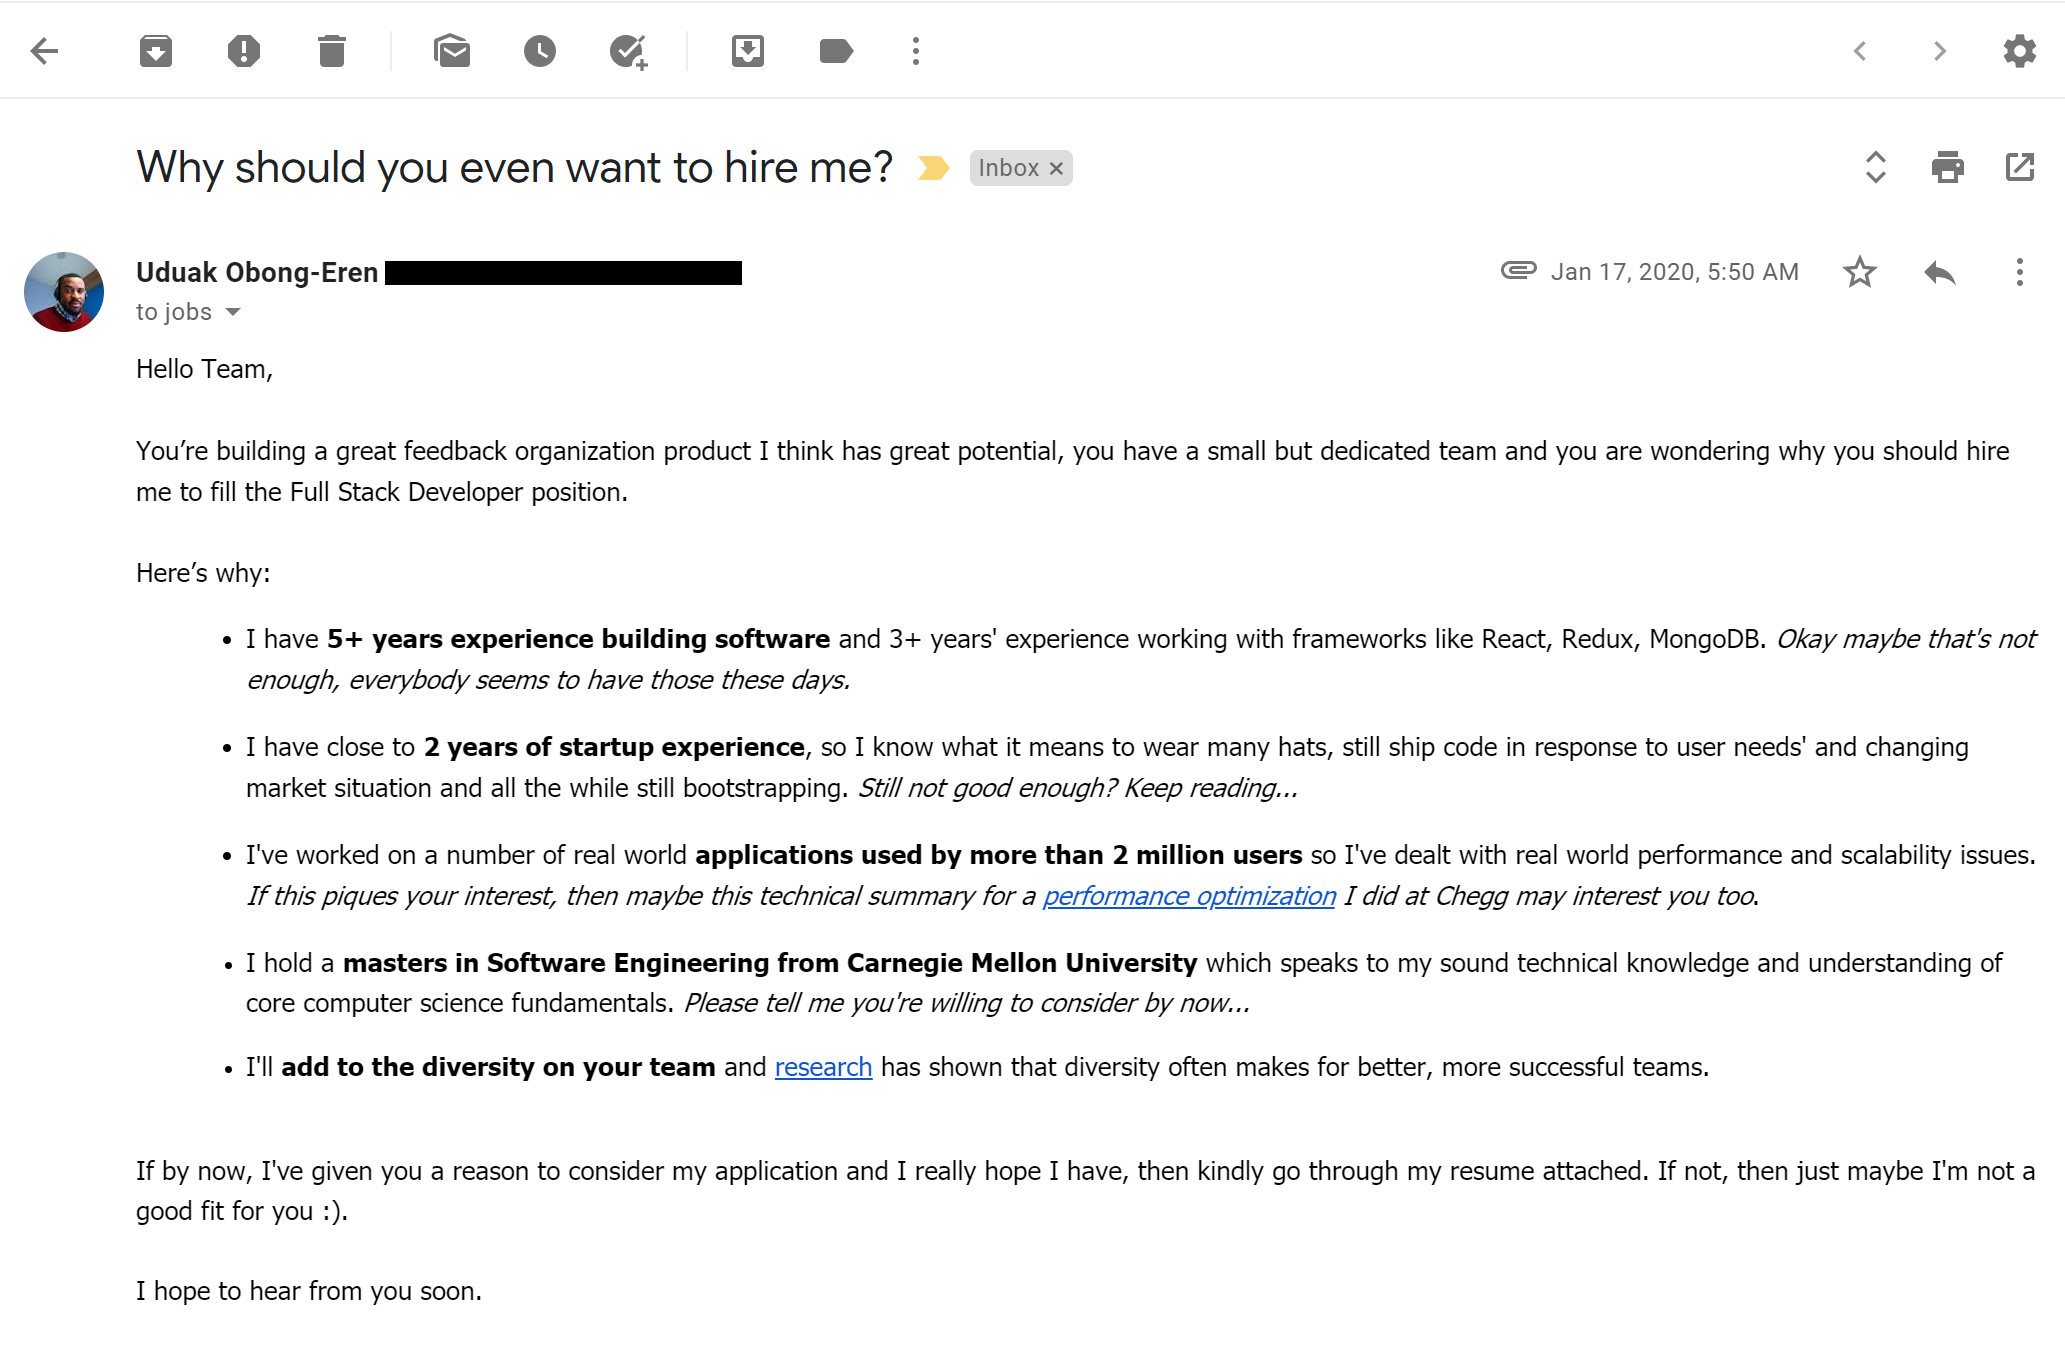
We're already accustomed to data being encrypted while at rest or in flight—FHE offers the possibility of doing computations on it as well, without ever actually decrypting it.
Yesterday, Ars spoke with IBM Senior Research Scientist Flavio Bergamaschi about the company's recent successful field trials of Fully Homomorphic Encryption. We suspect many of you will have the same questions that we did—beginning with "what is Fully Homomorphic Encryption?"
FHE is a type of encryption that allows direct mathematical operations on the encrypted data. Upon decryption, the results will be correct. For example, you might encrypt 2, 3, and 7 and send the three encrypted values to a third party. If you then ask the third party to add the first and second values, then multiply the result by the third value and return the result to you, you can then decrypt that result—and get 35.
You don't ever have to share a key with the third party doing the computation; the data remains encrypted with a key the third party never received. So, while the third party performed the operations you asked it to, it never knew the values of either the inputs or the output. You can also ask the third party to perform mathematical or logical operations of the encrypted data with non-encrypted data—for example, in pseudocode, FHE_decrypt(FHE_encrypt(2) * 5) equals 10.
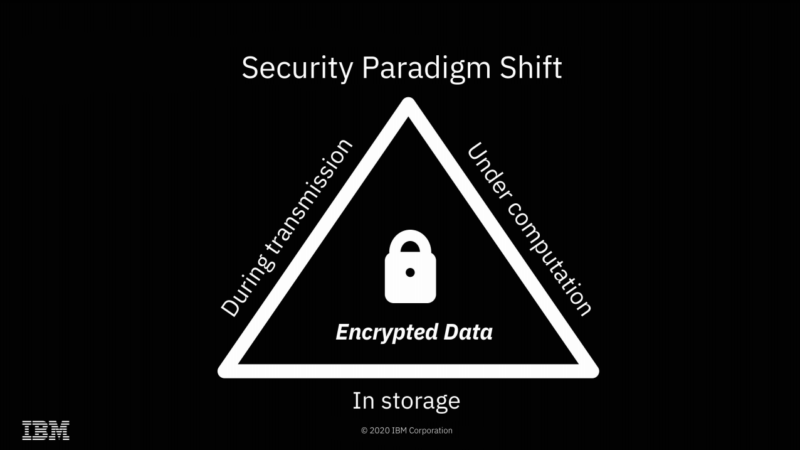
The most obvious application of FHE is solving what I like to call "the sysadmin problem"—preventing secret discovery by root-privileged operators.
IBM
The most obvious implication of FHE is a solution to what I like to call "the sysadmin problem"—if you do your computation on a system managed by a third party, the root-privileged operators at the third party generally have access to the data. Encryption at rest prevents access to the data outside the scope of whatever computation is going on at that specific moment—but with root privileges, a system operator can scan or alter the contents of RAM to gain access to whatever data is currently being operated on.
With FHE, you can perform those calculations without the actual data ever being exposed to the remote system at all. Obviously, this solves the sysadmin problem pretty thoroughly—when the machine itself never has access to the decrypted data, neither do its operators.
Of course, FHE isn't the first solution to the sysadmin problem—AMD's
is another, and it's considerably more efficient. With SEV enabled, an operator who has root privilege on a host system can't inspect or meaningfully alter the contents of RAM in use by a virtual machine running on that system. SEV is, effectively, free—SEV-protected VMs don't operate any more slowly than non-protected VMs do.
It's hard to come up with all the possibilities of fully homomorphic encryption off the top of your head—so here are a few to get us started.
IBM
Fully Homomorphic Encryption offers many possibilities that Secure Encrypted Virtualization does not, however. Since all mathematical and logical operations can be built from additive and multiplicative operations, this effectively means that any computation can be performed upon FHE encrypted data. This opens a dizzying array of possibilities: one might search a database without ever letting the database owner know what you searched for or what the result was. Two parties might discover the intersection set of their separately held datasets without either party revealing the actual contents of their data to the other.
"Secure outsourcing" is the only one of these archetypes that is possible without Fully Homomorphic Encryption. It's worth spending most of our time focusing on the other three, which do require it—because FHE comes at a significant cost.
Homomorphic Encryption limitations
This is a multiplicative scale, not a percentage scale—you're looking at, in many cases, 42x the computational power and 10-20x the memory needed to perform ML operations on FHE encrypted data.
The true/false positive prediction curves on the left are similar, but not identical—the FHE encryption itself isn't lossy, but it's operating on floating point data, which is.
This diagram of a cloud-based machine-learning and inference setup demonstrates how both storage and computation can be done on private models by untrusted third parties.
Although Fully Homomorphic Encryption makes things possible that otherwise would not be, it comes at a steep cost. Above, we can see charts indicating the additional compute power and memory resources required to operate on FHE-encrypted machine-learning models—roughly 40 to 50 times the compute and 10 to 20 times the RAM that would be required to do the same work on unencrypted models.
In the next image, we can see that the result curves of a machine-learning prediction task are very nearly identical whether the operations were done on data in the clear or on FHE-encrypted data. We wondered about the remaining difference—was FHE a little bit lossy? Not exactly, Bergamaschi explained. The model in use is based on floating-point data, not integer—and it's the floats themselves that are a little lossy, not the encryption.
Each operation performed on a floating-point value decreases its accuracy a little bit—a very small amount for additive operations, and a larger one for multiplicative. Since the FHE encryption and decryption themselves are mathematical operations, this adds a small amount of additional degradation to the accuracy of the floating-point values.
We should stress that these charts are only directly applicable to machine learning, and not every task lending itself to FHE is a machine-learning task. However, other tasks present their own limitations—for example, we spent some time going back and forth over how a blind search (one in which the search operator knows neither what you searched for nor the result it gave you) could work.
Normally, if you query a database, the database doesn't need to do a full text search on every row in the table(s) being queried—the table(s) will be indexed, and your search can be tremendously accelerated by use of those indices. If you're running a blind search using an FHE-encrypted value, however, your encrypted query must be masked against every full-text row in the queried table(s).
In this way, you can both submit your query and get your result without the database operator possessing knowledge of either—but that full-text read and masking operation against every single row in the queried tables won't scale very well, to say the least. How much of a problem this is depends greatly on the type of data being queried and how much of it there is—but we're probably looking at machine learning's 50:1 compute penalty and 20:1 memory penalty all over again, if not worse.
Successful field trials
IBM has completed two field trials of FHE with real data in the financial industry—one with a large American bank, and one with a large European bank.
This diagram of the FHE trial with a large American bank demonstrates using machine-learning models against financial data to determine likelihood of a loan being issued.
As daunting as the performance penalties for FHE may be, they're well under the threshold for usefulness—Bergamaschi told us that IBM initially estimated that the minimum efficiency to make FHE useful in the real world would be on the order of 1,000:1. With penalties well under 100:1, IBM contracted with one large American bank and one large European bank to perform real-world field trials of FHE techniques, using live data.
The American trial involved was based upon using machine-learning models to predict the likelihood of a loan being issued and given access to retail banking, loan, and investment information for a large group of customers. The dataset consisted of 364,000 entries, with several hundred features—and the model needed to identify relatively rare events (about 1 percent) in the dataset. Success for the trial was based on the encrypted predictions having similar accuracy to baseline, variable selection with similar accuracy, and acceptable compute overhead.
We don't have as much detail about the European study, as it's still under NDA—but the results of the American study were published in 2019 and can be viewed in detail at the Cryptology ePrint archive.
IBM's Homomorphic Encryption algorithms use lattice-based encryption, are significantly quantum-computing resistant, and are available as open source libraries for Linux, MacOS, and iOS. Support for Android is on its way.
Cortana is continuing to redefine the nature of a digital assistant, with new AI-powered experiences in Microsoft 365 that are accelerating productivity to help save you time and focus on the things that matter most.
As we make this shift toward a transformational AI-powered assistant experience in Microsoft 365, we need to adjust our focus areas of innovation and development to give our customers assistance where they need it most. As a result, we are making changes to some U.S. consumer-centric features and functionalities with lower usage.
In addition, after careful consideration, we’ve decided to end support for the Cortana service integration in the Harman Kardon Invoke speaker in January 2021. We know that most of our customers primarily use the Invoke to play music because of its premium quality sound. To make sure you can keep listening to music or your favorite podcasts, we’ve worked closely with Harman Kardon to create a Bluetooth-enabled device transition plan that we hope will help ease the impact of this change.
Customers who receive a firmware update from Harman Kardon in early 2021 will still be able to continue listening to their favorite music, podcasts, and radio stations on their Invoke via Bluetooth. The firmware update will be delivered automatically to devices connected to Wi-Fi within six months of its release. Once the Invoke is updated, Cortana will no longer be accessible on the device.
Additionally, we are offering the opportunity to receive one Microsoft $50 gift card per active Invoke to the owner of the latest U.S.-based Microsoft account used to set up an Invoke speaker that sent a voice request to the Cortana service after July 31, 2019, and prior to this announcement. You can see additional details of this offer on the Invoke support page.
Also in 2021, Cortana in Surface Headphones will continue pivoting toward its mission to help customers with productivity throughout their day. While we’ll be removing support for the previous version of Cortana in the first version of Surface Headphones, you’ll still be able to use both versions of Surface Headphones, as well as the new Surface Earbuds, to tap into Cortana via Outlook mobile to manage your inbox and schedule with the Play My Emails feature. Owners of first-generation Surface Headphones can learn more about a Microsoft gift card program on our support page.
We’ve spent a lot of time thinking through this transition and understand that these changes may be disruptive to some of our customers. We look forward to continuing to innovate on ways Cortana can help you navigate the modern workplace so you can save time and focus on the things that matter most in your day.
Alacritty is a terminal emulator with a strong focus on simplicity and performance. With such a strong focus on performance, included features are carefully considered and you can always expect Alacritty to be blazingly fast. By making sane choices for defaults, Alacritty requires no additional setup. However, it does allow configuration of many aspects of the terminal.
Default Command+N keybinding for SpawnNewInstance on macOS
Vi mode for regex search, copying text, and opening links
CopySelection action which copies into selection buffer on Linux/BSD
Option cursor.thickness to set terminal cursor thickness
Font fallback on Windows
Support for Fontconfig embolden and matrix options
Opt-out compilation flag winpty to disable WinPTY support
Scrolling during selection when mouse is at top/bottom of window
Expanding existing selections using single, double and triple click with the right mouse button
Support for gopher and gemini URLs
Unicode 13 support
Option to run command on bell which can be set in bell.command
Fallback to program specified in $SHELL variable on Linux/BSD if it is present
Block cursor is no longer inverted at the start/end of a selection
Preserve selection on non-LMB or mouse mode clicks
Wayland client side decorations are now based on config colorscheme
Low resolution window decoration icon on Windows
Mouse bindings for additional buttons need to be specified as a number not a string
Don't hide cursor on modifier press with mouse.hide_when_typing enabled
Shift + Backspace now sends ^? instead of ^H
Default color scheme is now Tomorrow Night with the bright colors of Tomorrow Night Bright
Set IUTF8 termios flag for improved UTF8 input support
Dragging files into terminal now adds a space after each path
Default binding replacement conditions
Adjusted selection clearing granularity to more accurately match content
To use the cell's text color for selection with a modified background, the color.selection.text variable must now be set to CellForeground instead of omitting it
URLs are no longer highlighted without a clearly delimited scheme
Renamed config option visual_bell to bell
Moved config option dynamic_title to window.dynamic_title
Selection not cleared when switching between main and alt grid
Freeze when application is invisible on Wayland
Paste from some apps on Wayland
Slow startup with Nvidia binary drivers on some X11 systems
Display not scrolling when printing new lines while scrolled in history
Regression in font rendering on macOS
Scroll down escape (CSI Ps T) incorrectly pulling lines from history
Dim escape (CSI 2 m) support for truecolor text
Incorrectly deleted lines when increasing width with a prompt wrapped using spaces
Documentation for class in --help missing information on setting general class
Linewrap tracking when switching between primary and alternate screen buffer
Preservation of the alternate screen's saved cursor when swapping to primary screen and back
Reflow of cursor during resize
Cursor color escape ignored when its color is set to inverted in the config
Fontconfig's autohint and hinting options being ignored
Ingoring of default FreeType properties
Alacritty crashing at startup when the configured font does not exist
Font size rounding error
Environment variable RUST_LOG for selecting the log level
A court has issued a final ruling denying fan-funding platform Patreon’s request for an injunction against 72 former backers of comedian Owen Benjamin who are seeking arbitration against the company for disrupting the economic relationship between themselves and Benjamin.
The final ruling follows a tentative ruling against Patreon from earlier this month and means that the company now has to pay upfront filing fees on each of the 72 individual arbitration claims within 30 days of the due date on the invoice. These fees can be upwards of $10,000 per arbitration.
When the arbitration commences, Patreon will also have to pay further legal fees and have a rolling obligation to pay them within 30 days. Lawyer, commentator, and producer Mike Cernovich has predicted that these fees could be as high as $20 million.
In the final ruling, the court cited three reasons for denying Patreon’s request for an injunction.
Double your web browsing speed with today's sponsor. Get Brave.
First, the court wrote that Patreon “fails to show that it will suffer any irreparable injury or interim harm” if it’s not granted the injunction and noted that “merely having to incur expense in order to participate in arbitration proceedings is not irreparable harm.”
Second, the court wrote that “Patreon fails to show a reasonable likelihood of prevailing on its claims” and added that even if the claims are “not arbitrable,” “those issues are for the arbitrators, not the court, to decide.”
Third, the court wrote that “California courts rarely grant the extraordinary relief Patreon seeks here” and noted that once a dispute is submitted to arbitration, “the [California Arbitration Act] contemplates limited, if any, judicial involvement.” The court added that “typically, those who enter into arbitration agreements expect that their dispute will be resolved without necessity for any contact with the courts” and “that conclusion is ‘especially true’ where, as here, ‘the arbitration began without the need to seek a court order compelling arbitration.'”
Not only does the ruling mean Patreon has to pay these likely substantial fees but the ruling also gives users a legal avenue to defend against censorship under this California arbitration law.
Under this law, the drafting party of employment or consumer arbitration agreements has to pay the arbitration fees and they can’t reclaim the fees, regardless of the outcome. This means that companies such as Patreon, that force arbitration through their terms of service, risk potentially huge arbitration fees when they ban users because the former backers of these users can seek arbitration over “tortious interference” (disrupting the economic relationship between the creators and their backers).
For deplatformed users that had hundreds or thousands of backers when they were banned, this could leave these companies liable for millions of dollars in arbitration fees.
Lawyer Nick Rekieta said that this case is likely to act as a warning to Big Tech companies that deplatform their users:
“This is an extremely important case and what just happened is a shot across the bow of Big Tech companies. Your terms of service are binding upon you at least in so far as these arbitration and anti-class action provisions and we can use them against them.
That is important because this is how we defend ourselves from things like deplatforming, from things like cancel culture, and it is a big win in this sphere.
Even if they [Benjamin’s former backers] end up losing the arbitration, the threat of removing someone from the platform and facing thousands, potentially thousands of arbitrations claims coming in, that should give them pause at least.”
Cernovich added that in this specific case, because Patreon changed its terms of service after it was put on notice by Benjamin’s former backers, it could also face arbitrations because it unilaterally altered the terms of service “in a way that’s illegal under California law.”

