Hey guys! This week, it’s gonna be a little unusual. I plan to start a multi-week series to implement a Pathtracer in Lua. Well not everything is to be implemented in Lua, but most of the stuffs. Why Lua you ask? Because 1. Lua is a very flexible language and I can just hot-reload my Pathtracing code whenever I feel like, and 2. the result can be shown instantaneously. No more tedious waiting for the monstrously slow C++ codebase to compile. I know there’s Ninja and everything but Visual Studio really did a number on me. I hope you can go on this beautiful journey with me as well, random internet stranger!
Project Structure
The project itself will be called LuaPT. The heavy-lifting and core code will be done in C++, while the actual pathtracing code will be written in Lua. In this case, we can hot-reload the pathtracer in real time when changes are made, making the whole process extremely quick.
But it’s kind of hard to distinguish between heavy-lifting and actual pathtracing. Model loading, image I/O and the like will obviously be a C++ task, but it’s not like pathtracing is a trivial task. Therefore, here are my plans so far:
- Model loading, image I/O, or just about every I/O related thing will be written in C++.
- Thread workers and management will be written in C++, but it will be Lua which gives them tasks.
- The pathtracer will be visualized using GLFW & ImGui (C++)
- C++ will take care of hot-reloading Lua.
- BVH construction is somewhere in the middle and so both can take care of it (preferrably C++?).
- Ray sampling, Monte Carlo integration, etc. is done completely in Lua.
Flowchart
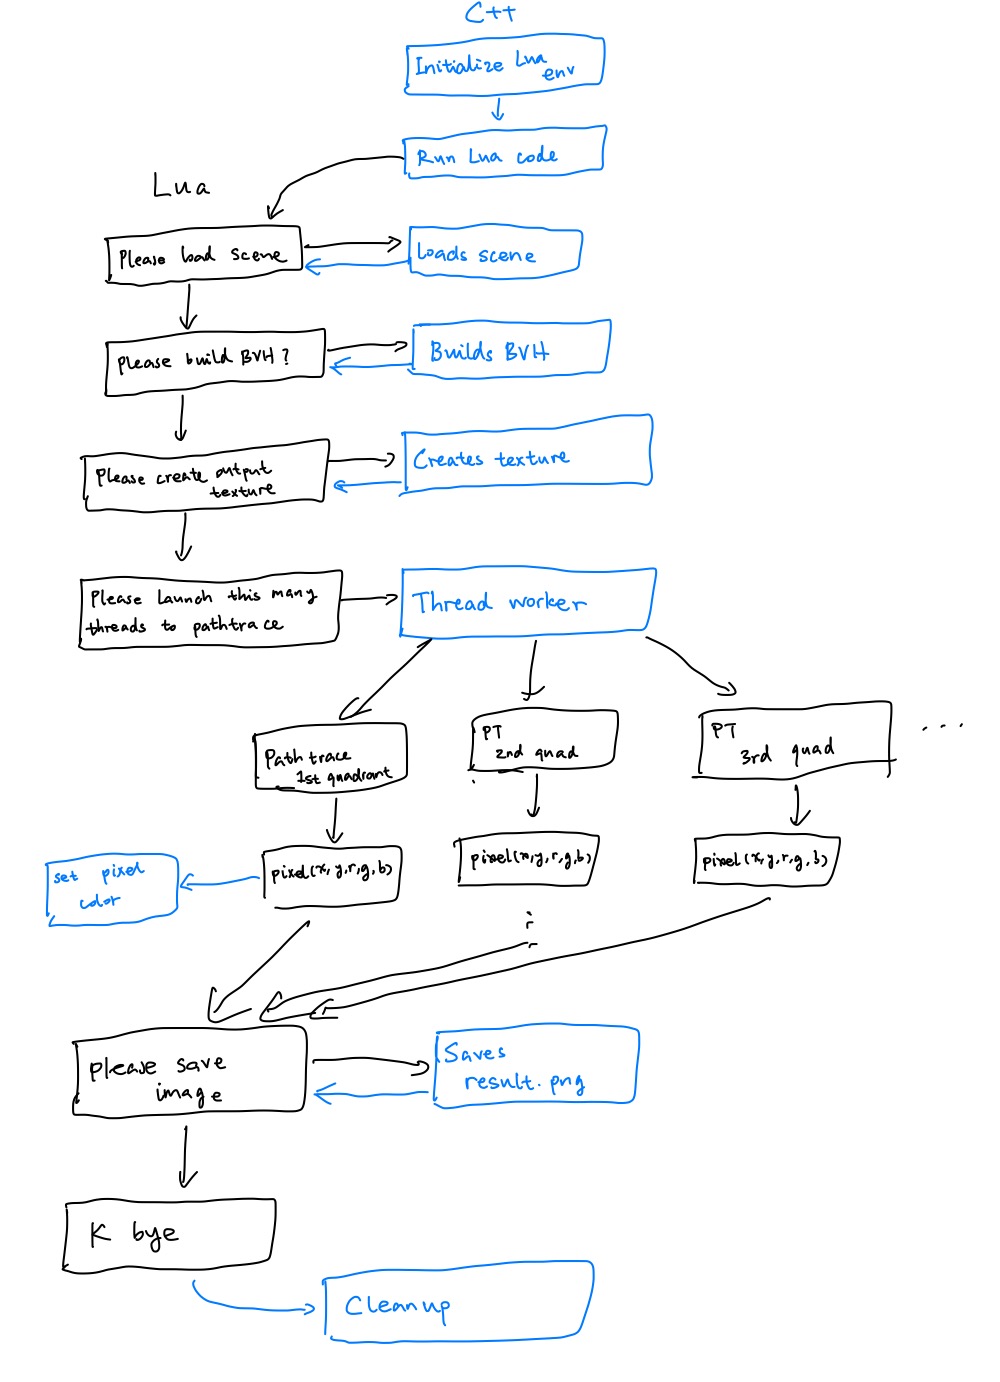
Here’s a super simple flowchart demonstrating the workflow.

The blue parts will be done in C++, and the black part in Lua. As we can see, Lua is politely asking C++ to do things most of the time. However, the actual pathtracing part is in Lua. That means we can either pass the whole scene into Lua, and implement the intersect function, or having Lua invoke the intersect function implemented in C++. You know, it looks almost like an engine. I guess I will know more as the design progresses.
Image I/O
And now it’s time to get to work! We’ll be implementing the Image class first; after all, what’s a pathtracer’s worth if it cannot output images?
using CComp = unsigned char; // CComp for color component

struct RGB
{
    CComp r;
    CComp g;
    CComp b;
};

class Image
{
public:
    /**
     * Default constructor
     */
    Image();


    unsigned int at(int x, int y) const;
    void set_rgb(int x, int y, CComp r, CComp g, CComp b);
    void set_rgb(int x, int y, const RGB &rgb);
    RGB get_rgb(int x, int y) const;
    bool save(const std::string &dest) const;
    bool load(const std::string &path);

    /**
     * Copy constructor
     *
     * @param other The other image, to be copied from.
     */
    Image(const Image& other);

    /**
     * Destructor
     */
    ~Image();

    int id() const;

    int w, h;

private:
    std::unique_ptr<CComp[]> image;
    int id_;
    bool initialized;
};
The Image class holds a unique_ptr which will be freed upon going out of scope. In this way, we can manage the memory usage efficiently. The implementation involves using stb_image.h and stb_image_write.h of the stb library. We will only showcase some key functions below because dumping the whole source file in a blog post is a massive waste of space.
The image is initialized by setting the values of all of its channels to 0 (including alpha). Right now we only support RGBA image - even though we won’t be using the alpha channel anytime soon.
Image::Image(int w, int h, int ch) : w(w), h(h), image(nullptr), id_(::id++), initialized(false)
{
    assert(ch == num_ch && "Unsupported: channels != 4");
    image.reset(new CComp[w * h * num_ch]);
    initialized = true;
    for (int y = 0; y < h; y++)
    {
        for (int x = 0; x < w; x++)
        {
            image[at(x, y) + 0] = 0;
            image[at(x, y) + 1] = 0;
            image[at(x, y) + 2] = 0;
            image[at(x, y) + 3] = 0;
        }
    }
}
The at function asserts that the sampling position is correct and calculates the proper offset. Only initialized images can be used.
unsigned int Image::at(int x, int y) const
{
    assert(initialized && "Image is not initialized");

    if (x < 0) { x = 0; }
    if (y < 0) { y = 0; }
    if (x >= w) { x = w; }
    if (y >= h) { y = h; }
    return (y * w + x) * num_ch;
}
The Lua Environment
Now to set up the Lua environment. Other than the classic lua_State pointer, we will hold all Lua-related variables in the Lua class as well.
/**
 * The Lua interface. Responsible for loading in scripts and executing them.
 * The whole thing is designed to be a giant state machine, and therefore non-copyable.
 */
class Lua
{
public:
    /**
     * No copy constructor
     */
    Lua(const Lua &another) = delete;

    /**
     * Destructor
     */
    ~Lua();

    int execute(const std::string &buffer);
    int execute_file(const std::string &file);

    void report_error(const std::string &msg);
    void register_funcs();

    std::vector<std::string> err_log;

    static std::shared_ptr<Lua> inst();

private:
    /**
     * Default constructor
     * Thou shalt not call me directly, for I am a singleton
     */
    Lua();

    bool lua_ready;
    lua_State *l;
    std::vector<std::shared_ptr<Image> > images;
};
The Lua class is a singleton and can only be accessed using inst(), in which it will be lazy-initialized (Lua() is private). It is capable of executing both lines of code and files. An error log is kept so that errors are easy to trace. Right now, when LuaPT launches, a CLI shows and accepts file names as input. Lua::inst()->execute_file() is then executed with errors logged into err_log. Then the CLI asks for another file name and executes that. Then it loops until EOF is reached.
In the Lua constructor, it will invoke register_funcs in which C++-Lua interoperability functions are registered, for example, creating/saving an image:
void Lua::register_funcs()
{
    lua_register(l, "make_image", make_image);
    lua_register(l, "set_pixel", set_pixel);
    lua_register(l, "save_image", save_image);
    lua_register(l, "free_image", free_image);
}
Lua Wrappers & GC
As Lua can’t just invoke constructors in C++, we need to implement extra functions so that images can be managed in Lua. We achieve this by having an Image vector in the Lua class, so that make_image can just be inserting a new image into said vector and returning the index. We can then manipulate the image in Lua using the handle we got. When deleting the image, we call free_image in Lua so that it is removed from the vector. The smart pointer will now have 0 reference and free itself.
But why not embrace Lua’s intrinsic GC as well? Lua can garbage collect things when they are left alone after a while. This is quite useful when, for example, the codebase in Lua becomes complicated down the line and resource management becomes difficult. To make things easier for us, we can wrap the functions up so they become pseudo classes (again), but this time, it’s in Lua.
Image = {
    handle = 0,
    w = 0,
    h = 0,
    __gc = function()
        if w ~= 0 and h ~= 0 then
            free_image(self.handle)
        end
    end
}

function Image:new(w, h)
    local ret = {}
    setmetatable(ret, self)
    self.__index = self
    ret.handle = make_image(w, h)
    ret.w = w
    ret.h = h
    return ret
end

function Image:save(name)
    save_image(self.handle, name)
end

function Image:pixel(x, y, r, g, b)
    set_pixel(self.handle, x, y, clamp(r, 0, 1), clamp(g, 0, 1), clamp(b, 0, 1))
end

function Image:pixel_vec4(x, y, vec4)
    set_pixel(self.handle, x, y, clamp(vec4.x, 0, 1), clamp(vec4.y, 0, 1), clamp(vec4.z, 0, 1))
end
So to recap, we implemented the image I/O in C++, as classes, then wrapped them up as functions. Then in Lua, we wrapped the functions up (again) and they become classes.
Current Result
That’s all we’ve implemented so far. A way for Lua to save/write the image. Concurrency, model loading, etc. is still further down the line.
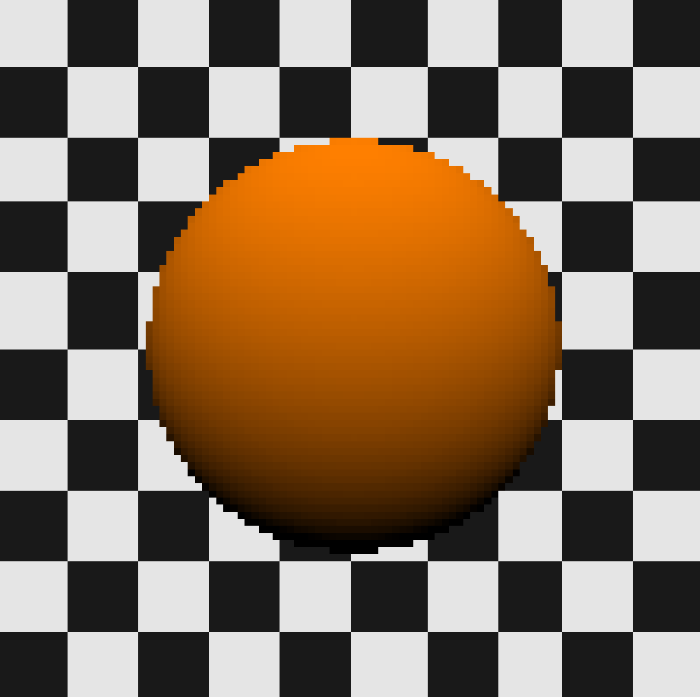
But we can still have some impressive result. For example, feast your eye on THIS! After implementing a small math library in Lua later, we have raymarched a ball using the very thing we just made.

require "lib/image"
require "math"
local pprint = require "lib/pprint"

local im = Image:new(100, 100)

function shade(u, v, x, y)
    ro = Vec4:new(0, 0, -2, 1)
    center = Vec4:new(0, 0, 0, 1)
    front = center:subtr(ro):nor3() -- most of the time we won't be needing the 4th component
    right = front:cross(Vec4:new(0, 1, 0, 1)):nor3()
    up = front:cross(right):nor3()

    rd = right:scl(u):add(up:scl(v)):add(front:scl(1)):nor3()
    t = 0.01

    for i = 1, 200 do
        p = ro:add(rd:scl(t))

        -- try to sample a sphere located at center with r=0.5
        r = 1.0
        d = p:len3() - r
        if d < 0.01 then
            -- a sphere at the center has a special case normal where the position being exactly the opposite of the normal direction
            nor = p:nor3():scl(-1)
            nor.y = -nor.y
            brightness = math.max(0.0, nor:dot3(Vec4:new(0, 1, 1, 1):nor3()))
            return Vec4:new(1.0, 0.5, 0.0, 1.0):scl(brightness)
        end
        t = t + d
        if t > 20 then
            break
        end
    end

    -- color background
    uu = math.floor(u * 5)
    vv = math.floor(v * 5)
    if (uu + vv) % 2 == 0 then
        return Vec4:new(0.1, 0.1, 0.1, 1)
    else
        return Vec4:new(0.9, 0.9, 0.9, 1)
    end

end

for y = 1, 100 do
    for x = 1, 100 do
        u = (x - 1) / 100.0 * 2.0 - 1.0
        v = (y - 1) / 100.0 * 2.0 - 1.0
        res = shade(u, v, x - 1, y - 1)
        im:pixel_vec4(x - 1, y - 1, res)
    end
end

im:save("rm.png")
I will smooth the project around the edges and implement it bit by bit in the coming weeks. By posting it onto my blog, it now has automatically become a huge sunken cost and now I can’t abandon it anymore (?). So stay tuned for more!
Copyleft 2023 42yeah.
from Hacker News https://ift.tt/LR4oQeM
No comments:
Post a Comment
Note: Only a member of this blog may post a comment.