Introduction
Conan is a software package manager for C and C++ developers.
It works on all operating systems, including Windows, Linux, macOS, FreeBSD, Solaris and others, and can be targeted to any platform, including desktop, server and cross-construction for embedded and bare metal devices.
It integrates with other tools such as Docker, MinGW, WSL and with all building systems, such as CMake, MSBuild, Makefiles, Meson, SCons. It can even integrate with any proprietary building system.
Conan is completely free, open source and fully decentralized. The central ConanCenter repository contains hundreds of popular open source library packages, with many precompiled binaries.
Installation
There are several ways to install Conan. Among the possibilities you can use Portage in Gentoo or Funtoo, as follows:
emerge dev-util/conanOn Arch Linux you can use Yay:
# no sudo
yay -S conan
You can also download the .deb, .rpm, tarball packages directly from here and install:
Or even install via pip, according to them, more recommended:
Before you will need Pip installed, example for systems that use APT:
sudo apt install python3-pipAnd just run like this:
pip3 install conanIf you have any problems with the installation, try only for your user:
pip3 install conan --user
Use
Let’s start with a basic example, let’s create an MD5 hash application that uses one of the most popular libraries for C++: Poco. We will use CMake as a build system in this case, but keep in mind that Conan works with any build system and is not limited to using only CMake.
1. Create the following source file within a directory.
mkdir mymd5 && cd mymd5
vim md5.cpp
This will be the source file of our application:
#include "Poco/MD5Engine.h"
#include "Poco/DigestStream.h"

#include <iostream>

int main(int argc, char ** argv){
   Poco::MD5Engine md5;
   Poco::DigestOutputStream ds(md5);
   std::string str = {};
   if( argc > 1 ){
      str = argv[1];
   }else{
     std::cerr << "Enter the word to generate the HASH MD5." << '\n';
     return 1;
   }
   ds << str;
   ds.close();
   std::cout << Poco::DigestEngine::digestToHex(md5.digest()) << '\n';
   return 0;
}
2. Now we are going to install Poco
We can do the search directly through the browser at the link: https://conan.io/center, or use conan via the command line:
conan search poco --remote=conan-centerThe --remote=conan-center option prompts you to search online, it can be ignored unless you have the remotes.json file properly configured in the directory: $HOME/.conan/remotes.json.
The output will look like this:
user@host ~/mymd5
Existing package recipes:

poco/1.8.1
poco/1.9.3
poco/1.9.4
poco/1.10.0
poco/1.10.1
user@host ~/mymd5
Suppose you used the command conan inspect poco/1.9.4 (Use the help for more information: conan --help) to inspect this version and it is just the version you want, so just install it. To do this, create a file named: conanfile.txt within your project (in this case, the project: mymd5) with the following information:
[requires]
poco/1.9.4

[generators]
cmake
Make sure you have CMake installed. This will generate the file
conanbuildinfo.cmake.
3. Before installing, let’s prepare our profile for Conan
To do this, run the commands:
conan profile update settings.compiler.libcxx=libstdc++11 defaultIf you want Conan to automatically detect run:
conan profile new default --detect, if the ABI of your compiler is not compatible you will receive a “beautiful warning” and you will need to run the command indicated just above anyway.
This command will configure the file in the path: $HOME/.conan/profiles/default, something like this:
[settings]
os=Linux
os_build=Linux
arch=x86_64
arch_build=x86_64
compiler=gcc
compiler.version=9
compiler.libcxx=libstdc++11
build_type=Release
[options]
[build_requires]
[env]
4. Now we are going to install the dependencies with Conan
To do this, simply run the commands:
mkdir build && cd build
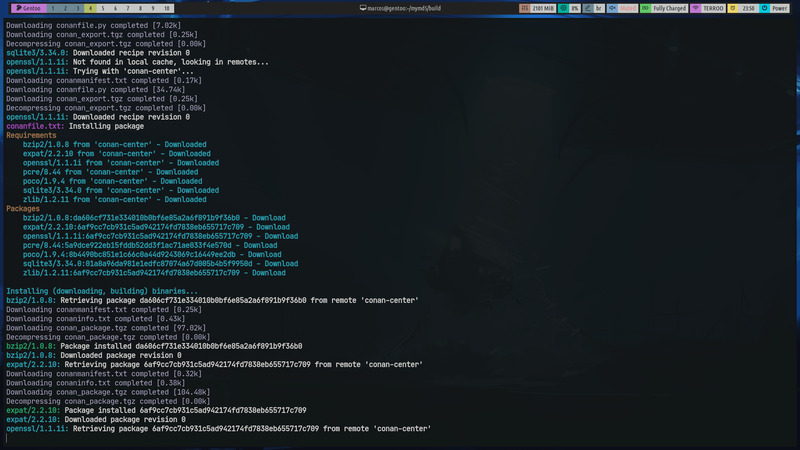
conan install ..
The output will look like this:

5. Create the build file
Now let’s create the CMakeLists.txt file based on the file: conanbuildinfo.cmake
vim CMakeLists.txt- Outside thebuilddirectory, at the root of your project.
cmake_minimum_required(VERSION 2.8.12)
project(MD5Encrypter)

add_definitions("-std=c++11")

include(${CMAKE_BINARY_DIR}/conanbuildinfo.cmake)
conan_basic_setup()

add_executable(md5 md5.cpp)
target_link_libraries(md5 ${CONAN_LIBS})
6. All set, let’s create this!
For Linux or macOS run this command:
cmake .. -G "Unix Makefiles" -DCMAKE_BUILD_TYPE=Release
make
There, the binary md5 was generated inside the bin/md5 directory and we can already test it
$ cd bin/
$ ./md5
Enter the word to generate the HASH MD5.
$ ./md5 "Terminal Root"
a69f0efcca0116a76921947f135ccdac
Simple, right?!
For more information consult the official Conan repository.
from Hacker News https://ift.tt/3lhJhHO
No comments:
Post a Comment
Note: Only a member of this blog may post a comment.