Game Boy Advance Architecture
A Practical Analysis

Cartridge slot and amplifier are in the back

A quick introduction
The internal design of the Game Boy Advance is quite impressive for a portable console that runs on two AA batteries.
This console will carry on using Nintendo’s signature GPU. Additionally, it will introduce a relatively new CPU from a UK company that will surge in popularity in years to come.
CPU
Most of the components are combined into a single package called CPU AGB. This package contains two completely different CPUs:
- A Sharp LR35902 running at either 8.4 or 4.2 MHz: If it isn’t the same CPU found on the Game Boy! It’s effectively used to run Game Boy (DMG) and Game Boy Color (CGB) games. Here’s my previous article if you want to know more about it.
- An ARM7TDMI running at 16.78 MHz: This is the new processor we’ll focus on, it most certainly runs Game Boy Advance games.
Note that both CPUs will never run at the same time or do any fancy co-processing. The only reason for including the very old Sharp is for backwards compatibility.
What’s new?
Before ARM Holdings (currently “Arm”) became incredibly popular in the smartphone world, they licensed their CPU designs to power Acorn’s computers, Apple’s Newton, Nokia’s phones and the Panasonic 3DO. Nintendo’s chosen CPU, the ARM7TDMI, is based on the earlier ARM710 design, and includes:
- ARM v4 ISA: The 4th version of the 32-bit ARM instruction set.
- Three-stage pipeline: Execution of instructions are divided into three steps or stages. The CPU will fetch, decode and execute up to three instructions concurrently. This enables maximum use of the CPU’s resources (which reduces idle silicon) while also increasing the amount of instructions executed per unit of time.
- 32-bit ALU: Can operate 32-bit numbers without consuming extra cycles.
Moreover, this core contains some extensions referenced in its name (TDMI):
- T → Thumb: A subset of the ARM instruction set whose instructions are encoded into 16-bit words.
- Being 16-bit, Thumb instructions require half the bus width and occupy half the memory. However, since Thumb instructions offer only a functional subset of ARM you may have to write more instructions to achieve the same effect.
- Thumb only offers conditional execution on branches, its data processing ops use a two-address format, rather than three-address, and it only has access to the bottom half of the register file.
- In practice Thumb uses 70% of the space of ARM code. For 16-bit wide memory Thumb runs faster than ARM.
- If required, ARM and Thumb instructions can be mixed in the same program (called interworking) so developers can choose when and where to use each mode.
- D → Debug Extensions: Provide JTAG debugging.
- M → Enhanced Multiplier: Previous ARM cores required multiple cycles to compute full 32-bit multiplications, this enhancement reduces it to just a few.
- I → EmbeddedICE macrocell: Debug module that allows hardware breakpoints, watchpoints and allows the system to be halted while debugging.
Memory locations
The inclusion of Thumb in particular had a strong influence on the final design of this console. Nintendo mixed 16-bit and 32-bit buses between its different modules to reduce costs while providing programmers with the necessary resources to optimise their code. Usable memory is distributed across the following locations:
- IWRAM (Internal WRAM) → 32-bit with 32 KB: Useful for storing ARM instructions and data in big chunks.
- EWRAM (External WRAM) → 16-bit with 256 KB: Optimised for storing Thumb-only instructions and data in small chunks.
- PAK ROM -> 16-bit with variable size: This is the place where the cartridge ROM is accessed.
- Cart RAM -> 16-bit with variable size: This is the place where the cartridge RAM is accessed.
Although this console was marketed as a 32-bit system, the majority of its memory is only accessible through a 16-bit bus, meaning games will mostly use the Thumb instruction set to avoid spending two cycles per instruction fetch. Only critical sections should use the ARM instruction set.
How do they maintain compatibility?
You’ll be surprised that there is no software implemented to detect whether the cartridge inserted is a GB or GBA one. Instead, the console relies on hardware switches: A shape detector effectively identifies the type of cartridge and then only passes power through the required bus.
Graphics
Before we begin, you’ll find the system a mix between the SNES and the Game Boy, the graphics core is still the well-known 2D engine called PPU. I recommend reading those articles before continuing since I’ll be revisiting lots of previously-explained concepts.
Compared to previous Game Boys we now have a colour LCD screen that can display up to 32,768 colours (15-bit). It has a resolution of 240x160 pixels and a refresh rate of ~60Hz.
Organising the content

We have the following regions of memory in which to distribute our graphics:
- 96 KB 16-bit VRAM (Video RAM): Where 64 KB store background graphics and 32 KB store sprite graphics.
- 1 KB 32-bit OAM (Object Attribute Memory): Stores up to 128 sprite entries (not the graphics, just the indices and attributes). Its bus is optimised for fast rendering.
- 1 KB 16-bit PAL RAM (Palette RAM): Stores two palettes, one for backgrounds and the other for sprites. Each palette contains 256 entries of 15-bit colours each, colour ‘0’ being transparent.
Constructing the frame
If you’ve read the previous articles you’ll find the GBA familiar, although there is additional functionality that may surprise you, and don’t forget that this console runs on two AA batteries.
I’m going to borrow the graphics of Sega’s Sonic Advance 3 to show how a frame is composed.
Tiles
Last block is reserved for sprites
GBA’s tiles are strictly 8x8 pixel bitmaps, they can use 16 colours (4bpp) or 256 colours (8bpp). 4bpp tiles consume 32 bytes, while 8bpp ones take 64 bytes.
Tiles are grouped into charblocks. Each block is reserved for a specific type of layer.
Because each charblock is designed to fit in 16 KB of memory, up to 256 8bpp tiles or 512 4bpp tiles can be stored per block. There are six charblocks allocated, which combined require 96 KB of memory: The exact amount of VRAM this console has.
Four charblocks are used for backgrounds and two are used for sprites.
Backgrounds
Layer 3 will be scaled to simulate water effects
The background layer of this system has improved significantly since the Game Boy Color. It finally includes some features found in the Super Nintendo (remember the affine transformations?).
The PPU can draw up to four background layers. The capabilities of each one will depend on the selected mode of operation:
- Mode 0: Provides four static layers.
- Mode 1: Only three layers are available, although one of them is affine (can be rotated and/or scaled).
- Mode 2: Supplies two affine layers.
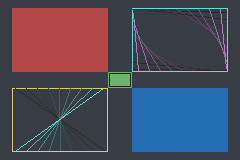
Each layer be up to 512x512 pixels wide. If it’s an affine one then it will be up to 1024x1024 pixels.
Sprites
The size of a sprite can be up to 64x64 pixels wide, yet for having such a small screen they will end up occupying a big part of it.
If that wasn’t enough, the PPU can now apply affine transformations to sprites!
Sprite entries are 32-bit wide and their values can be divided in two groups:
- Attributes: Contains x/y position, h/v flipping, size, shape (square or rectangle), sprite type (affine or regular) and location of first tile.
- Affine data: Only used if the sprite is affine, specify scaling and rotation.
Result
As always, the PPU will combine all layers automatically, but it’s not over yet! The system has a couple of effects available to apply over these layers:
- Mosaic: Makes tiles look more blocky.
- Alpha blending: Combines colours of two overlapping layers resulting in transparency effects.
- Windowing: Divides the screen into two different windows where each one can have its own separate graphics and effects, the outer zone of both windows can also be provided with tiles.
On the other side, in order to update the frame there are multiple options available:
- Command the CPU during VBlank/HBlank: The traditional way.
- Use the DMA Controller: DMA provides transfer rates ~10x faster and can be scheduled during VBlank and HBlank. This console provides 4 DMA channels (two reserved for sound, one for critical operations and the other for general purpose). Bear in mind that the controller will halt the CPU during the operation (although it may hardly notice it!).
Beyond Tiles
Sometimes we may want to compose a background from which the tile engine won’t be able to draw all required graphics. Now, modern consoles addressed this by implementing a frame-buffer architecture but this is not possible when there’s very little RAM… Well, the GBA happens to have 96 KB of VRAM which is enough to allocate a bitmap with the dimensions of our LCD screen.
Good news is that the PPU actually implemented this functionality by including three extra modes, these are called bitmap modes:
- Mode 3: Allocates a single fully-coloured (8bpp) frame.
- Mode 4: Provides two frames with half the colours (4bpp) each.
- Mode 5: There’s two fully-coloured frames with half the size each (160x128 pixels).
The reason for having two bitmaps is to enable page flipping: Drawing over a displayed bitmap can expose some weird artefacts during the process. If instead we manipulate another one then none of the glitches will be shown to the user. Once the second bitmap is finished the PPU can be updated to point to the second one, effectively swapping the displayed frame.
Rendered bitmap with some primitives
Notice the screen doesn't show significant patterns produced by tile engines

Episode distributed as a GBA Video cartridge (it suffered a lot of compression, of course)
Overall it sounds like a cutting-the-edge feature, however most games held on to the tile engine. Why? Because in practice it costs a lot of CPU resources.
You see, while using a tile engine the CPU can delegate most of the computations to the graphics chip. By contrast, the frame-buffer system that the PPU provides is limited to only displaying that segment of memory as a single background layer, that means no more individual affine transformations, layering or effects unless the CPU computes them. Also, the frame-buffer occupies 80 KB of memory, so only 16 KB (half) are available to store sprite tiles.
For this reason, these modes are used exceptionally, such as for playing motion video (Game Boy Advance Video completely relied on this) or rendering 3D geometry with the CPU.
Audio
The GBA features a 2-channel sample player which works in combination with the legacy Game Boy sound system.
Here is a breakdown of each audio component using Sonic Advance 2 as example:
PCM
The new sound system can now play PCM samples, it provides two channels called Direct Sound where it receives samples using a FIFO queue (implemented as a 16-byte buffer).
Samples are 8-bit and signed (encoded in values from -128 to 127). The default sampling rate is 32 kHz, although this depends on each game: since a higher rate means a larger size and more CPU cycles, not every game will spend the same amount of resources to feed the audio chip.
DMA is essential to avoid clogging CPU cycles. Timers are also available to keep in-sync with the queue.
PSG
While the Game Boy subsystem won’t share its CPU, it does give out access to its PSG. For compatibility reasons this is the same design found on the original Game Boy. I’ve previously written this article that goes into detail about each channel in particular.
The majority of GBA games used it for accompaniment or effects. Later ones will optimise their music for PCM and leave the PSG unused.
Combined
Finally, everything is automatically mixed together and output through the speaker/headphone jack.
Even though the GBA has just two PCM channels, some games can magically play more than two concurrent samples. How is this possible? Well, while only having two channels may seem a bit weak on paper, the main CPU can use some of its cycles to provide both audio sequencing and mixing (that should give you an idea of how powerful the ARM7 is!)
Best of both worlds
Some games took the PCM-PSG duality further and ‘alternated’ the leading chip depending on the context.
In this game (Mother 3), the player can enter two different rooms, one relatively normal and the other with a nostalgic setting. Depending on the room the character is in, the same score will sound modern-ish or 8bit-ish.
Games
Programming for the GBA was similar to the SNES with the addition of all the advantages of developing games in the early 2000s: Standardised high-level languages, better compilers, faster RISC CPUs, non-proprietary computers for development, comparatively better documentation and… Internet access!
Games are mostly written in C with critical sections in assembly (ARM and Thumb) to save cycles. Nintendo provided a SDK with libraries and compilers. BIOS calls were available to simplify I/O access and reduce cartridge size.
Game data is stored inside a new proprietary cartridge called GamePak.
Accessing cartridge data
While the ARM7 has a 32-bit address bus, there are only 24 address lines connected to the cartridge. This should mean that up to 16 MB can be accessed on the cartridge without needing a mapper, however, the official docs state that 32 MB of cartridge data are mapped in memory. So what’s happening here? The truth is, the Gamepak uses 25-bit addresses (which explains that 32 MB block) but its bottommost bit is fixed at zero, so the only 24 remaining bits are set. This is how Gamepak addressing works.
Now, does this mean that data located at odd addresses (with its least significant bit at ‘1’) will be inaccessible? No, because the data bus is 16-bit: For every transfer, the CPU/DMA will fetch the located byte plus the next one, allowing to read both even and odd addresses. As you can see, this is just another work of engineering that makes full use of hardware capabilities while reducing costs.
Cartridge space
In order to hold saves, Game Paks could either include:
- SRAM: These need a battery to keep its content and can size up to 64 KB. It’s accessed through the GBA’s memory map.
- Flash ROM: Similar to SRAM without the need of a battery, can size up to 128 KB.
- EEPROM: These require a serial connection and can theoretically size up to anything (often found up to 8 KB).
Accessories
The famous Game Boy Link Cable provided multi-playing capabilities. Additionally, the cable has a special feature internally known as Multi-boot: Another console (either GBA or GameCube) can send a functional game to the receiver’s EWRAM, then the latter would boot from there (instead of needing a cartridge).
Anti-Piracy & Homebrew
In general terms, the usage of proprietary cartridges was a big barrier compared to the constant cat-and-mouse game that other console manufacturers had to battle while using the CD-ROM.
To combat against bootleg cartridges (unauthorised reproductions), the GBA’s BIOS incorporated the same boot process found in the original Game Boy.
Flashcards
As solid state storage became more affordable, a new type of cartridge appeared on the market. Flashcards looked like ordinary Game Paks but had the addition of a card slot (SD, MiniSD, MicroSD or whatever) which enabled to run game ROMs. The concept is not new actually, developers have internally used similar tools in order to test their games on a real console (and manufacturers provided the hardware to enable this).
However, commercial availability of these cards proved to be a grey area: Nintendo condemned its usage due to enabling piracy where as some users defended that it was the only method for running Homebrew (programs made outside game studios and consequently without the approval of Nintendo). After Nintendo’s legal attempts, these cartridges were banned in some countries (like in the UK) nonetheless they still persisted worldwide.
That’s all folks

Too bad it doesn't have a backlit!
Sources / Keep Reading
General
CPU
Graphics
Audio
Games
Anti-Piracy
Photography
Contributing
This article is part of the Architecture of Consoles series. If you found it interesting please consider donating, your contribution will be used to get more tools and resources that will help to improve the quality of current articles and upcoming ones.
A list of desirable tools and latest acquisitions for this article are tracked in here:
## Interesting hardware to get (ordered by priority)

- Any Dev kit (only if found at a reasonable price)

## Acquired tools used

- Original GBA (£40)
- The two games analysed in the article (£20)
Alternatively, you can help out by suggesting changes and/or adding translations.
Changelog
Always nice to keep a record of changes.
## 2020-09-19

- Corrected grammar and added content, thanks @dpt
- Expanded section about gamepak's 25-bit addressing

## 2020-08-22

- Clarified tile section

## 2019-12-09

- Even better Thumb explanation.
- Added more audio info.

## 2019-10-03

- Improved Thumb explanation

## 2019-09-17

- Added a quick introduction

## 2019-09-01

- Added my GBA 🧐

## 2019-08-26

- Used better wording on some explanations

## 2019-08-19

- Corrected wee mistakes

## 2019-08-18

- Ready for publication
from Hacker News https://ift.tt/3mZ8QfQ
No comments:
Post a Comment
Note: Only a member of this blog may post a comment.