Open Source Virtual Background
Linux:movie-camera:April 9th, 2020
With many of us around the globe under shelter in place due to COVID-19 video calls have become a lot more common. In particular, ZOOM has controversially become very popular. Arguably Zoom’s most interesting feature is the “Virtual Background” support which allows users to replace the background behind them in their webcam video feed with any image (or video).
I’ve been using Zoom for a long time at work for Kubernetes open source meetings, usually from my company laptop. With daily “work from home” I’m now inclined to use my more powerful and ergonomic personal desktop for some of my open source work.
Unfortunately, Zoom’s linux client only supports the “chroma-key” A.K.A. “green screen” background removal method. This method requires a solid color backdrop, ideally a green screen with uniform lighting.
Since I do not have a green screen I decided to simply implement my own background removal, which was obviously better than cleaning my apartment or just using my laptop all the time. :grin:
It turns out we can actually get pretty decent results with off the shelf, open source components and just a little of our own code.
Reading The Camera 🔗︎
First thing’s first: How are we going to get the video feed from our webcam for processing?
Since I use Linux on my personal desktop (when not playing PC games) I chose to use the OpenCV python bindings as I’m already familiar with them and they include useful image processing primatives in addition to V4L2 bindings for reading from webcams.
Reading a frame from the webcam with python-opencv is very simple:
1import cv2 2cap = cv2.VideoCapture('/dev/video0') 3success, frame = cap.read() For better results with my camera before capturing set:
1# configure camera for 720p @ 60 FPS 2height, width = 720, 1280 3cap.set(cv2.CAP_PROP_FRAME_WIDTH ,width) 4cap.set(cv2.CAP_PROP_FRAME_HEIGHT,height) 5cap.set(cv2.CAP_PROP_FPS, 60) Most video conferencing software seems to cap video to 720p @ 30 FPS or lower, but we won’t necessarily read every frame anyhow, this sets an upper limit.
Put the frame capture in a loop and we’ve got our video feed!
1while True: 2 success, frame = cap.read() We can save a test frame with just:
1cv2.imwrite("test.jpg", frame) And now we can see that our camera works. Success!

don’t mind my corona beard
Finding The Background 🔗︎
OK, now that we have a video feed, how do we identify the background so we can replace it? This is the tricky part …
While Zoom doesn’t seem to have commented anywhere about how they implemented this, the way it behaves makes me suspect that a neural network is involved, it’s hard to explain but the results look like one. Additionally, I found an article about Microsoft Teams implementing background blur with a convolutional neural network.
Creating our own network wouldn’t be too hard in principle – There are many articles and papers on the topic of image segmentation and plenty of open source libraries and tools, but we need a fairly specialized dataset to get good results.
Specifically we’d need lots of webcam like images with the ideal human foreground marked pixel by pixel versus the background.
Building this sort of dataset in prepartion for training a neural net probably would be a lot of work. Thankfully a research team at Google has already done all of this hard work and open sourced a pre-trained neural network for “person segmentation” called BodyPix that works pretty well! ❤️
BodyPix is currently only available in TensorFlow.js form, so the easiest way to use it is from the body-pix-node library.
To get faster inference (prediction) in the browser a WebGL backend is preferred, but in node we can use the Tensorflow GPU backend (NOTE: this requires a NVIDIA Graphics Card, which I have).
To make this easier to setup, we’ll start by setting up a small containerized tensorflow-gpu + node environment / project. Using this with nvidia-docker is much easier than getting all of the right dependencies setup on your host, it only requires docker and an up-to-date GPU driver on the host.
1{ 2 "name": "bodypix", 3 "version": "0.0.1", 4 "dependencies": { 5 "@tensorflow-models/body-pix": "^2.0.5", 6 "@tensorflow/tfjs-node-gpu": "^1.7.1" 7 } 8} bodypix/DockerfileDockerfile
1# Base image with TensorFlow GPU requirements 2FROM nvcr.io/nvidia/cuda:10.0-cudnn7-runtime-ubuntu18.04 3# Install node 4RUN apt update && apt install -y curl make build-essential \ 5 && curl -sL https://deb.nodesource.com/setup_12.x | bash - \ 6 && apt-get -y install nodejs \ 7 && mkdir /.npm \ 8 && chmod 777 /.npm 9# Ensure we can get enough GPU memory 10# Unfortunately tfjs-node-gpu exposes no gpu configuration :( 11ENV TF_FORCE_GPU_ALLOW_GROWTH=true 12# Install node package dependencies 13WORKDIR /src 14COPY package.json /src/ 15RUN npm install 16# Setup our app as the entrypoint 17COPY app.js /src/ 18ENTRYPOINT node /src/app.js Now to serve the results… WARNING: I am not a node expert! This is just my quick evening hack, bear with me :-)
The following simple script replies to an HTTP POSTed image with a binary mask (an 2d array of binary pixels, where zero pixels are the background).
1const tf = require('@tensorflow/tfjs-node-gpu'); 2const bodyPix = require('@tensorflow-models/body-pix'); 3const http = require('http'); 4(async () => { 5 const net = await bodyPix.load({ 6 architecture: 'MobileNetV1', 7 outputStride: 16, 8 multiplier: 0.75, 9 quantBytes: 2, 10 }); 11 const server = http.createServer(); 12 server.on('request', async (req, res) => { 13 var chunks = []; 14 req.on('data', (chunk) => { 15 chunks.push(chunk); 16 }); 17 req.on('end', async () => { 18 const image = tf.node.decodeImage(Buffer.concat(chunks)); 19 segmentation = await net.segmentPerson(image, { 20 flipHorizontal: false, 21 internalResolution: 'medium', 22 segmentationThreshold: 0.7, 23 }); 24 res.writeHead(200, { 'Content-Type': 'application/octet-stream' }); 25 res.write(Buffer.from(segmentation.data)); 26 res.end(); 27 tf.dispose(image); 28 }); 29 }); 30 server.listen(9000); 31})(); We can use numpy and requests to convert a frame to a mask from our python script with the following method:
1def get_mask(frame, bodypix_url='http://localhost:9000'): 2 _, data = cv2.imencode(".jpg", frame) 3 r = requests.post( 4 url=bodypix_url, 5 data=data.tobytes(), 6 headers={'Content-Type': 'application/octet-stream'}) 7 # convert raw bytes to a numpy array 8 # raw data is uint8[width * height] with value 0 or 1 9 mask = np.frombuffer(r.content, dtype=np.uint8) 10 mask = mask.reshape((frame.shape[0], frame.shape[1])) 11 return mask Which gives us a result something like:

While I was working on this, I spotted this tweet:
This is definitely the BEST background for video calls. 💯 pic.twitter.com/Urz62Kg32k
— Ashley Willis (McNamara) (@ashleymcnamara) April 2, 2020
Now that we have the foreground / background mask, it will be easy to replace the background.
After grabbing the awesome “Virtual Background” picture from that twitter thread and cropping it to a 16:9 ratio image …

… we can do the following:
1# read in a "virtual background" (should be in 16:9 ratio) 2replacement_bg_raw = cv2.imread("background.jpg") 3 4# resize to match the frame (width & height from before) 5width, height = 720, 1280 6replacement_bg = cv2.resize(replacement_bg_raw, (width, height)) 7 8# combine the background and foreground, using the mask and its inverse 9inv_mask = 1-mask 10for c in range(frame.shape[2]): 11 frame[:,:,c] = frame[:,:,c]*mask + replacement_bg[:,:,c]*inv_mask Which gives us:
The raw mask is clearly not tight enough due to the performance trade-offs we made with our BodyPix parameters but .. so far so good!
This background gave me an idea …
Making It Fun 🔗︎
Now that we have the masking done, what can we do to make it look better?
The first obvious step is to smooth the mask out, with something like:
1def post_process_mask(mask): 2 mask = cv2.dilate(mask, np.ones((10,10), np.uint8) , iterations=1) 3 mask = cv2.erode(mask, np.ones((10,10), np.uint8) , iterations=1) 4 return mask This can help a bit, but it’s pretty minor and just replacing the background is a little boring, since we’ve hacked this up ourselves we can do anything instead of just a basic background removal …
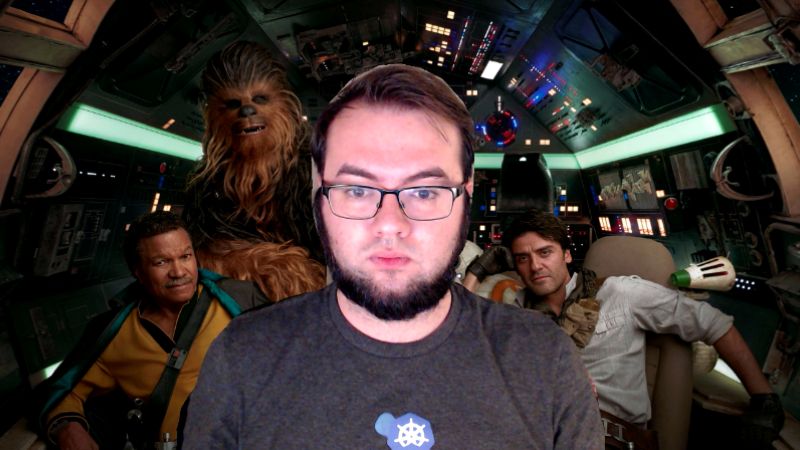
Given that we’re using a Star Wars “virtual background” I decided to create hologram effect to fit in better. This also lets lean into blurring the mask.
First update the post processing to:
1def post_process_mask(mask): 2 mask = cv2.dilate(mask, np.ones((10,10), np.uint8) , iterations=1) 3 mask = cv2.blur(mask.astype(float), (30,30)) 4 return mask Now the edges are blurry which is good, but we need to start building the hologram effect.
Hollywood holograms typically have the following properties:
- washed out / monocrhomatic color, as if done with a bright laser
- scan lines or a grid like effect, as if many beams created the image
- “ghosting” as if the projection is done in layers or imperfectly reaching the correct distance
We can add these step by step.
First for the blue tint we just need to apply an OpenCV colormap:
1# map the frame into a blue-green colorspace 2holo = cv2.applyColorMap(frame, cv2.COLORMAP_WINTER) Then we can add the scan lines with a halftone-like effect:
1# for every bandLength rows darken to 10-30% brightness, 2# then don't touch for bandGap rows. 3bandLength, bandGap = 2, 3 4for y in range(holo.shape[0]): 5 if y % (bandLength+bandGap) < bandLength: 6 holo[y,:,:] = holo[y,:,:] * np.random.uniform(0.1, 0.3) Next we can add some ghosting by adding weighted copies of the current effect, shifted along an axis:
1# shift_img from: https://stackoverflow.com/a/53140617 2def shift_img(img, dx, dy): 3 img = np.roll(img, dy, axis=0) 4 img = np.roll(img, dx, axis=1) 5 if dy>0: 6 img[:dy, :] = 0 7 elif dy<0: 8 img[dy:, :] = 0 9 if dx>0: 10 img[:, :dx] = 0 11 elif dx<0: 12 img[:, dx:] = 0 13 return img 14 15# the first one is roughly: holo * 0.2 + shifted_holo * 0.8 + 0 16holo2 = cv2.addWeighted(holo, 0.2, shift_img(holo1.copy(), 5, 5), 0.8, 0) 17holo2 = cv2.addWeighted(holo2, 0.4, shift_img(holo1.copy(), -5, -5), 0.6, 0) Last: We’ll want to keep some of the original color, so let’s combine the holo effect with the original frame similar to how we added the ghosting:
1holo_done = cv2.addWeighted(img, 0.5, holo2, 0.6, 0) A frame with the hologram effect now looks like:
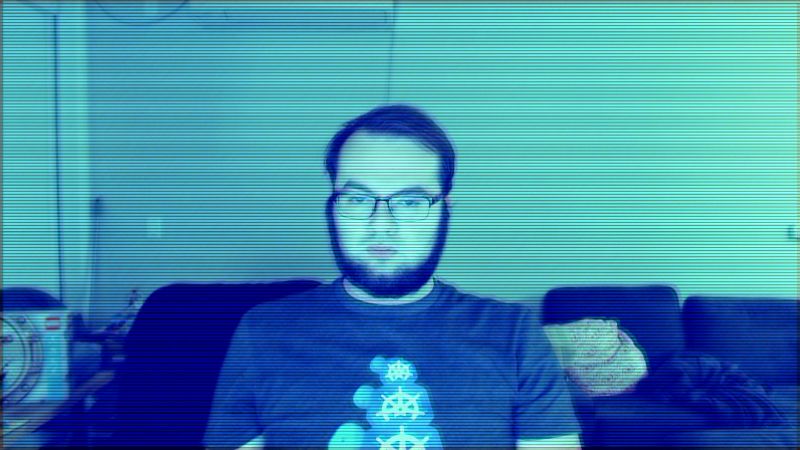
On it’s own this looks pretty :shrug:
But combined with our virtual background it looks more like:
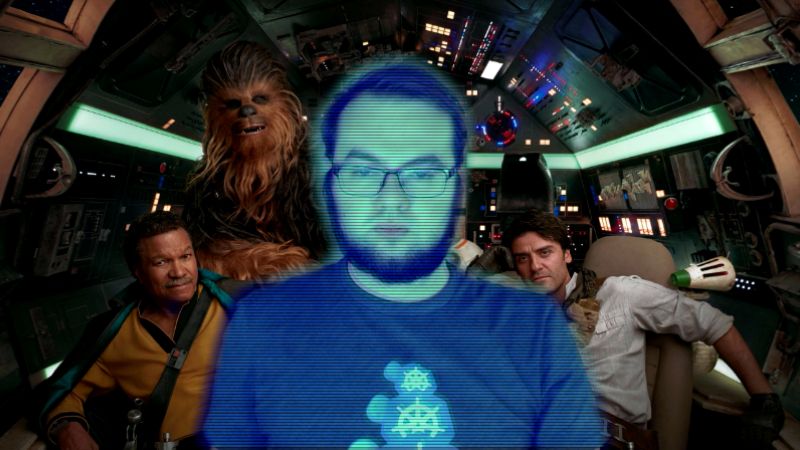
There we go! :tada: (I promise it looks cooler with motion / video :upside_down_face:)
Outputting Video 🔗︎
Now we’re just missing one thing … We can’t actually use this in a call yet.
To fix that, we’re going to use pyfakewebcam and v4l2loopback to create a fake webcam device.
We’re also going to actually wire this all up with docker.
First create a requirements.txt with our dependencies:
fakecam/requirements.txtDockerfile
1numpy==1.18.2 2opencv-python==4.2.0.32 3requests==2.23.0 4pyfakewebcam==0.1.0And then the Dockerfile for the fake camera app:
fakecam/DockerfileDockerfile
1FROM python:3-buster 2# ensure pip is up to date 3RUN pip install --upgrade pip 4# install opencv dependencies 5RUN apt-get update && \ 6 apt-get install -y \ 7 `# opencv requirements` \ 8 libsm6 libxext6 libxrender-dev \ 9 `# opencv video opening requirements` \ 10 libv4l-dev 11# install our requirements 12WORKDIR /src 13COPY requirements.txt /src/ 14RUN pip install --no-cache-dir -r /src/requirements.txt 15# copy in the virtual background 16COPY background.jpg /data/ 17# run our fake camera script (with unbuffered output for easier debug) 18COPY fake.py /src/ 19ENTRYPOINT python -u fake.pyWe’re going to need to install v4l2loopback from a shell:
1sudo apt install v4l2loopback-dkms And then configure a fake camera device:
1sudo modprobe -r v4l2loopback 2sudo modprobe v4l2loopback devices=1 video_nr=20 card_label="v4l2loopback" exclusive_caps=1 We need the exclusive_caps setting for some apps (chrome, zoom) to work, the label is just for our convenience when selecting the camera in apps, and the video number just makes this /dev/video20 if available, which is unlikely to be already in use.
Now we can update our script to create the fake camera:
1# again use width, height from before 2fake = pyfakewebcam.FakeWebcam('/dev/video20', width, height) We also need to note that pyfakewebcam expects images in RGB (red, green, blue) while our OpenCV operations are in BGR (blue, green, red) channel order.
We can fix this before outputting and then send a frame with:
1frame = cv2.cvtColor(frame, cv2.COLOR_BGR2RGB) 2fake.schedule_frame(frame) All together the script looks like:
1import os 2import cv2 3import numpy as np 4import requests 5import pyfakewebcam 6 7def get_mask(frame, bodypix_url='http://localhost:9000'): 8 _, data = cv2.imencode(".jpg", frame) 9 r = requests.post( 10 url=bodypix_url, 11 data=data.tobytes(), 12 headers={'Content-Type': 'application/octet-stream'}) 13 mask = np.frombuffer(r.content, dtype=np.uint8) 14 mask = mask.reshape((frame.shape[0], frame.shape[1])) 15 return mask 16 17def post_process_mask(mask): 18 mask = cv2.dilate(mask, np.ones((10,10), np.uint8) , iterations=1) 19 mask = cv2.blur(mask.astype(float), (30,30)) 20 return mask 21 22def shift_img(img, dx, dy): 23 img = np.roll(img, dy, axis=0) 24 img = np.roll(img, dx, axis=1) 25 if dy>0: 26 img[:dy, :] = 0 27 elif dy<0: 28 img[dy:, :] = 0 29 if dx>0: 30 img[:, :dx] = 0 31 elif dx<0: 32 img[:, dx:] = 0 33 return img 34 35def hologram_effect(img): 36 # add a blue tint 37 holo = cv2.applyColorMap(img, cv2.COLORMAP_WINTER) 38 # add a halftone effect 39 bandLength, bandGap = 2, 3 40 for y in range(holo.shape[0]): 41 if y % (bandLength+bandGap) < bandLength: 42 holo[y,:,:] = holo[y,:,:] * np.random.uniform(0.1, 0.3) 43 # add some ghosting 44 holo_blur = cv2.addWeighted(holo, 0.2, shift_image(holo.copy(), 5, 5), 0.8, 0) 45 holo_blur = cv2.addWeighted(holo_blur, 0.4, shift_image(holo.copy(), -5, -5), 0.6, 0) 46 # combine with the original color, oversaturated 47 out = cv2.addWeighted(img, 0.5, holo_blur, 0.6, 0) 48 return out 49 50def get_frame(cap, background_scaled): 51 _ret_, frame = cap.read() 52 # fetch the mask with retries (the app needs to warmup and we're lazy) 53 # e v e n t u a l l y c o n s i s t e n t 54 mask = None 55 while mask is None: 56 try: 57 mask = get_mask(frame) 58 except: 59 print("mask request failed, retrying") 60 # post-process mask and frame 61 mask = post_process_mask(mask) 62 frame = hologram_effect(frame) 63 # composite the foreground and background 64 inv_mask = 1-mask 65 for c in range(frame.shape[2]): 66 frame[:,:,c] = frame[:,:,c]*mask + background_scaled[:,:,c]*inv_mask 67 return frame 68 69# setup access to the *real* webcam 70cap = cv2.VideoCapture('/dev/video0') 71height, width = 720, 1280 72cap.set(3,width) 73cap.set(4,height) 74cap.set(cv2.CAP_PROP_FPS, 60) 75 76# setup the fake camera 77fake = pyfakewebcam.FakeWebcam('/dev/video20', width, height) 78 79# load the virtual background 80background = cv2.imread("/data/background.jpg") 81background_scaled = cv2.resize(background, (width, height)) 82 83# frames forever 84while True: 85 frame = get_frame(cap, background_scaled) 86 # fake webcam expects RGB 87 frame = cv2.cvtColor(frame, cv2.COLOR_BGR2RGB) 88 fake.schedule_frame(frame)Now build the images:
1docker build -t bodypix ./bodypix 2docker build -t fakecam ./fakecam And run them like:
1# create a network 2docker network create --driver bridge fakecam 3# start the bodypix app 4docker run -d \ 5 --name=bodypix \ 6 --network=fakecam \ 7 --gpus=all --shm-size=1g --ulimit memlock=-1 --ulimit stack=67108864 \ 8 bodypix 9# start the camera, note that we need to pass through video devices, 10# and we want our user ID and group to have permission to them 11# you may need to `sudo groupadd $USER video` 12docker run -d \ 13 --name=fakecam \ 14 --network=fakecam \ 15 -p 8080:8080 \ 16 -u "$$(id -u):$$(getent group video | cut -d: -f3)" \ 17 $$(find /dev -name 'video*' -printf "--device %p ") \ 18 fakecam Now make sure to start this before opening the camera with any apps, and be sure to select the “v4l2loopback” / /dev/video20 camera in Zoom etc.
The Finished Result 🔗︎
Here’s a quick clip I recorded of this in action:
Look! I’m dialing into the millenium falcon with an open source camera stack!
I’m pretty happy with how this came out. I’ll definitely be joining all of my meetings this way in the morning. :grin:
from Hacker News https://ift.tt/39UyfB4
No comments:
Post a Comment
Note: Only a member of this blog may post a comment.